background image


10

EN 


General safety instructions 

 
Check if the tension of your supply corresponds with the voltage indicated on the rating plate    of your 
appliance. 


Before commissioning this device please read the instruction manual carefully and keep this so that 
you can check them later . 


Please keep these instructions, the guarantee certificate, the sales receipt and, if possible, the carton 
with the inner packaging!   


The device is intended exclusively for private and not for commercial use!    Keep it away from direct 
heat, sun and moist and protect it against sharp impacts. 


Always remove the plug from the socket whenever the device is not in use, when attaching accessory 
parts, cleaning the device or whenever a disturbance occurs. Switch off    the device before. Pull on the 
plug, not on the cable. 


This appliance is not intended for use by persons with reduced physical, sensory or mental capacities , 
or lack of experience and knowledge (including children) , unless they have been supervised or 
instructed concerning use of the appliance by a person responsible for their safety.   


In order to protect children from the dangers of electrical appliances, never leave them unsupervised 
with the device. Consequently, when selecting the location for your device, do so in such a way that 
children do not have access to the device. Take care to ensure that the cable does not hang down. 


Test the device, plug    and the cable regularly for damage. If there is damage of any kind, the device 
should not be used but the appliance must be repaired by a qualified technician in order to avoid a 
hazard. Only original spare parts must be used. 


A    damaged cord or plug must be replaced by an authorized technician    to avoid a hazard. Do not 
repair the device yourself,. 


Keep the device and the cable away from heat, direct sunlight, moisture, sharp edges and such like. 


Never use the device unsupervised! Switch off the device whenever you are not using it, even if this is 
only for a moment. 


Do not use the device outdoors. 


Under no circumstances must the device be placed in water or other liquid, or come into contact with 
such. Do not use the device with wet or moist hands. 


Should the device become moist or wet, remove the mains plug from the socket immediately. Do not 
reach into the water. 


Use the device only for the intended purpose. 

Summary of Contents for OV-1413

Page 1: ...OV 1413 ...

Page 2: ...r hun veiligheid Om kinderen te beschermen tegen de gevaren van elektrische apparatuur mag u ze nooit zonder toezicht bij het apparaat laten Selecteer daarom een plek voor uw apparaat op dusdanige wijze dat kinderen er niet bij kunnen Zorg er voor dat de kabel niet naar beneden hangt Test het apparaat de stekker en de kabel regelmatig op schade Als er schade is dan dient het apparaat niet gebruikt...

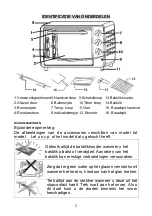
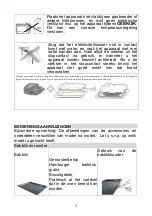
Page 3: ...fbeeldingen van de accessories verschillen van model tot model Let u s v p of het model dat u gekocht heeft Gebruik altijd de bakblikhouder wanneer u het bakblik plaatst of verwijdert Aanraken van het bakblik kan ernstige verbrandingen veroorzaken Zorg dat er geen water op het glazen venster komt wanneer het heet is hierdoor kan het glas breken Trek altijd aan de stekker wanneer u deze uit het sto...

Page 4: ...s terwijl het apparaat niet goed werkt kan dat brand veroorzaken Wanneer u gerechten bereidt die oliespetters veroorzaken zoals geroosterde kip wordt u aangeraden 2 stukken aluminiumfolie op het bakblik te leggen om oliespetters tegen te gaan Leg één op het bakblik De olie druipt dan in de ruimte tussen de stukken folie BEDIENINGSAANWIJZINGEN Bijzondere opmerking De afbeeldingen van de accessories...

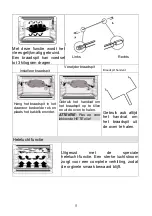
Page 5: ... Roosterondersteuning U kunt het bakblik op 4 verschillende standen zetten afhankelijk van het gerecht dat u wilt klaarmaken Wanneer u bijvoorbeeld gegratineerde macaroni klaarmaakt en u wilt dat het bovenste gedeelte het meest gebakken wordt kunt u de bovenste of de tweede steun gebruiken Voor geroosterde kip kunt u de vierde of de onderste steun gebruiken Braadspit functie Gebruik met braadspit ...

Page 6: ... het daarvoor bedoelde rek en plaats het bakblik eronder Gebruik het handvat om het braadspit op te tillen en uit de oven te halen ATTENTIE Pas op voor lekkende HETE olie Gebruik aub altijd het handvat om het braadspit uit de oven te halen Hetelucht functie Uitgerust met de speciale hetelucht functie Een sterke luchtstroom zorgt voor een complete verhitting zodat de orginele smaak bewaard blijft ...

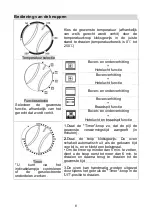
Page 7: ...ting Braadspit functie Boven en onderverhitting Hetelucht en braadspit functie Timer U kunt via het indicatielampje controleren of de geselecteerde onderdelen werken 1 Draai de Timer knop zo dat de pijl de gewenste verwarmingstijd aangeeft in minuten 2 Draai de knop kloksgewijs De oven schakelt automatisch uit als de gekozen tijd voorbij is en er klinkt een belsignaal Om de timer op minder dan 5 m...

Page 8: ...ELGEBRUIKT VOEDSEL SOORT VOEDSEL TEMPERATU UR STAND BLIK TIJD Brood 180 3 9 13 Cake 180 2 25 35 Vis 250 2 10 15 Kip Eend 220 250 2 30 45 Pannenkoeke n 160 1 7 10 Rundvlees 250 2 8 15 Ei Pinda s 125 150 2 6 10 Hot Dog 200 2 6 10 Hamburger 240 2 10 14 GEBRUIKSVOORSCHRIFTEN Voordat u het apparaat voor de eerste keer gebruikt Verwarm de lege oven voor 1 Plaats het bakblik en het rooster in de oven 2 Z...

Page 9: ...ijd minuten aangeeft volgens het gerecht dat u klaar wilt maken 2 Stel de Timer in door hem met de klok meet te draaien De oven schakelt automatisch uit aan het einde van de ingestelde tijd en de bel rinkelt Wanneer u de Timer instelt voor minder dan 5 min zet hem dan eerst op meer dan 6 min en draai hem dan terug naar de gewenste tijd 3 De oven kan handmatig uitgeschakeld worden tijdens het bakke...

Page 10: ... worden heel heet tijdens gebruik Zorg ervoor ze niet aan te raken terwijl u de deur opent en sluit Steek de stekker in een geschikt stopcontact Steek de stekker helemaal in het stopcontact Als u dit niet doet kan de stekker abnormaal heet worden Gebruik geen stopcontact voor elektrisch licht Sluit geen meerdere stekkers aan op hetzelfde stopcontact ONDERHOUD 1 Naast de reiniging beschreven in dez...

Page 11: ...for their safety In order to protect children from the dangers of electrical appliances never leave them unsupervised with the device Consequently when selecting the location for your device do so in such a way that children do not have access to the device Take care to ensure that the cable does not hang down Test the device plug and the cable regularly for damage If there is damage of any kind t...

Page 12: ...Rotisserie fork CAUTIONS Special indication The accessory image varies from different models Please refer to the actual model you buy Always use the food fork when inserting or removing the tray Touching these will cause severe burns When hot do not apply water to the glass window it may cause the glass to break When unplugging the cord always take hold of the plug itself Never pull on the cord Do...

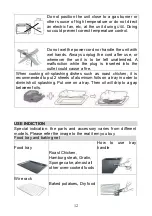
Page 13: ...is inserted into the outlet could cause a fire When cooking oil splashing dishes such as roast chicken it is recommended to put 2 sheets of aluminum foils on a tray in order to diminish oil splashing Put one on a tray Then oil will drip to a gap between foils USE INDICTION Special indication the parts and accessory varies from different models Please refer the image to the real item you buy Food t...

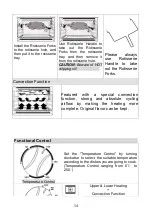
Page 14: ...e dishes you want to cook For instance when making macaroni gratin and you want to have the top part cooked the most use the second or the second rack support For roasting a chicken use the fourth or the bottom rack support Rotisserie Function Use with Rotisserie Forks Install Rotisserie Forks With this function even baking will be provided Rotisserie forks can carry food under 3 kilograms Left Ri...

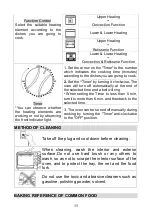
Page 15: ...use Rotisserie Handle to take out the Rotisserie Forks Convection Function Featured with a special convection function strong and absolute cycling airflow by making the heating more complete Original flavor can be kept Functional Control Temperature Control Set the Temperature Control by turning clockwise to select the suitable temperature according to the dishes you are going to cook Temperature ...

Page 16: ...ning it clockwise The oven will turn off automatically at the end of the selected time and a bell will ring When setting the Timer to less than 5 min turn it to more than 6 min and then back to the selected time 3 The oven can be turned off manually during cooking by turning the Timer anti clockwise to the OFF position METHOD OF CLEANING Take off the plug and cool down before cleaning When cleanin...

Page 17: ...mperature control dial to 250 and heat the empty oven for about 10 minutes Note There may be some smoke and a burning smell at first use but this is not a malfunction Temperature control dial Set the Temperature Control Dial for the dishes which you are going to cook Heat Operating Switch Select upper Lower or Upper and Lower according to the dishes you are going to cook You can observe whether th...

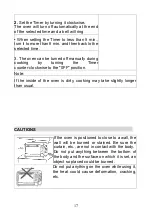
Page 18: ...ning the Timer counter clockwise to the 0FF position Note If the inside of the oven is dirty cooking may take slightly longer than usual CAUTIONS If the oven is positioned to close to a wall the wall will be burned or stained Be sure the curtain etc are not in contact with the body Do not put anything between the bottom of the body and the surface on which it is set an object so placed could be bu...

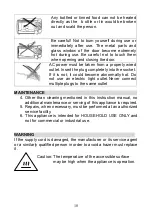
Page 19: ... abnormally hot Do not use an electric light outlet Never connect multiple plugs to the same outlet MAINTENANCE 4 Other than cleaning mentioned in this instruction manual no additional maintenance or serving of this appliance is required 5 Repairs when necessary must be performed at an authorized service facility 6 This appliance is intended for HOUSEHOLD USE ONLY and not for commercial or industr...

Page 20: ...Gerät um sie vor den Gefahren im Umgang mit elektrischen Geräten zu schützen Suchen Sie für das Gerät also einen Platz aus der für Kinder unzugänglich ist Achten Sie darauf dass das Kabel nicht herunterhängt Überprüfen Sie das Gerät den Stecker und das Kabel regelmäßig auf Schäden Verwenden Sie das Gerät nicht bei Vorhandensein irgendwelcher Schäden sondern lassen Sie es von einem Techniker repari...

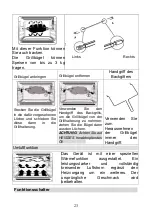
Page 21: ...itter 16 Grillbügel VORSICHT Besonderer Hinweis die Einzelteile und die Ausstattung variieren zwischen verschiedenen Modellen Lesen Sie die Hinweise zu dem Bild des Artikels den Sie erworben haben Benutzen Sie beim Einschieben oder Entnehmen des Backbleches immer den Blechhalter Das Berühren des Blechs kann zu schweren Verbrennungen führen Benetzen Sie das Glasfenster in heißem Zustand nicht mit W...

Page 22: ...iemals mit feuchten Händen Ziehen Sie nach Gebrauch oder wenn Sie das Gerät unbeaufsichtigt lassen immer den Netzstecker Eine Fehlfunktion bei eingestecktem Stromkabel kann einen Brand verursachen Wenn SIe fettsptritzende Gerichte wie Brathuhn zubereiten ist es zu empfehlen 2 Aluminiumfolien auf dem Backblech zu platzieren um das Fettspritzen einzudämmen Legen Sie eine Folie auf ein Blech Das Fett...

Page 23: ... von Pudding und anderen heißen Flüssigkeiten geboten Blechschiene Entprechend den Gerichten die Sie zubereiten möchten können Sie das Blech in 4 verschiedenen Positionen platzieren Wenn Sie beispielsweise Makkaronigratin zubereiten und möchten dass der obere Teil besonders gar ist benutzen Sie die oberste oder die zweite Blechschiene Benutzen Sie die vierte oder die unterste Blechschiene zur Zube...

Page 24: ... Verwenden Sie den Handgriff des Backgrills um die Grillbügel von der Grillhalterung zu nehmen ziehen Sie die Bügel dann aus den Löchern ACHTUNG Achten Sie auf HEISSES herabtropfendes Öl Verwenden Sie zum Herausnehmen der Grillbügel immer den Handgriff Umluftfunktion Das Gerät ist mit einer speziellen Wärmefunktion ausgestattet Ein leistungsstarker und vollständig kreisender Luftstrom ergänzt den ...

Page 25: ...rollleuchte können Sie beobachten ob die Heizelemente in Betrieb sind 1 Stellen Sie den Pfeil der Zeitschaltuhr auf die Zahl die der Uhrzeit Minuten der zu kochenden Gerichte entspricht 2 Drehen Sie die Zeitschaltuhr im Uhrzeigersinn Der Backofen schaltet sich nach Ablauf der eingestellten Zeit automatisch aus eine Glocke ertönt Wenn Sie eine Uhrzeit von weniger als 5 Minuten einstellen möchten dr...

Page 26: ...FÜR GÄNGIGE SPEISEN Art der Speise Temperatur Schiene Zeit Brot 180 3 9 13 Kuchen 180 2 25 35 Fisch 250 2 10 15 Huhn Ente 220 250 2 30 45 Pfannkuchen 160 1 7 10 Rindfleisch 250 2 8 15 Eier Erdnüsse 125 150 2 6 10 Hot Dog 200 2 6 10 Hamburger 240 2 10 14 BEDIENUNGSANWEISUNGEN Heizen Sie den leeren Ofen vor bevor Sie das Gerät zum ersten Male benutzen 1 Schieben Sie das Blech und das Backgitter hine...

Page 27: ...n anzeigt 2 Stellen Sie die Zeitschaltuhr ein indem SIe sie im Uhrzeigersinn drehen Der Ofen wird sich nach Ablauf der eingestellten Zeit automatisch abstellen und eine Glocke wird ertönen Wenn Sie die Zeitschaltuhr auf weniger als 5 Minuten einstellen möchten stellen Sie sie auf mehr als 6 Minuten und dann zurück auf die gewünschte Zeit 3 Der Ofen kann während der Benutzung manuell ausgeschaltet ...

Page 28: ...llte Speisen können nicht direkt aufgewärmt werden die Flasche oder Dose könnte aufplatzen und den Benutzer verbrühen Passen Sie auf dass Sie sich während oder direkt nach Gebrauch nicht verbrennen Die Metallteile und das Glasfenster können während des Gebrauchs sehr heiß werden Vermeiden Sie es sie beim Öffnen oder Schließen der Tür zu berühren Stromversorgung muss von einer korrekt angeschlossen...

Page 29: ... vorgenommen werden 3 Dieses Gerät ist NUR FÜR DEN HAUSGEBRAUCH bestimmt und nicht für die kommerzielle oder industrielle Nutzung VORSICHT Falls das Stromkabel oder der Netzstecker beschädigt werden müssen sie vom Hersteller seinen Servicebeauftragten oder einer ähnlich qualifizierten Person ausgetauscht werden um Gefahren zu vermeiden Achtung Die Temperatur der berührbaren Oberfläche kann während...

Page 30: ... s assurer qu ils ne jouent pas avec l appareil Afin de protéger les enfants des dangers des appareils électriques ne les laissez jamais sans surveillance à proximité de l appareil En conséquence lorsque vous choisissez l emplacement de l appareil faites le de telle manière que l enfant n aura pas accès à l appareil Vérifiez et assurez vous que les câbles ne pendent pas Testez régulièrement l appa...

Page 31: ...Indicateur lumineux 12 Grille 16 Fourche à rôtir ATTENTION Indications spéciales Les composants et accessoires varient suivant les modèles Veuillez vous référer à l image de l objet que vous avez réellement acheté Utilisez systématiquement la poignée du plateau lorsque vous le mettez dans le four où que vous le retirez Le contact avec le plateau provoque des brûlures graves Lorsqu elle est chaude ...

Page 32: ...uement le cordon après utilisation ou lorsque l appareil est laissé sans surveillance Une défaillance lorsque l appareil est branché sur secteur peut provoquer un incendie Lorsque vous cuisinez des plats susceptibles de provoquer des projections d huile comme du poulet rôti il est recommandé de placer deux feuilles de papier aluminium sur le plateau pour limiter les projections Placez en une sur u...

Page 33: ...u d autre liquides chauds Support de plaques Il vous est possibles de positionner le plateau sur 4 positions différentes selon les plats que vous préparez Par exemple lorsque vous faites des macaronis au gratin et que vous désirez obtenir une partie supérieure plus cuite utilisez le premier ou le second support de plateau Pour rôtir un poulet utilisez le 4e support ou celui du bas Fonction Rôtisso...

Page 34: ...mble sur le support Utilisez la poignée de rôtissoire pour retirer les fourches à rôtir du support puis retirez le des orifices prévus ATTENTION Prenez garde l huile de cuisson CHAUDE Veuillez systématiquemen t utiliser la poignée de rôtissoire pour retirer les fourches à rôtir Fonction Convection Accessible à partir de la fonction spéciale de convection un flux d air puissant circulant dans le fo...

Page 35: ...rôtissoire et convection Minuterie Vous pouvez voir si les éléments de cuisson fonctionnent ou non en observant les Indicateurs Lumineux disposés en façade 1 Placez la flèche de la Minuterie sur le numéro correspondant au temps de cuisson en minutes en fonction du plat que vous comptez cuire 2 Réglez la Minuterie en la faisant tourner dans le sens des aiguilles d une montre Le four s arrêtera auto...

Page 36: ...COURANTS TYPE DE PLAT TEMPERATURE ETAGERE MINUTERIE Pain 180 3 9 13 Gateau 180 2 25 35 Poisson 250 2 10 15 Poulet canard 220 250 2 30 45 Pancake 160 1 7 10 Boeuf 250 2 8 15 Œuf Cacahuète 125 150 2 6 10 Hot Dog 200 2 6 10 Hamburger 240 2 10 14 INSTRUCTIONS D UTILISATION Avant d utiliser l appareil pour la première fois Chauffez le four vide 1 Placez le plateau et la grille de cuisson 2 Réglez le bo...

Page 37: ...n du plat que vous allez cuir 2 Réglez la minuterie en la tournant dans le sens des aiguilles d une montre Le four s éteindra automatiquement une fois le temps écoulé et une sonnerie se déclenchera Lorsque vous désirez régler la minuterie pour une durée inférieure à 5 minutes faites d abord tourner le bouton au delà de 6 minutes puis revenez à la valeur désirée 3 Le four peut être éteint manuellem...

Page 38: ... directement car les bouteilles ou boîtes se casseraient et provoqueraient des brûlures Soyez prudent Faites attention à ne pas vous brûler durant l utilisation ou juste après celle ci Les parties métalliques et la vitre de la porte sont extrêmement chaudes durant l utilisation Evitez de les toucher lorsque vous ouvrez ou fermez la porte L alimentation AC doit provenir d une fiche correctement con...

Page 39: ... et n est pas prévu pour être utilisé dans un cadre commercial ou industriel AVERTISSEMENT Si le cordon d alimentation ou la fiche sont endommagés Ils doivent être remplacés par le constructeur son agent ou une personne avec une qualification équivalente afin d éviter les risques Avertissement La température de la surface accessible peut être élevée lorsque l appareil fonctionne ...

Page 40: ... la loro sicurezza Per proteggere i bambini dai pericoli degli apparecchi elettrici non lasciarli mai senza controllo con il dispositivo Di conseguenza quando si sceglie il luogo per il dispositivo si deve farlo in modo che i bambini non vi abbiano accesso Fare attenzione che il cavo non penzoli Controllare regolarmente che il dispositivo la spina e il cavo non siano danneggiati Se c è un qualche ...

Page 41: ...cazioni speciali Le immagini degli accessori variano tra i diversi modelli Fare riferimento al modello che si è acquistato Utilizzare sempre l apposita impugnatura quando si inforna o sforna il vassoio Il contatto con questo potrebbe provocare serie ustioni Quando è calda non porre la finestra in vetro in contatto con acqua per evitare che il vetro si rompa Quando si stacca la spina di alimentazio...

Page 42: ...a potrebbe causare un incendio Quando si cucinino pietanze che tendono a causare spruzzi d olio come ad esempio il pollo arrosto si raccomanda di mettere 2 fogli di stagnola sul vassoio per diminuire gli spruzzi Metterne uno sul vassoio L olio sgocciolerà attraverso lo spazio tra i due fogli ISTRUZIONI PER L USO Indicazioni speciali Componenti ed accessori variano tra i diversi modelli Fare riferi...

Page 43: ...cucinare Per esempio per la pasta al forno che prevede che la parte superiore sia quella più cotta usare il superior appoggio Per il pollo arrosto usare il quarto appoggio o quello inferiore Funzione rosticceria Utilizzare con le pinze girarrosto Inserire le pinze Per questa funzione viene fornito un vassoio da forno Il forchettone girarrosto può sostenere prodotti con peso non superiore a 3 kg Si...

Page 44: ...r estrarre il forchettone girarrosto Funzione convezione Caratterizzato da una speciale funzione convezione con un ciclo di areazione costante e completo rende la cottura più completa consentendo di mantenere i sapori originali Comando funzionale Comando della temperatura Impostare il comando della temperatura ruotando in senso orario per selezionare la temperatura adatta in base ai piatti da cuci...

Page 45: ... cottura minuti a seconda del piatto da cucinare 2 Impostare il Timer ruotandolo in senso orario Il forno si spegnerà automaticamente al termine dell tempo selezionato e un campanello suonerà Quando si imposta il Timer per meno di 5 min ruotarlo a 6 min e poi ritornare sulla durata selezionata 3 Il forno può essere spento manualmente durante la cottura ruotando il Timer in senso anti orario fino a...

Page 46: ...a Scaldare il forno a vuoto 1 Inserire il vassoio e la griglia 2 Posizionare il selettore della resistenza su SUPERIORE E INFERIORE e impostare la manopola del termostato su 250 scaldare il forno vuoto per circa 10 minuti N B Al primo utilizzo potrebbero riscontrarsi fumo e odore di bruciato ma non si tratta di un malfunzionamento Manopola del termostato Impostare la manopola del termostato per gl...

Page 47: ...mpo selezionato e verrà emesso un segnale acustico Quando il Timer deve essere selezionato per un tempo inferiore ai 5 minuti ruotarlo oltre i 6 e poi tornare indietro sul tempo desiderato 3 È possibile spegnere il forno manualmente durante la cottura ruotando il Timer in senso antiorario fino alla posizione OFF N B Se l interno del forno è sporco la cottura potrebbe richiedere un tempo leggerment...

Page 48: ...non incorrere in ustioni durante ed immediatamente dopo l uso Le parti metalliche e la finestra in vetro della porta diventano estremamente calde durante l uso Fare attenzione a non toccarle quando si apre e chiude la porta L alimentazione AC deve essere fornita da una presa adatta Inserire completamente la spina nella presa Se non lo è potrebbe scaldarsi in modo anomalo Non usare prese da illumin...

Page 49: ...ne sono danneggiati vanno sostituiti dal produttore da un suo agente di assistenza o da una persona similmente qualificata in modo da evitare rischi Attenzione la temperatura delle superfici accessibili potrebbe essere alta quando l elettrodomestico è in funzione ...

Page 50: ...eger a los niños de los peligros de los aparatos eléctricos nunca los deje solos con el aparato sin supervisión Consecuentemente al seleccionar el emplazamiento del aparato piense en un lugar fuera del alcance de los niños Asegúrese de que el cable no quede colgando Pruebe el aparato el enchufe y el cable para detectar cualquier daño posible En caso de detectar cualquier tipo de daño no utilice el...

Page 51: ...illa 16 Tenedor de asado PRECAUCIONES Indicación especial La imagen de los accesorios varia dependiendo del modelo Refiérase al modelo real que ha comprado Use siempre el tenedor de alimentos cuando introduzca o saque la bandeja Tocar la bandeja provocará quemaduras graves Cuando esté caliente no ponga agua en el ventana de vidrio Puede causar la rotura del cristal Cuando desenchufe el cable tómel...

Page 52: ...hufado puede causar un incendio Cuando cocine platos que salpican aceite como pollo asado se recomienda poner dos hojas de aluminio en la bandeja para disminuir las salpicaduras de aceite Ponga una en la bandeja Entonces el aceite goteará en el agujero entre las dos hojas INDICACIONES DE USO Indicación especial las partes y accesorios varían según los diferentes modelos Refiérase a la imagen para ...

Page 53: ...quidos calientes Soporte para el estante Puede ajustar la bandeja en 4 posiciones diferentes según los platos que quiera preparar Por ejemplo cuando quiera prepara macarrones gratinados y quiere que la parte superior esté más cocida use el soporte superior o el segundo Para asar un pollo utilice el cuarto soporte para bandeja o el inferior Función de asado Uso con tenedor de asado Instalación de t...

Page 54: ...l hueco de asado y póngalo en la bandeja de asado Use el asa de asado para sacar el tenedor de asado de la bandeja y sáquelo luego del hueco para asado PRECAUCIÓN Cuidado con el aceite que gotee estará CALIENTE Use siempre el asa de asado para sacar el tenedor de asado Función de convección Con una función de convección especial se produce un potente flujo de aire circulante que hace más completo ...

Page 55: ...de asado Calor superior e inferior Función de convección y asado Temporizador Puede observar si los elementos calentadores están funcionando mirando el testigo delantero 1 Ponga la flecha del Temporizador en el número que indica el tiempo de cocción minutos según el plato que vaya a cocinar 2 Ponga el Temporizador girándolo a la derecha El horno se apagará automáticamente al final del tiempo selec...

Page 56: ...MENTOS MÁS COMUNES TIPO DE ALIMENTO TEMPERATU RA SITIO SOPO RTE TIEMPO Pan 180 3 9 13 Bizcocho 180 2 25 35 Pescado 250 2 10 15 Pollo Pato 220 250 2 30 45 Crepe 160 1 7 10 Ternera 250 2 8 15 Huevo Cacahu ete 125 150 2 6 10 Hot dog 200 2 6 10 Hamburguesa 240 2 10 14 INSTRUCCIONES DE FUNCIONAMIENTO Antes de usar la unidad la primera vez Caliente el horno vacío 1 Introduzca la bandeja y la rejilla de ...

Page 57: ...or al número que indica el tiempo de cocción minutos según los platos que quiera cocinar 2 Ajuste el temporizador girándolo en el sentido de las agujas del reloj al final del tiempo seleccionado el horno se apagará automáticamente y una campana sonará Cuando ajuste el temporizador a menos de 5 min gírelo a mas de 6 min y después vuelva atrás hasta el tiempo a seleccionar 3 El horno se puede apagar...

Page 58: ...o quemarse durante el uso o inmediatamente después del uso Las partes metálicas y la ventana de vidrio estarán muy calientes durante el uso Tenga cuidado de no tocarlas cuando abra y cierre la puerta La corriente CA se debe tomar de una salida de corriente adecuada Inserte el enchufe completamente en la toma Si no es así puede volverse anómalamente caliente No use una salida de eléctrica de luz Nu...

Page 59: ...nchufe están dañados debe cambiarlos el fabricante su servicio técnico o un persona similarmente cualificada para evitar daños Precaución La temperatura de las superficies accesibles puede ser elevada cuando el electrodoméstico esté funcionando ...

Page 60: ...s aparelhos eléctricos nunca as deixe sem supervisão junto do aparelho Da mesma forma quando seleccionar o local onde vai colocar o aparelho faça o de modo a que as crianças não lhe consigam aceder Certifique se de que o cabo não fica suspenso Verifique regularmente se o dispositivo a ficha e o cabo estão danificados Se houver algum tipo de dano não deve utilizar o aparelho Deve entregá lo a um té...

Page 61: ...1 Pé de suporte 15 Pega do espeto 4 Encaixe da grelha 8 Luz piloto 12 Grelha 16 Forquilha do espeto rotativo PRECAUÇOES Indicações especiais A imagem do acessório varia segundo os diferentes modelos Consulte o modelo que comprou recentemente Utilize sempre o suporte da bandeja quando a inserir ou retirar Se a manusear poderá sofrer queimaduras graves Quando o forno estiver quente não deite água pa...

Page 62: ...a temperatura Não molhe o cabo de alimentação ou manuseie a unidade com as mãos molhadas Desligue sempre o cabo após utilização ou sempre que a unidade fique a funcionar sozinha A ocorrência de uma avaria enquanto a ficha é ligada à tomada pode causar um incêndio Quando cozinhar pratos com óleo que salpique como frango assado recomenda se a que coloque duas 2 folhas de alumínio sobre a bandeja par...

Page 63: ...tilizar o suporte da bandeja Hambúrgueres Carne Gratinados Bolos fofos e quase todos os outros alimentos cozinhados no forno Grelha da unidade Batata Assada Alimentos Secos Bandeja e Grelha Para alimentos que possam pingar ferver como peixe etc Espeto e pega As grelhas não são totalmente quadradas Nota Tenha cuidado quando retirar pudins e outros alimentos líquidos Suporte da Prateleira ...

Page 64: ...fique mais tostada utilize a segunda grelha ou a grelha superior da unidade Função Rotativa Utilização do Espeto Rotativo Colocação das Forquilhas do Espeto Rotativo Com esta função poderá fazer mais tipos de assados O espeto rotativo pode suportar até 3 kilos Esquerda Direita Colocação do Espeto Rotativo Remoção do Espeto Rotativo Pega do Espeto Superior Segunda Terceira Quarta ...

Page 65: ...ra retirar as Forquilhas do Espeto Rotativo Função de Convecção Equipado com uma função especial de convecção um fluxo de ar forte em movimento ciclíco que aquece de maneira mais completa Mantém o sabor original Regulação do Funcionamento Regulação da Temperatura Rode o Regulador de Temperatura no sentido dos ponteiros dos relógios para seleccionar a temperatura adequada de acordo com o prato que ...

Page 66: ...no final do tempo seleccionado e soará uma campaínha Quando seleccionar o Temporizador para menos de 5 minutos primeiro rode o para mais que 6 minutos e depois volte atrás para o tempo pretendido 3 O forno pode ser desligado manualmente rodando o Temporizador no sentido contrário ao dos ponteiros dos relógios para a posição DESLIGADO MÉTODOS DE LIMPEZA Retire a ficha da tomada e deixe arrefecer o ...

Page 67: ...O programe a temperatura para 250 C e deixe aquecer o forno vazio durante cerca de 10 minutos Nota Poderá ocorrer algum fumo e cheiro a queimado na primeira utilização mas não significa avaria Programação da temperatura Regule a programação da temperatura para os pratos que vai cozinhar Interruptor de funcionamento do aquecimento Seleccione ALTO BAIXO ou ALTO E BAIXO de acordo com os pratos que va...

Page 68: ...rário para a posição DESLIGADO Nota Se o interior do forno estiver sujo a cozedura poderá ligeiramente demorar mais que o normal PRECAUÇÕES Se o forno estiver colocado muito perto de uma parede esta poderá ficar queimada ou manchada Certifique se de que cortinas e outras protecções não entram em contacto com a unidade Não coloque nada em cima da unidade e da superfície na qual está colocada Um obj...

Page 69: ...o utilize uma extensão com corte de energia Nunca ligue várias fichas na mesma extensão MANUTENÇÃO 1 Além dos métodos de limpeza mencionados neste manual de instruções não são necessários a manutenção adicional ou serviços para este aparelho 2 As reparações quando necessárias devem ser levadas a cabo por um serviço de reparações autorizado 3 Este aparelho foi concebido APENAS para UTILIZAÇÃO DOMÉS...

Page 70: ...l and packaging puts your attention to this important issue The materials used in this appliance can be recycled By recycling used domestic appliances you contribute an important push to the protection of our environment Ask your local authorities for information regarding the point of recollection Avvertenza per la tutela dell ambiente Come indicato dal simbolo riportato sul prodotto sulle istruz...

Reviews: