Triplex Removable HDDCD-RW Installation And Operaion Manual Download Page 50


50

5.2.3.2.1 Remote play


This device has the full triplex so you can use 

the Viewer Software in the remote without 

affecting the performance of the 1 - channel 

DVR. You can also use the Viewer Software to 

play and back up. If you have a PTZ camera, 

the Viewer Software can also control it. 


“Play": 

Click it to see the DVR play window. 

Use the 

"Previous page" 

and

 "Next page" 

buttons to find the record you want from the record 
list. Click the 

"Time Search" 

page to use the time 

and date search entries to help your search.


"Pause":

 Click to freeze the image. 


"Stop":

 Click to stop playing back the 

recorded video.


"REC":

 Click to control the recording of the 

DVR. Press the button to start or stop the 
recording.


"REV": 

Click to play a recorded video in the 

reverse direction at speeds, which are faster than 
the recorded speed.


"FWD": 

Click to play a recorded video in the 

forward direction at speeds, which are faster than 
the recorded speed.


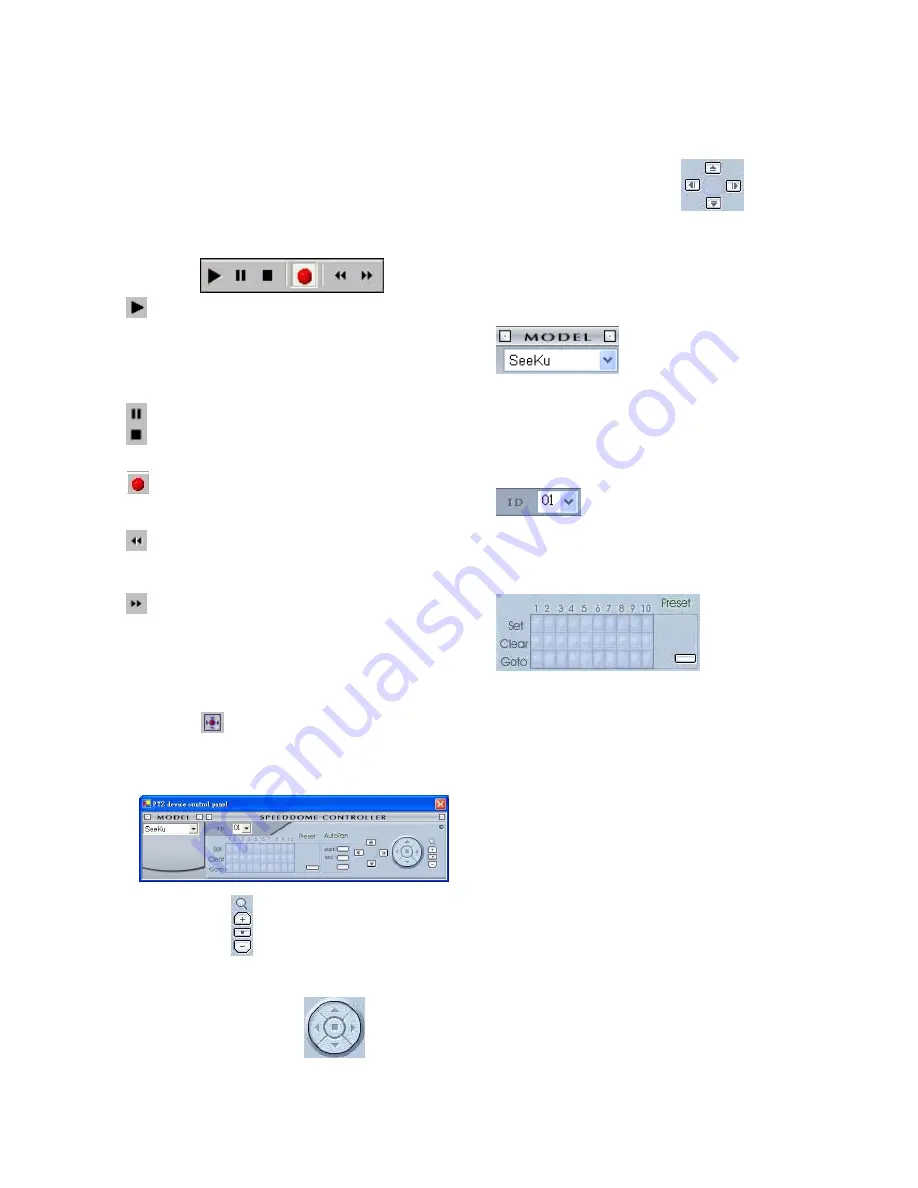
5.2.3.2.2 Change Pan/Tilt/Zoom Setting 

Click the 

  button on the home page to open 

the Speed Dome Controller. 


1. Click the 

 button to control the Zoom 

setting on the Speed Dome Controller. 

2.  The right-hand set,

, has four 

buttons, each of which, upon being clicked, 

will turn the camera all the way, without 

stopping, in one of the four designated 

directions. The fifth button, in the center, will 

stop the camera at any point you prefer. 

The left-hand set of buttons,

, has 

four buttons, each of which, upon being 

clicked, will move one short step only in any 

of the four designated directions. 

3. Select a Speed Dome device Model 

 from the drop-down list 

on the Speed Dome Controller. The 

Controller will be able to display the listed 

Models by turn. 

4. Select a Speed Dome device ID 

  from the drop-down list on the 

Speed Dome Controller. The Controller will 

be able to display the listed IDs by turn. 

5.  


Each of the ten buttons under ‘Set’ is 

connected with a specific position and angle 

of either panning or tilting of the camera. 

Click each button to activate its particular 

position and angle. Press the button under 

‘Preset‘ to turn the camera angle by angle in 

the set positions. 

Each of the ten buttons under ‘Clear’ can be 

clicked to delete the corresponding ‘Set’ 

button above it. For example, if you wish to 

de-activate ‘Set’ button #4, please click 

‘Clear’ button #4 to delete its corresponding 

‘Set’ counterpart. 

Each of the ten buttons designated ‘Go to’ 

can be clicked to view the particular 

corresponding angle of the position in which 

it is set. 

Summary of Contents for Removable HDDCD-RW

Page 1: ...INSTALLATION OPERATION MANUAL 1 C H 1CH Digital Video Recorder MPEG4 Model Removable HDD CD RW Before trying to connect or operate this product please read this manual completely...

Page 2: ...place anything on top of the unit that might spill or fall into it Do not attempt to service this unit yourself as opening or removing covers may expose you to dangerous voltage or other hazards Pleas...

Page 3: ...1 CD Rewritable unit Backup Operations FOR CD ROM MODEL ONLY 25 3 5 2 Mobile Rack HD Backup Operations for removable HDD model only 26 3 5 3 SD Card Backup Operations for Removable HDD Model 28 3 5 4...

Page 4: ...4 6 4 O S D Message 64 6 5 Time Index Table 65 6 6 Specifications 66 6 7 ScanIP 67 APPENDIX 1 Using CD Discs FOR CD RW MODEL ONLY 69...

Page 5: ...ne fixed hard disk drive and one removable hard disk for removable model only z Main recording media one fixed HDD plus a CD RW For CD ROM model only z Hard disk drive hot swapping capability z Pre al...

Page 6: ...ompartment The compartment allows you to install a hard disk drive mostly for backup purposes Make sure the drive is well secured with the mounting screws in the mobile rack before you put the rack in...

Page 7: ...ain simultaneously 12 13 Up Down buttons Press these two buttons to select the desired contents for programming in the setup menu mode 15 Enter Button Press to enter a selected item and save the setti...

Page 8: ...this right to play a recorded video in the forward direction at faster or slower speeds than the recorded speed 23 Eject button Pressing this controls the insertion and ejection of the tray 24 Emerge...

Page 9: ...Please refer to 6 1 RS 232 RS 485 Protocol for more details 32 VIDEO OUT Connector The connector provides the unit s composite video signals to a MUX 33 MONITOR Connector The connector provides the u...

Page 10: ...buzzers or lights 5V 0V Active 4 ALARM RESET INPUT This pin connects to an alarm clear device for clearing an alarm 5V 0V Active 5 RECORD IN INPUT This pin connects to a record triggering device for...

Page 11: ...V AUDIO IN IN OUT OUT VIDEO TO MONITOR TO MUX S VCR IN FROM MUX MAIN MONITOR I O Camera Monitor RS 485 ETHERNET 10 100 2 INSTALLATION 2 1 Basic Connection A Connecting with a Single Camera B Connectin...

Page 12: ...nt HD2 Mobile please contact your distributors or installers for specific instructions on how to install it Please don t serve yourself before consulting your installers If there is only one hard disk...

Page 13: ...0G 7200 RPM 8M WD1200AABS 120G 7200 RPM 2M WD1200AAJS 120G 7200 RPM 8M WD1200AAKS 120G 7200 RPM 16M WD1600AABS 160G 7200 RPM 2M WD1600AAJS 160G 7200 RPM 8M WD1600AAKS 160G 7200 RPM 16M WD2500AABS 250G...

Page 14: ...e the DVR will display the following sample message plus the default display Press the Display button 8 again the unit will not display any OSD message Press the button one more time to go back to the...

Page 15: ...R is updating the system software which will take approximately 90 seconds to process 9 Restart the unit when the device sounds a tone twice and displays the message PLEASE RESTART The process is comp...

Page 16: ...rements For an NTSC unit for example if the unit is set to record images with the BEST quality at a 30 Frame Sec record rate normally a 80GB hard disk drive will be filled in 38 7 hours see the gray a...

Page 17: ...in a weekly table which programs the DVR to turn on and off at specified times This way the DVR will start stop recording according to the programmed schedule 1 Press the Setup button 9 to enter the...

Page 18: ...he recording function before the scheduled recording the unit will operate recording as shown in the diagram below and keep those Images in different files 03 00 06 00 08 00 12 00 14 00 START END STAR...

Page 19: ...lace Timer Recording Actual Recording Speed Alarm Takes Place Normal Alarm Normal Normal Alarm Alarm Normal 3 2 4 Externally Triggered Recording By connecting disconnecting RECORD IN of ALARM I O on t...

Page 20: ...e recording s end use the SEARCH functions or rewind to replay the file if required 3 3 2 Fast Forward Backward There are 7 speeds available for playback 1x 2x 4x 8x 16x 30x and 100x While playing bac...

Page 21: ...forward direction the other JOG dial 21 can act in both a forward and a backward direction as well as picture by picture A By PAUSE button 3 Press the PAUSE button 3 to display one frame field of a p...

Page 22: ...the Enter button 15 to display the selected video Key Operation Press the 12 and v 13 buttons to select a video press the 11 and 14 buttons to flip over a page NOTE T Timer recording R External trigg...

Page 23: ...ith the thumbnail search function 1 Press the Search button 10 to enter the search mode 2 Select the THUMBNAIL and press the Enter button 15 to access the thumbnail page 3 Set the date you wish to sea...

Page 24: ...EL 1 Interval 1 Hour LEVEL 2 Interval 10 Min LEVEL 3 Interval 1 Min LEVEL 4 Interval 10 Sec LEVEL 5 Interval 1 Sec 3 4 5 SD CARD Search Take the following steps to proceed with the SD card search func...

Page 25: ...t one selects a CD item and forgets to insert it See the picture below for this status and please insert a CD or press the search button to exit the CD menu 3 5 Backup Operations 3 5 1 CD Rewritable u...

Page 26: ...YES meaning you re deleting a particular image Press the Search button to exit this page viii If your selection is complete enter item 3 BURN in the CD JPEG menu Give the device some time to complete...

Page 27: ...tons and button 13 to highlight HD BACKUP select FULL then press the Enter button 15 to proceed ALARM Duplicate all the alarm event recorded video from HD 1 to HD2 z Stay on the DISK SETTING page z Us...

Page 28: ...four functions as shown below 3 5 3 1 Archive Single image Clips into an SD Card Please take the following steps to archive a critical image in an SD card 1 Press the Setup button 9 to enter the setu...

Page 29: ...stored depends on the SD card s capacity The image is stored in the AVI compressed format If more than one clip is stored in an SD card file names will be assigned in sequence as shown below SAVE TO...

Page 30: ...YSTEM 3 Highlight SYSTEM and press the Enter button 15 to enter the SYSTEM SETTING page 4 Then set SD SETUP to LOAD 3 5 5 Updating System Software Please refer to section 2 4 for more details 3 6 Key...

Page 31: ...select the context for setting Enter 15 button Press to enter the selected item and to save the setting Shuttle Ring 20 Turn to highlight the desired option or to select the context for setting Jog Di...

Page 32: ...FULL This option determines the way to utilize storage media in case of a full disk REWRITE When the hard disk is full the device continues recording by displacing the old data STOP When the hard disk...

Page 33: ...the way to record sound if necessary ON Enables AUDIO recording OFF Disables AUDIO recording ALM TYPE This option allows users to set a type of alarm input corresponding to the sensor signal in use N...

Page 34: ...e ENABLE option to ON and set the SENSITIVITY 1 5 to a suitable value NOTE The MOTION ENABLE option is not allowed set to ON when MULTIPLEXER option is set to ON in the RECORD page it is because the m...

Page 35: ...y of October UK Daylight saving time begins at 1 00 a m on the last Sunday of March Time reverts to standard time at 1 00 a m on the last Sunday of October SET to set the start and ending for the dayl...

Page 36: ...entry for use OFF Disables the RS 485 communication port BAUD You have the option of using a Baud rate at 8 different levels 2400 4800 9600 19200 28800 38400 57600 or 115200 NET ENABLE This option ena...

Page 37: ...ion allows you to duplicate data from HD 1 to HD 2 Please set HD 2 as BACKUP first For operation details please refer to section 3 5 FULL Duplicates all the recorded video from HD1 to HD2 ALARM Duplic...

Page 38: ...ing records from the oldest one onwards MENU BACKGND There are 3 levels of background color transparency you can choose from level 1 is totally transparent level 3 is opaque and level 2 is between lev...

Page 39: ...u ON Enables pass protection for the setup menu OFF Disables pass protection for the setup menu DEFAULT This option allows you to reload the factory default setting Please do note that the password wo...

Page 40: ...PC B Connect to a LAN Hub Intranet The RJ 45 PIN configuration for connecting with a LAN Hub is shown below C Connect to WAN Internet The RJ 45 PIN configuration for connecting to a WAN is the same as...

Page 41: ...ON NOTE This function can only work if the LAN which the unit is connected to has a DHCP server If the DHCP server is working the DVR will obtain an IP address automatically from the DHCP server In t...

Page 42: ...nd correctly configure the MASK and GATEWAY settings according to your network architecture If you have any questions regarding those settings please contact a qualified MIS professional or your ISP 2...

Page 43: ...int to the Local Area Connection and click the right bottom of the mouse Click the Properties to enter the Local Area Connection 3 Click on the Configuration tag check if the TCP IC is included among...

Page 44: ...ovider If you are using a DHCP server please select Obtain an IP address automatically Any assigned the IP address for the connected DVRs must be in the same class type as the server If there is no DH...

Page 45: ...his IP is the DVR IP address that is assigned for the connected DVR 3 If you receive a response as in the sample screen below the connection hasn t been successfully established Please re check all th...

Page 46: ...recorded data for the event time you want z It supports your local PC simultaneously with the DVR backup data The programs can be operated by a selected PC equipped with the following requirements z...

Page 47: ...button to complete the installation process Step 6 After completing installation you can double click the file shown below Or click the Start Menu in the computer and select Programs to open the Progr...

Page 48: ...ically search the whole local LAN 1 channel DVR device to see a list NOTE If you want to create a new DVR connection via the Internet please press the button Enter the DVR s Host name or IP address an...

Page 49: ...e window Give the file name If you want to exit click Cancel Print Click the Print Preview button and go to the Preview option to adjust the image size Go to the Print Settings area and then go to Mar...

Page 50: ...set has four buttons each of which upon being clicked will turn the camera all the way without stopping in one of the four designated directions The fifth button in the center will stop the camera at...

Page 51: ...ant Channel ID To choose the camera Play Monitor Use the panel below to play or stop etc If you already want to back up click the Start backup button If you want to stop click the Stop backup button E...

Page 52: ...ra Play Monitor Use the panel below to play or stop etc If you already want to back up click the Start backup button If you want to stop click the Stop backup button 5 2 3 4 Web Page Viewer This devic...

Page 53: ...or not 3 Auto Scan Interval Here you have two entries Scan Working Devices and Scan Available Devices Set the time in seconds for both entries as per your requirements The Scan Working Devices entry...

Page 54: ...k to a recorded video from the PLAY LIST Click to freeze the image Click to activate or stop the recording function of the device Click to leave the home page of the DVR Press to enter the SETUP windo...

Page 55: ...the home page to enter the Record Alarm setting page 2 Click the connection on the Record Alarm setting page to enter the Timer Record setting page 3 Set the TIMER RECORD to ON to enable the TIMER REC...

Page 56: ...the drop down list on the Speed Dome Controller The Controller will be able to display the ID entries by turn 11 Each of the ten buttons under Set is connected with a specific position and angle of e...

Page 57: ...e PC communication parameters 9600 bps No Parity 8 Data Bits 1 Stop Bit 6 1 2 Communication Protocol 6 1 2 0 General Command Format Lead Code 0x41 Dest ID Src ID Main category Second category Number o...

Page 58: ...G_L 128 0x 80 JOG_R 129 0x 81 KEY_SHUTTLE_L8 130 0x 82 100x 1 16x KEY_SHUTTLE_L7 131 0x 83 100x 1 16x KEY_SHUTTLE_L6 132 0x 84 30x 1 8x KEY_SHUTTLE_L5 133 0x 85 16x 1 8x KEY_SHUTTLE_L4 134 0x 86 8x 1...

Page 59: ...x06 0x14 0x11 0x05 0x00 DVR Act Changing the time and date D Request State Second Category 0x06 PC Request 0x41 0x01 0x20 0x02 0x06 0x00 0x4f DVR Response 0x41 0x20 0x01 0x02 0x06 0x01 System State 0...

Page 60: ...0x02 0x11 0x08 HDD 0x0 4 Bytes REC Position 2 Bytes Image NO 0x4f Get HDD REC Position and Image NO used in Playback Immediately command Non REC Mode DVR Response ERROR 0x41 0x20 0x01 0x02 0x11 0x01...

Page 61: ...1 Built in hard disk 1 Unscrew all the 4 mounting screws on the mobile rack of the unit and detach it 2 Carefully lift the mobile rack to a vertical position 3 Unscrew the secured screws to detach the...

Page 62: ...ard and remove 4 Place the hard disk in the rack 5 Place the HDD inside the mobile rack Use four of the provided screws to fix the HDD in place 6 Place the top cover back to the carrier body by slidin...

Page 63: ...ETU P PW D DEFAULT VERSION MAIN PAGE SD CD SETUP SAVE OPER ATION LO G ENTER 2 OFF SET OFF LOAD ENTER COMM SETTING COMM ID 01 RS232 ON RS485 ON BAUD 2400 NET ENABLE OFF NET DHCP OFF NET IP SET NET ACCO...

Page 64: ...on or uses the SEARCH function but no video can be played 17 SET TO NTSC PLS RESTART System has to be set to NTSC please reboot PAL is similar 18 SOFTWARE UPDATE Software update 19 PLEASE RESTART The...

Page 65: ...e an index for the recent recorded data will be generated and the index of the next oldest data will be erased so that the list does remain 3000 in total And the next oldest data will be kept in the i...

Page 66: ...m Time Event list Filter thumbnail SD card Alarm Time Event list Filter thumbnail SD card CD OSD Language English Chinese T Set up Menu Multi layer Network setting Log list 2000 records Alarm In Out 1...

Page 67: ...s to display the desired changes instantly 4 Do you want to execute an auto search for free IP If and when you want to auto search the free IP select Yes or No If clicked Yes the software will provide...

Page 68: ...ss box on the right to enter it into an IP Address on the left 2 To change any IP address type in the new address in the Free IP Address box on the right as well as the device Login Name and Password...

Page 69: ...caddy lightly at the middle of its front and push gently to insert Ejecting The Disc 1 Press the eject button 2 Carefully lift out the disc 3 Press the eject button or lightly touch the center of the...

Page 70: ...lation As suggested in your specifications please do not install in an unstable position or in one that causes vibrations 2 Do not install in high humidity direct sunlight or damp conditions 3 Do not...

Reviews: