


Trouble Shooting
FAQ
What can I plug into the APS+?
Never insert any object other than a plug into the APS+ outlets.
The APS+ is designed for use with indoor AV equipment. Do not use
outdoors.
Never use the APS+ for appliances other than AV equipment, such as a
fridge, electric kettle, electric oven or microwave.
Never use the APS+ for power tools such as power drills, bench saws and
other power tools.
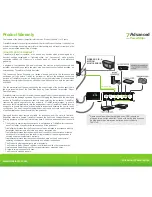
What AV equipment should I plug into the grey always on outlets?
Plug in Audio Visual (AV) equipment that need constant power for recording
features, timers and program guides such as:
• TiVo
• DVD recorders
• Devices with a hard disk drive (HDD)
• Digital receivers
• Set-top boxes
• Game console with a HDD
What AV equipment should I plug into the switched outlets?
The TV must be plugged into the green outlet labelled < tv >. Plug in devices
such as the following to the remaining switched outlets:
• Blu-ray, DVD and CD player
• Amplifiers
• Game consoles without a HDD
• Home theatre speaker systems
How does the APS+ save energy?
The APS+ saves energy through:
1) Master control
• All switched outlets are automatically switched off within one minute after
the TV is switched off.
2) Energy saving feature
•
In TV mode all switched outlets are automatically switched off after
135 minutes if there is no RF, IR remote control signal or movement
detected.
• In music mode all switched outlets are automatically switched off after
eight hours if there is no RF, IR remote control signal or movement is
detected.
No power to outlets
No power at switched outlets
The TV peripherals do not switch
off when the TV is off
The multi-sensor is blinking on and
off every 5 seconds
The TV keeps switching off after
30, 60, 120 minutes
The resettable switch must be at
the reset position.
The multi-sensor must be
connected to the APS+ and RF or
IR signal from any remote must be
received to switch on the switched
outlets.
Alternatively, press the button on
the multi-sensor to switch on
switched outlets manually.
Make sure that the TV is plugged
into the outlet with the green TV
icon.
Make sure that the TV peripherals
are connected to the green
switched outlets (except for TV).
The switched outlets will switch off
after the TV has been switched off
for 1 minute.
This is a notification that your TV
will shut off in 10 minutes.
The power saving / countdown
timer shuts off the TV and
peripherals after 30 / 60 / 120
minutes if no RF/IR signal or
movement is sensed. To reset the
time for another 30 / 60 / 120
minutes, press a button on an
RF/IR remote control or move in
front of the multi-sensor.
Problem
Solution
www.tricklestar.com
Advanced Pow
Advanced
Pow
Outlet
7
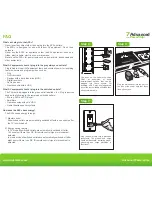
Step 2
Step 1
< tv >
surge
ground
switched
< tv >
always on
switched
Plug in devices that should always
have power to them into the always on
outlets. Eg. DVR and set-top boxes.
TV must be plugged into this outlet.
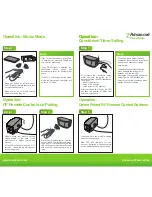
Remove the backing from the double
sided tape on the back of the
multi-sensor & fix to/near the TV
Step 5
- OPTIONAL
Step 7
Plug the power strip into a grounded
receptacle. The ground and surge
lights will illuminate - indicating proper
grounding and surge protection is
functional.
Step 6
Installation
Step 4
Plug the multi-sensor into the port on
the side of the power strip that looks
like a phone jack.
Plug the TAV link multi-sensor into TV
HDMI port if you have a smart TV or
HDMI connected
peripherals.
Step 3
switched
dvd
cable box
game console
amplifier
< tv >
subwoofer
The icons on the outlet strip serve
ONLY as examples of home
entertainment devices that can be
plugged into these outlets. For
example, a DVD may be plugged into
any of the four switched outlets as they
all operate the same.
always on
ground
surge
sensor
swiched
www.tricklestar.com
Advanced Pow
Advanced
Pow
Outlet
7


