background image

LUMIPAR12UH3

14

- 4 - MAINTENANCE

4.1 MAINTENANCE AND CLEANING THE UNIT

•  Make sure the area below the installation place is free from unwanted persons during setup.

•  Switch off the unit, unplug the main cable and wait until the unit has cooled down.

•  All screws used for installing the device and any of its parts should be tightly fastened and should not 

be corroded.

•  Housings, fixations and installation spots (ceiling, trusses, suspensions) should be totally free from any 

deformation.

•  The main cables must be in impeccable condition and should be replaced immediately even when a 

small problem is detected.

•  It is recommended to clean the front at regular intervals, from impurities caused by dust, smoke, or 

other particles to ensure that the light is radiated at maximum brightness. For cleaning, disconnect the 

main plug from the socket. Use a soft, clean cloth moistened with a mild detergent. Then carefully wipe 

the part dry. For cleaning other housing parts use only a soft, clean cloth. Never use a liquid, it might 

penetrate the unit and cause damage to it.

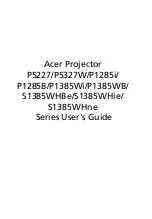
4.2 FUSE REPLACEMENT

1.  Disconnect this product from the power outlet.

2.  Remove the safety cap by a screwdriver.

3.  Replace the blown fuse with a fuse of the exact same type and 

rating.

4.  Install the safety cap, and reconnect power.

4.3 TROUBLESHOOTING

Fuse

Fig.9

Problems

Possible causes

Checks and remedies

Fixture does not light up

• 

No mains supply

• 

Dimmer fader set to 0

• 

All color faders set to 0

• 

Faulty LED

• 

Faulty LED board

• 

Check the power supply voltage

• 

Increase the value of the dimmer channels

• 

Increase the value of the color channels

• 

Replace the LED board

• 

Replace the LED board

General low light intensity

• 

Dirty lens assembly

• 

Misaligned lens assembly

• 

Clean the fixture regularly

• 

Install lens assembly properly

Fixture does not power up

• 

No power

• 

Loose or damaged power cord

• 

Faulty internal power supply

• 

Check for power on power outlet

• 

Check power cord

• 

Replace internal power supply

Fixture does not respond to DMX

• 

Wrong DMX addressing

• 

Damaged DMX cables

• 

Bouncing signals

• 

Check control panel and unit addressing

• 

Check DMX cables

• 

Install terminator as suggested

Contact an authorized service center in case of technical problems or not reported in the table can not be 

resolved by the procedure given in the table.

Summary of Contents for LUMIPAR12UH3

Page 1: ...USER MANUAL MANUALE UTENTE LUMIPAR12UH3 EN IT SUPER SLIM PARLED...

Page 2: ...means for any commercial use In order to improve the quality of products Music Lights S r l reserves the right to modify the characteristics stated in this instruction manual at any time and without...

Page 3: ...3 Functions and settings 3 1 Operation 3 2 Basic 3 3 Menu structure 3 4 Auto show 3 5 Static Color 3 6 Sound Mode 3 7 Manual Color 3 8 Dimmer 3 9 Linking 3 10 DMX configuration 3 11 DMX addressing 3...

Page 4: ...liquids water or metal objects enter the fixture Do not dismantle or modify the fixture All work must always be carried out by qualified technical personnel Contact the nearest sales point for an ins...

Page 5: ...PWM USB port for USB WIFI transreceiver optional Silent operation and HD dimming system 1 2 TECHNICAL SPECIFICATIONS LIGHT SOURCE Source 12x8 W RGBWAP LEDs Luminous flux 2537 lm Lux 963 5 lux 3m Sour...

Page 6: ...240V 50 60Hz Power consumption at 230V 83 W Power consumption at 120V 84 5 W Output at 230V 30 units on a single power line Output at 120V 16 units on a single power line PHYSICAL Cooling natural cool...

Page 7: ...l functions and manage them 6 POWER IN mains plug for connection to a socket 100 240V 50 60Hz via the supplied mains cable The support for the mains fuse is located near the mains plug Only replace a...

Page 8: ...comply scrupulously with all the regulations particularly re garding safety currently in force in the country in which the fixture s being used Install the projector at a suitable location by means of...

Page 9: ...ed to connect the unit to a socket which can be switched on and off via a light switch 3 2 BASIC Access control panel functions using the four panel buttons located directly underneath the LED Display...

Page 10: ...ases via the control panel on the back of the fixture MENU 1 DMX Personality and Starting Address 6 CH d1 d512 Selects DMX personality and DMX starting value 11 CH d1 d512 2 Static Colors C C1 C63 Sel...

Page 11: ...through the buttons UP DOWN Press the button ENTER to confirm Using UP DOWN button select the desired color value 000 255 Press ENTER button to continue to the next color Continue until the desired m...

Page 12: ...cate the operating mode and DMX value The LUMIPAR12UH3 is equipped with 3 pole XLR connections 3 11 DMX ADDRESSING To able to operate the LUMIPAR12UH3 with a light controller adjust the DMX start addr...

Page 13: ...MX output of the first unit Connect the DMX output to the DMX input of the following unit Connect again the output to the input of the following unit until all the units are connected in chain When th...

Page 14: ...cros 000 015 016 255 8 STROBE No Function Strobe slow to fast 000 015 016 255 PROGRAM SPEED Speed slow to fast 000 255 SOUND SENSITIVITY Sound sensistivity OFF Control the sound sensitivity 000 010 01...

Page 15: ...oller 2 Press 3 Press or to either increase or decrease sound sensitivity Manual Color Control To choose a specific color with the controller 1 Press MANUAL on the controller 2 Press any number betwee...

Page 16: ...damage to it 4 2 FUSE REPLACEMENT 1 Disconnect this product from the power outlet 2 Remove the safety cap by a screwdriver 3 Replace the blown fuse with a fuse of the exact same type and rating 4 Ins...

Page 17: ......

Page 18: ...arziale per propri scopi commerciali vietata Al fine di migliorare la qualit dei prodotti la Music Lights S r l si riserva la facolt di modificare in qualunque momento e senza preavviso le specifiche...

Page 19: ...3 1 Funzionamento 3 2 Impostazione base 3 3 Struttura menu 3 4 Autoshow 3 5 Static Color 3 6 Modalit Musicale 3 7 Manual Color 3 8 Funzione dimmer 3 9 Collegamento 3 10 Configurazione canali DMX 3 11...

Page 20: ...ai 45 C Evitare che nell unit penetrino liquidi infiammabili acqua o oggetti metallici Non smontare e non apportare modifiche all unit Tutti gli interventi devono essere sempre e solo effettuati da p...

Page 21: ...postabile Porta USB per il ricetrasmettotore Wi Fi opzionale Operativit silenziosa con HD Dimming 1 2 SPECIFICHE TECNICHE SORGENTE LUMINOSA Sorgente 12x8W RGBWAP LEDs Flusso luminoso 2537lm Lux 963 5l...

Page 22: ...W Potenza assorbita a 120V 84 5W Output a 230V 30 unit connesse in serie Output a 120V 16 unit connesse in serie CARATTERISTICHE FISICHE Raffreddamento proiettore privo di ventole e struttura disegnat...

Page 23: ...DE per il collegamento ad una presa di rete 100 240V 50 60Hz tramite il cavo di rete in dotazione Accanto alla spina si trova il portafusibile Sostituire un fusibile difettoso solo con uno dello stess...

Page 24: ...stabilit sufficiente e supportare almeno 10 volte il peso dell unit Inoltre assicurarsi di rispettare tutte le avvertenze in materia di sicurezza Fissare il proiettore attraverso l apposita staffa 1 a...

Page 25: ...n interruttore 3 2 IMPOSTAZIONE BASE Il LUMIPAR12UH3 dispone di un LED display e 4 pulsanti per accesso alle funzioni del pannello di controllo fig 4 Fig 4 Funzione dei tasti MENU UP DOWN ENTER Per sc...

Page 26: ...ER per salvare l impostazione PremereiltastoMENUpertornareindietrooattenderealcunisecondiperusciredalmenudiimpostazione MENU 1 DMX Personality and Starting Address 6 CH d1 d512 Selects DMX personality...

Page 27: ...indi premere il tasto ENTER Selezionare il colore r g b A W P attraverso il tasto ENTER Utilizzare i tasti UP DOWN per impostare il valore desiderato 000 255 Premere il tasto ENTER per confermare e pa...

Page 28: ...l valore desiderato 001 512 tenere premuto invece il tasto UP DOWN per lo scorrimento veloce Premere il tasto ENTER per confermare l impostazione Premere il tasto MENU per tornare indietro o per uscir...

Page 29: ...rasmettere in modo affidabile i dati di controllo DMX Collegare l uscita DMX del controller con l ingresso DMX della prima unit Collegare quindi l uscita DMX con l ingresso DMX della successiva unit l...

Page 30: ...s 000 015 016 255 8 STROBE No Function Strobe slow to fast 000 015 016 255 PROGRAM SPEED Speed slow to fast 000 255 SOUND SENSITIVITY Sound sensistivity OFF Control the sound sensitivity 000 010 011 2...

Page 31: ...olare la velocit di lampeggio stroboscopico del programma 1 Premere STROBE sul telecomando 2 Premere oppure per aumentare o diminuire la velocit di lampeggio 3 Premere di nuovo STROBE per disattivare...

Page 32: ...le bruciato con uno dello stesso tipo e valore 2 Con un cacciavite rimuovere il portafusibile dalla sua sede e il fusibile bruciato dal suo supporto sostituire il fusibile con uno identico per tipolog...

Page 33: ......

Page 34: ......

Page 35: ......

Page 36: ...2019 Music Lights S r l TRIBE un brand di propriet della Music Lights S r l TRIBE is a brand of Music Lights S r l company MUSIC LIGHTS S r l Phone 39 0771 72190 www musiclights it...

Reviews: