background image

1.  Sun Shield

2.  Front Cover

3.  Zoom and Focus Lever

4.  IR LED

5. Lens

6.  Air Vent

7.  Video Output Interface

8.  Integrated Bracket

9.  Reset Button

10. SD Card Slot

11. Power Interface

12. Network Interface
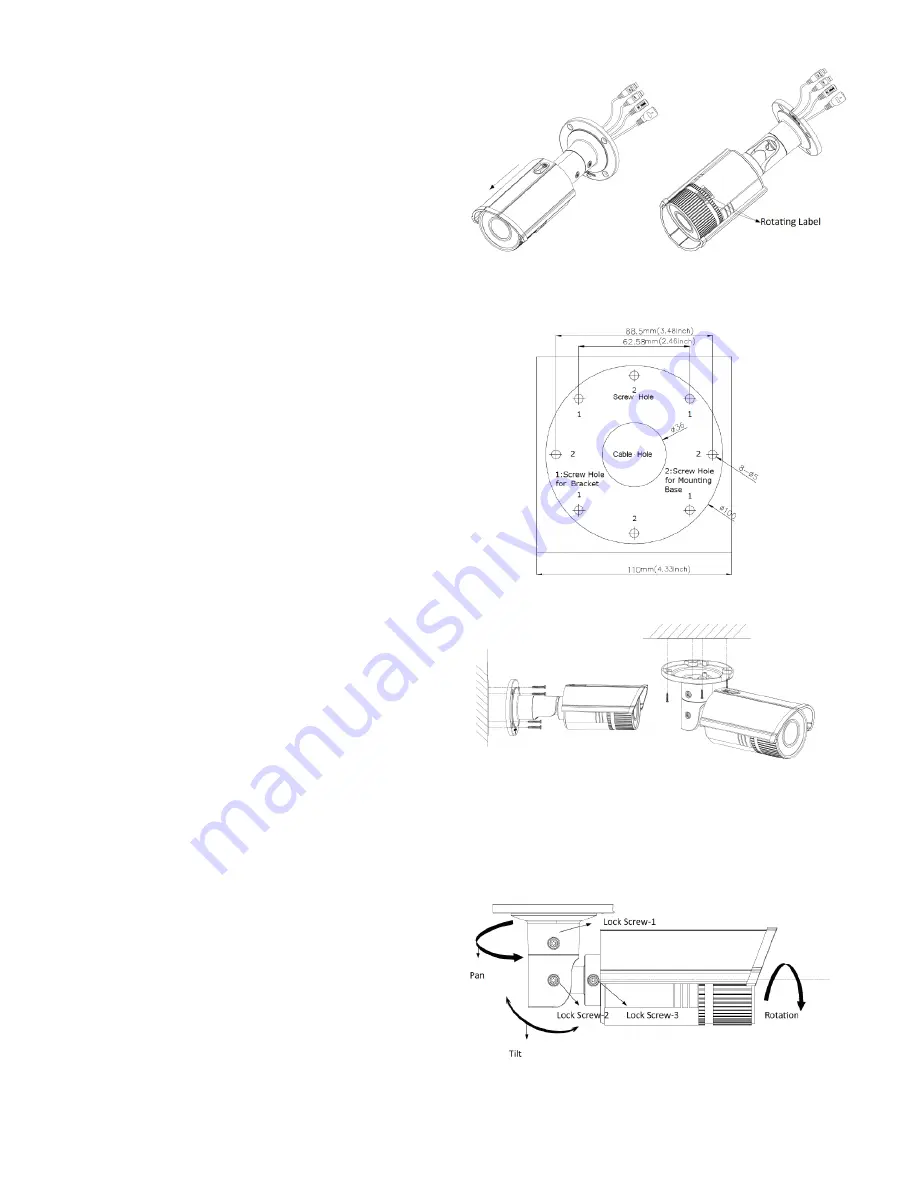
2.   Drill the Holes

1.  Attach the drill template (supplied) to  


the wall where the camera is to be  

 mounted.

2.  Drill screw holes in the wall according  


to the drill template.

3  If you need to route cables through the


wall (or ceiling), cut a cable hole 


according to the drill template.

4  Route the cables of the camera.

5  Secure the camera to the wall (or 


ceiling) with expansion screws. (fig.7)

3.  Viewing Angle Adjustment

Pan Adjustment (See fig.8)

Loosen lock screw-1.Adjust the panning 

position of the camera. The adjusting range 

is from 0 to 360 degrees.Tighten the lock 

screw-1.

Tilt Adjustment (See fig.8)

Loosen lock screw-2. Adjust the tilting 

position of the camera. The adjusting range 

is from 0 to 90 degrees.Tighten the lock 

screw-2.

Rotation Adjustment (See fig.8)

Loosen lock screw-3.Rotate the rotation 

position to adjust the azimuth angle of the 

image. The adjusting range is from 0 to 360 

degrees.Tighten lock screw-3.

For detailed instructions please visit

www.triax.co.uk

Fig. 7

Fig. 8

Fig. 6

Fig. 5

Summary of Contents for TBV IP 301041

Page 1: ...TBV IP 3 0MP Varifocal IR Bullet Network Camera Your ultimate connection Part No 301041 Quick Guide...

Page 2: ...ous voltage within the product enclosure that may be of sufficient magnitude to constitute a risk of electric shock WARNING CAUTION WARNING Precautions Use the appropriate power supply The input power...

Page 3: ...R LED s 30m 100ft Onboard Storage up to 32GB Vandal Proof Audio I O Alarm I O Part No 301041 BACK LIGHT COMPENSATION IP66 WEATHERPROOF HD VIDEO MICRO SD CARD SLOT DUAL STREAM AUTO WHITE BALANCE IR LED...

Page 4: ...n as follows Installation Note Please make sure that the wall is strong enough to withstand three times the weight of the camera Steps 1 SD Card Installation 1 Rotate the sunscreen M3X5 screw anti clo...

Page 5: ...Adjustment Pan Adjustment See fig 8 Loosen lock screw 1 Adjust the panning position of the camera The adjusting range is from 0 to 360 degrees Tighten the lock screw 1 Tilt Adjustment See fig 8 Loose...

Page 6: ...1 G 726 Audio Bit Rate 64Kbps G 711 16Kbps G 726 Image Max Image Res 2048 x 1536 Frame Rate 60Hz 15fps 2048 x 1536 30fps 1920 1080 30fps 1280 x 720 50Hz 12 5fps 2048 x 1536 25fps 1920 1080 25fps 1280...

Page 7: ...DC 12V 10 PoE 802 3af Not Supplied Power Consumption Max 5 5W 7 5W with ICR On IR Distance 30m 100ft Weather Proof Rating IP66 Dimensions 105 x 295 6mm 4 13 x 11 64 Weight 1200g 2 65lb For detailed in...

Page 8: ...TRIAX UK Abergorki Industrial Estate Treorchy RCT CF42 6DL Tel 0845 601 0578 e mail sales triax co uk www triax co uk...

Reviews: