TRIATEK FMS-1655R Installation Manual Download Page 8

SUBHEAD

FMS-1655R

Due to continuous improvement, Triatek reserves the right to change product specifications without notice.

5

 -

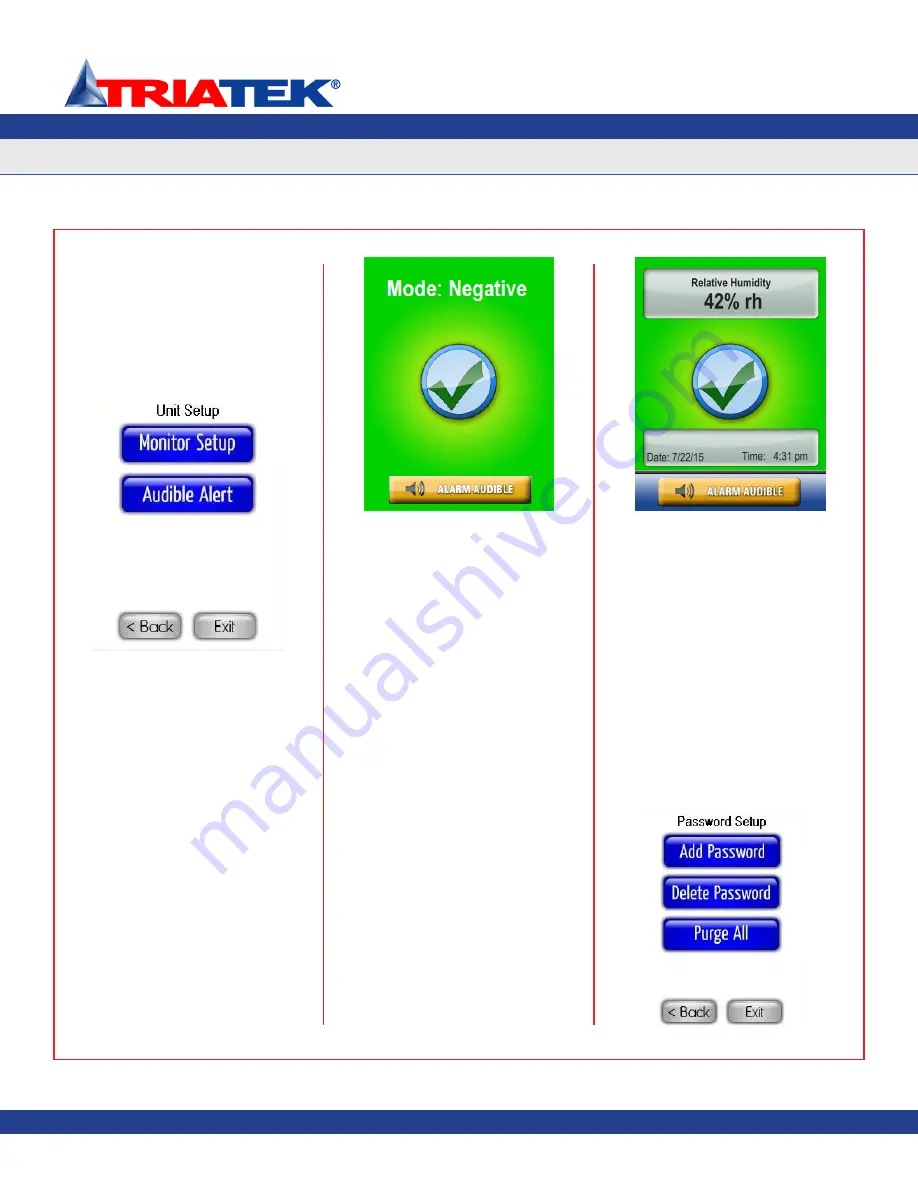
Specifying the Subnetwork Address

To specify the subnetwork address of the 

companion FMS-1655, select the 

Monitor 

Setup

 option on the 

Unit Setup

 menu (see 

Figure 9

). Use the address slider to specify 

the subnetwork address of the companion 

FMS-1655.

   Fig 9. Unit Setup menu

In addition to specifying the subnetwork 

address of the controller to be monitored, the


Viewing Mode

 must also be selected. 

There are two viewing mode options 

available: 

Standard View

 and 

Status-only


View

Standard View

 presents the normal single 

sensor viewing screen with the two simulated 

LCD windows at the top and bottom of the 

display. 

Status-only View

 presents the user 

with a clean view free of numeric values as 

shown in 

Figure 10

.

Fig 10. Status-only View

Selecting the Individual Parameter

The FMS-1655R is capable of monitoring any 

of the six parameters being monitored by the 

companion FMS-1655 controller (

Figure 11 

shows the relative humidity being displayed 

on the FMS-1655R). 

To select the parameter you would like 

displayed on the FMS-1655R, tap the 

displayed parameter in the upper LCD 

window (gray box) on the main display. 

Tapping this field invokes a details screen 

which includes all six of the analog input 

parameters currently being monitored at the 

companion FMS-1655.

To change which parameter is displayed on 

the main screen of the FMS-1655R, select 

the individual parameter on the details screen 

and tap the 

OK

 button. 

Adding Password Security

The FMS-1655R menu system may be 

protected by adding as many as ten user-

specified passwords to the system. 

A password entry may be created by selecting 

the 

Add Password

 option on the 

Password 

Setup

 menu, which is accessible from the 

System Setup

 menu (see 

Figures 12 and 13

). 

The user is prompted to enter a minimum 

of four and up to eight digits. All password 

entries are stored in non-volatile memory, 

and are preserved while the unit is powered 

down. In the event that a password has been 

forgotten, there is a factory-default override 

password that will provide access to the user 

menu system. Please consult with the factory 

for more information regarding this password.

INSTALLATION MANUAL

Triatek reserves the right to change product specifications without notice.

Fig. 11 Standard View

Fig. 12 Password Setup

Summary of Contents for FMS-1655R

Page 1: ...FMS 1655R Installation Manual Programmer s Guide Version 08 14 15 Triatek FMS 1655R Remote Display ...

Page 2: ...riatek Controller 7 Notes 8 PROGRAMMER S GUIDE Introduction 9 Main Setup Menu 9 Unit Setup 10 Configuring Monitor Settings 10 Configuring Audible Alert Settings 10 System Setup 11 Managing System Security Passwords 12 Adding New Passwords 12 Deleting an Existing Password 12 Purging All Passwords 12 Display Setup 12 Configuring the Safety HaloTM 12 Selecting Display Mode 13 Selecting Display Bright...

Page 3: ...User Interface LCDSizeandType 3 2 diagonal transmissive Resolution 240 pixels x 320 pixels portrait mode Viewing Area 50 60 mm x 66 80 mm Color Depth 18 bit or 262K colors Backlight Color White Luminous Intensity min 2500 cd m2 Mechanical Mounting Options Surface Plastic Flush Brushed Stainless MountingDimensions surface mount 3 Wx5 Hx1 13 D Mounting Dimensions flush mount 5 W x 8 H x D Environmen...

Page 4: ...ration of the remote display The display incorporates bright background color changes to indicate up to five different statuses at the companion FMS 1655 Green represents normal status whereby the monitored parameter is within defined normal operating limits Yellow indicates that the monitored parameter has drifted outside of the normal operating limits and is approaching the alarm region Red indi...

Page 5: ... the tabs bent towards you Using the four tabs on the retrofit mounting plate as alignment guides press the mounting plate onto the inside surface of the drywall opening firmly to ensure maximum adhesion 5 The electrical connections must be terminated before installing the stainless steel faceplate of the FMS 1655R Run the 4 conductor dual twisted pair electrical connection from the nearest FMS 16...

Page 6: ...te has been properly installed the electrical connections should be terminated before installing the cover with the display Run the 4 conductor dual twisted pair electrical connection from the nearest controller Refer to the wiring diagram shown on page 7 for details 6 Terminate the interface cable originating from the host controller at the 4 position and 3 position terminal blocks on the back si...

Page 7: ...Figure 8 indicates that the monitored parameter has reached a critical condition and is outside of the allowable limits of the target setpoint This visual indication is supplemented by an audible alarm to indicate that attention is required The FMS 1655R incorporates a full color touchscreen display and with an intuitive menu system that allows the user to quickly setup the remote display for imme...

Page 8: ...To select the parameter you would like displayed on the FMS 1655R tap the displayed parameter in the upper LCD window gray box on the main display Tapping this field invokes a details screen which includes all six of the analog input parameters currently being monitored at the companion FMS 1655 To change which parameter is displayed on the main screen of the FMS 1655R select the individual parame...

Page 9: ...lected may be adjusted either by using the hotspots on the main display or by selecting Display Setup Set Time Date The FMS 1655R is also designed to request time and date settings periodically from the companion FMS 1655 assuming it resides on a network that has a time server available This ensures that the time and date are accurate on the FMS 1655R main display Fig 13 Adding a password Configur...

Page 10: ...riatek reserves the right to change product specifications without notice INSTALLATION MANUAL Wiring FMS 1655R to Nearest Triatek Controller Triatek reserves the right to change product specifications without notice 7 CN7 CN3 NETWK NETWK GND V ...

Page 11: ...R Due to continuous improvement Triatek reserves the right to change product specifications without notice INSTALLATION MANUAL Notes Triatek reserves the right to change product specifications without notice 8 ...

Page 12: ...s automatically time out after 60 seconds This prevents unauthorized access to the user menu system should a unit be inadvertently left unattended at one of the configuration screens Main Setup Menu All of the configuration screens that allow the settings of the FMS 1655R to be configured for a specific application originate from the top level of the user interface menu system the Main Setup Menu ...

Page 13: ...igure 17 with no numeric values and only background color to indicate the current status of the companion FMS 1655 Tapping Finish at the Monitor Setup configuration screen stores that subnetwork address of the companion FMS 1655 and begins the polling process immediately Configuring Audible Alert Settings The Audible Alert option on the Unit Setup menu provides support for configuring the settings...

Page 14: ...ion This critical condition is indicated by a red background and a red exclamation point action icon The Safety Halo status indicator if enabled will flash quickly in red to indicate the Alarm status A blue background indicates that Neutral isolation mode is selected at the companion FMS 1655 This mode is indicated by an action icon represented as a red circle with a line through its center The Sa...

Page 15: ... the display brightness and setting the system time and date Configuring the Safety Halo The Safety Halo option on the Display Setup menus allows you to configure the settings for the Safety Halo bezel including the Nightly Auto Dim feature This feature allows the Safety Halo to automatically reduce its brightness to the specified percentage at the specified Starting Hour and return to normal brig...

Page 16: ...nize its local time and date with the network resident controller it is monitoring thereby allowing the time based features to operate accurately These include the Alarm Buzzer Quiet Period and the Safety HaloTM Auto Dim Period Selecting this option invokes the time configuration screen as shown in Figure 25 The colon between the hours and minutes automatically appears while entering the time Simi...

Page 17: ...bout This FMS Remote Display screen to identify the specific details pertaining to your unit Resetting the FMS 1655R The Reset Monitor option on the Diagnostics menu allows the user to perform a soft reboot of the remote display and completely re initialize the unit This option may be useful during the installation process when changes have been made to the network parameters subnetwork address Se...

Page 18: ... continuous improvement Triatek reserves the right to change product specifications without notice User Menu Flow Diagram Triatek reserves the right to change product specifications without notice 15 PROGRAMMER S GUIDE ...

Page 19: ...ors and more all designed to seamlessly integrate into a facility s building automation system Triatek s customer service is unparalled Our product support system includes on site installatinos phone support repairs calibrations and in depth training sessions From our knowledgable engineers and sales team to our talented field technicians Triatek goes above and beyond to ensure our products are in...

Reviews: