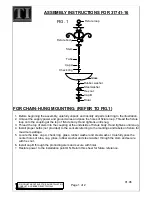

ASSEMBLY INSTRUCTIONS FOR 31741-16
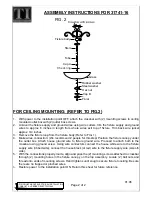
FOR CEILING MOUNTING: (REFER TO FIG.2)
1. With power to the installation point OFF, attach the crossbar with (2) mounting screws to ceiling
mounted outlet box with (2) outlet box screws.
2. Unravel the fixture supply and ground wires using wire cutters, trim the fixture supply and ground
wires to approx. 6 inches in length from where wires exit top of fixture. Trim back wire jacket
approx. 3/4 inches.
3. Remove the fixture loop from the fixture body (Refer to FIG. 1).
4. Make wires connection: (We recommend 2 people for this step) Position the fixture canopy under
the outlet box. Attach house ground wire to fixture ground wire. Proceed to attach both to the
crossbar using ground screw. Using wire connectors connect the house white wire to the fixture
supply wire (ribbed side); connect the house black (or red) wire to the fixture supply wire (smooth
side).
5. With the connections properly made, align and pass the (2) mounting screws attached to crossbar
through (2) mounting holes in the fixture canopy on the top assembly. Locate (2) ball nuts and
thread onto ends of mounting screws. Hand tightens until snug to secure fixture to ceiling. Be sure
there are no trapped or pinched wires.
6.
Restore power to the installation point ON. Retain this sheet for future reference.
01.06
Page 2 of 2
IF IN DOUBT ABOUT ELECTRICAL INSTALLATION,
CONSULT A LICENSED ELECTRICIAN!
FIG. 2
Fixture body
Stem
Tube
Cap A
Check ring
Rubber washer
Hex nut
Steel washer
Cap B
Finial
Glass


