This flue sensor mounting repair kit CAN
ONLY BE USED IN CASES WHERE THE
STAINLESS STEEL FLUE SENSOR
MOUNTING PORT BODY IS NO
LONGER ATTACHED TO THE STAIN-
LESS STEEL FLUE PIPE and where the
replacement of the flue pipe is hindered due
to limited installation clearance.
For Solo 175 and 250 boilers, this flue sen-
sor mounting plug can be used directly on
flue pipes equipped with a light grey colored
combustion test port cap. DO NOT
ATTEMPT TO USE THIS PLUG ON Solo
175 and 250 BOILERS EQUIPPED WITH
A WHITE COLORED COMBUSTION
TEST PORT CAP unless a step bit or self
centering bit is used to drill the sensor port
opening to 5/8”.
Instructions
1. Turn power to unit “OFF” and allow it to cool.
2. Shut off main gas supply to the inlet of the unit
at the main manual gas shutoff valve to the unit.
3. Remove the front door and padlock the electri-
cal shut-off to the unit to prevent accidental
activation. For residential systems, shut off
breaker in electrical panel.
4. Remove sensor wiring from the flue sensor.
5. Using a vise grip, hold the stainless steel flue
sensor mounting port body and unscrew the flue
sensor from the mounting port body with 10
mm or adjustable wrench. Clean off outside of
flue sensor with a damp cloth.
6. Carefully spray a small amount of WD-40 only
on discolored exterior of flue pipe to remove
discoloration. DO NOT EXPOSE BOTTOM
OF HEAT EXCHANGER /FLUE PIPE GAS-
KET TO OIL. Soak for 2 – 3 minutes, then
wipe off with a dry cloth.
7. Lightly sand off the discoloration from the flue
pipe. Repeat cleaning process if necessary.
8. Carefully check sensor mounting port for burrs.
If necessary, debur rough internal edges of sen-
sor mounting port with fine metal file. Make
sure to remove all sharp edges from the flue
pipe.
9. Rinse flue sensor mounting port with water and
carefully wipe any oil residue off flue pipe and
port with clean cloth.
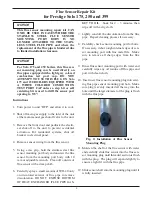
10. Insert new flue sensor mounting plug into exist-
ing flue pipe sensor mounting port hole. Make
sure plug is evenly inserted all the way into the
hole until the larger diameter of the plug is flush
with the flue pipe.
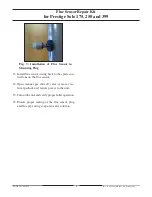
11. Moisten the shaft of the flue sensor with water
and carefully slide flue sensor into the flue sen-
sor mounting plug until threaded section is flush
with the plug. The plug will expand slightly to
ensure a tight fit with the flue pipe.
12. Slide sensor shaft into the mounting plug until it
is fully inserted.
NOTICE
NOTICE
Flue Sensor Repair Kit
for Prestige Solo 175, 250 and 399
2
Fig. 2: Installation of Flue Sensor
Mounting Plug


