

A
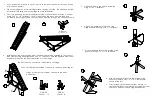
DETAIL A
SCALE 1 : 8
B
C
4b
4c
4a
DETAIL B
SCALE 1 : 10
DETAIL C
SCALE 1 : 8
If you purchased a specialty option, be sure to read ALL relevant instruction packets
1.
prior to any assembly.
Place the stringer on a firm working surface, laying on its side. The back and bottom
2.
assemblies ship fastened to the stringer but are folded flat.
Pivot the back and bottom assemblies until their connection holes align. Connect
3.
using 5/16" x 1-1/2" fasteners. For 6-7 step models, the back is not welded and
includes a back support tube that must also be bolted through the connection hole.
Install support tubes as shown below. Support tubes are connected to the support
4.
tube clamps using hand tightened 5/16" x 1" fasteners. Detailed figures below show
examples of how the support tubes attach to the clamps.
Support tubes 4a connect to the bottom and stringer.
Support tubes 4b (if provided) connect to the back and stringer.
Support tubes 4c (if provided) connect to the back
and bottom.
3
2
Attach casters to the bottom assembly
5.
using 5/16" x 1" fasteners.
Attach the guardrail to the top of the
6.
stringer assembly using 5/16" x 1" fasteners.
Attach the handrails on the outside of the
7.
guardrail using 5/16" x 1-1/2" fasteners.
Attach the handrail posts to the stringer using
8.
handrail clamps and 5/16" x 1-3/4" fasteners as
shown at the left.
Prior to standing the ladder upright, be sure to
9.
tighten all fasteners completely, including any that
may have been only hand-tightened earlier.
4
5
6
7
8


