11
limiting the use of detergents. In this case, rinse the part
profusely. Do not immerse the motor unit in water or
other liquids; clean it with a damp cloth.
Caution: blades are very sharp; pay attention not to
cut yourself while removing the attachment or during
cleaning operations.
DESCRIPTION G20006
1) Motor Block
2) Work bowl
3) Blade group
4) Lid
6) ON/OFF switch
OPERATION
(Fig. B - C - D)
• Fasten the work bowl (2) to the motor block (1) (fig. B).
• Secure the blade group (3) to the rotating pin (1a), making sure it clips into place (fig. B).
Blades (3) are sharp, handle them with the utmost care. Put the food in the work bowl (2) (making sure to
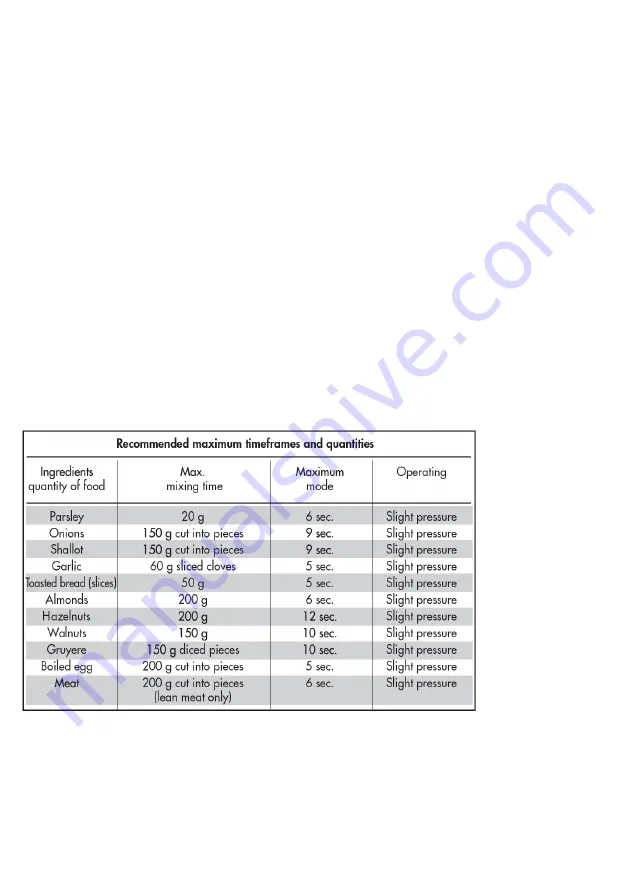
comply with the quantities reported in the “quantities and timeframes” table).
Pour thinly sliced pieces of food in the work bowl (2).
• Place the lid (4) over the motor block (1) (fig. C).
• Connect the plug to the power socket.
• Turn appliance ON by exerting a slight pressure on the lid (4) with the palm of your hand (fig. C).
If the appliance fails to start once this operation is concluded, ascertain that possible pieces of food are not
stuck between the lid (4) and the edge of the work bowl (2), thus preventing lid (4) from sliding in.
• To stop the appliance, just release the lid (4). Locking latches have been supplied to stop the blade group (3)
almost immediately. Wait until the blades come to a complete standstill before removing lid (4).
• To retrieve the blade group (3), press the central switch (3a) and lift the work bowl (2) simultaneously (fig.
D). Before pulling out the lid (4), ALWAYS disconnect the plug from the power socket.
Useful tips
• Blending results depend on how long the appliance has been running.
• To obtain tiny and consistently chopped ingredients, exert a slight pressure on the lid and remove, if need
be, any piece of food reclined against the work bowl wall, using a spatula to bring it back to the centre.
• If chopping consistency tend to diminish after a long period of operation, replace the blade.


