background image

TER-8/1200 
4668
 

“EGA Spółka z o.o.” Spółka Komandytowa ul. Rzeczna 1, Nowa Wieś Rzeczna                                                                                                                       

83-200 Starogard 

Gdański tel/fax:+48 58 56 300 80 

www.ega.com.pl


23 


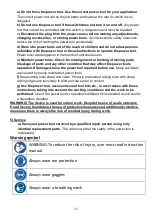
Waer protective gloves 


In  accordance  with  essential  applicable  safety  standards  of 

European directives 


EAC - compliance certificate Customs Union 


Class II product 


Additional safety instructions 

1.Never drape the power cable over the machine bench! 

2.Wear  protective  clothing. Wear  full  face  protection,  eye  protection  or  safety  goggles,  in 
accordance  with  the  job  at  hand.  Where  appropriate,  wear  a  dust  mask,  ear  defenders, 
protective gloves or special aprons that keep grinding and material particles away from you. 
Protect your eyes from the foreign bodies that fly off during certain applications.   
Dust  or  breathing  masks  must  be  used  to  filter  particles  generated  by  the  application. 
Hearing loss can be caused by exposure to high intensity noise. 

3.Always wear a dust mask and safety goggles. Contact with or breathing in noxious / toxic 
dust produced  by  grinding metal  that is  finished  with  lead paint can  be dangerous  for  the 
user and surrounding people. 

4.This power tool must not be used for wet grinding.Use for dry grinding only. Coolant can 
weaken the bonding strength of the wheel and cause it to fail. 

5.This bench grinder should only be used when stationary. Secure to a solid, even surface. 

6.Do not use any accessories that have not been especially designed and recommended 
for this power tool by the manufacturer. Simply because an accessory can be connected to 
your power tool does notguarantee it can be used safely. 

7.Only  use  grinding  disks  whose  diameter,  thickness  and  intended  use  meet  the 
requirements  of  this  power  tool.  Incorrectly  sized  grinding  disks  may  not  be  sufficiently 
screened or controllable. Use of unsuitable grinding disks can result in danger to the user or 
damage to the power tool. 

8.Do not use grinding disks that are damaged or misshapen.   

9.Only use manufacturer-recommended grinding disks that are rated with a spin speed that 
is equal to or over that listed as the power tool‘s rated speed on the product label. 

Summary of Contents for 4673

Page 1: ...SZLIFIERKA STOŁOWA 350W BENCH GRINDER 350W TBG 200 350 Oryginalna Instrukcja Obsługi Instruction Manual nr kat 4673 ...

Page 2: ...ędzie jest używane UWAGA Nie wolno używać elektronarzędzia niezgodnie z jego przeznaczeniem Ogólne zasady bezpieczeństwa Ostrzeżenie Należy przeczytać i zrozumieć wszystkie zalecenia Nieprzestrzeganie poniższych zaleceń może spowodować porażeniem prądem pożar i lub ciężkie obrażenia ciała Niniejszą instrukcję należy zachować Termin elektronarzędzie w ostrzeżeniach odnosi się do elektronarzędzia za...

Page 3: ...ody zwiększają ryzyko porażenia prądem e Podczas pracy elektronarzędziem na zewnątrz należy użyć przedłużacza przystosowanego do użytku na zewnątrz Użycie sznurka nadającego się do użytku na zewnątrz zmniejsza ryzyko porażenia prądem f Jeśli nie można uniknąć używania elektronarzędzia w wilgotnym miejscu należy zastosować zasilanie zabezpieczone prądem różnicowoprądowym RCD Użycie RCD zmniejsza ry...

Page 4: ...no forsować narzędzia Do pracy należy używać elektronarzędzia które jest do tego przeznaczone Odpowiednio dobranym elektronarzędziem pracuje się lepiej i bezpieczniej w danym zakresie wydajności b Nie należy używać elektronarzędzia którego włącznik jest uszkodzony Elektronarzędzie którego nie można włączyć lub wyłączyć jest niebezpieczne i musi być naprawione c Przed regulacją urządzenia wymianą o...

Page 5: ...enia stosowania środków zabezpieczających i dodatkowych środków ochronnych zawsze istnieje ryzyko szczątkowe doznania urazów podczas pracy 5 Serwis Czynności serwisowo naprawcze mogą wykonywać jedynie wykwalifikowani technicy Czynności naprawcze lub konserwacyjne wykonane przez niewykwalifikowaną osobę mogą przyczynić się do ryzyka powstania obrażeń ciała 6 Symbole Przeczytaj instrukcję obsługi Na...

Page 6: ...wać na płaskiej wytrzymałej płaszczyźnie 6 Nie wolno stosować akcesoriów które nie zostały przewidziane lub polecone przez producenta specjalnie dla tego urządzenia Tylko prawidłowe przymocowanie akcesoriów gwarantuje bezpieczne użytkowanie urządzenia 7 Należy używać tylko tarcz szlifierskich których średnica grubość i zakres zastosowania odpowiadają wymogom tego elektronarzędzia Źle wymierzone ta...

Page 7: ...oże w obracające się narzędzie 16 Podczas przenoszenia elektronarzędzia musi być ono wyłączone Przez przypadkowy kontakt Państwa ubranie może zostać uchwycone przez obracające się narzędzie które przeciąć może Państwa ciało 17 Regularnie czyścić otwory wentylacyjne elektronarzędzia Dmuchawa silnika przyciąga pył do obudowy a duże skupienie metalowego pyłu spowodować może zagrożenie elektryczne 18 ...

Page 8: ...odpórka pod obrabiany przedmiot 3 Tarcza szlifierska gruboziarnista 4 Szybka 5 Osłona przeciwiskrowa 6 Pokrywa ochronna 7 Tarcza szlifierska drobnoziarnista 8 Kołnierz mocujący 9 Otwór mocowania do stołu 10 Zestaw mocowania szybki a Śruba b Pierścień sprężynujący c Podkładka d Nakrętka e Podkładka zębata 11 Zestaw mocowania podpórki a Śruba zamkowa b Nakrętka ustalająca c Podkładka Montaż Przed mo...

Page 9: ...montażu należy zwrócić uwagę na wystarczającą ilość miejsca do pracy przy szlifierce np do swobodnego poruszania rękoma Wskazówka Cztery gumowe stopki pod urządzeniem mogą służyć do tłumienia hałasów 1 Najpierw należy wywiercić cztery otwory Stopkę urządzenia 9 można użyć jako szablon do zaznaczenia miejsca wiercenia Szlifierkę podwójną należy ustawić na żądanej pozycji i przez otwory w stopce zaz...

Page 10: ... 10c 3 Śrubę 10a włożyć przez szczelinę osłony 5 i otwór w górnej części pokrywy ochronnej 6 Fot 2 4 Śrubę 10a zabezpieczyć przy pomocy podkładki zębatej 10e i nakrętki 10d Fot 2 5 Kroki od 1 do 4 należy powtórzyć przy montażu drugiej szybki Montowanie podpórki pod obrabiany przedmiot Przed użyciem po obu stronach szlifierki należy zamontować podpórkę pod obrabiany przedmiot 2 W tym celu należy uż...

Page 11: ... i dopuszczalnej prędkości obrotowej w min 1 względnie prędkości obwodowej w m s odpowiadają danym przedstawionym przez producenta 2 Prosimy pamiętać że maks prędkość obrotowa tarczy musi być większa od maks prędkości obrotowej elektronarzędzia 3 Tarcze szlifierskie należy przechowywać w suchym miejscu w możliwie stałej temperaturze 4 Należy się upewnić że wymiary tarcz szlifierskich pasują do tej...

Page 12: ...wy 8 Fot 4 Wskazówka Śruby podkładki nakrętki itp należy starannie odłożyć na bok aby mieć pewność że żadne części nie zginą i aby po przymocowaniu nowej tarczy szlifierskiej były one łatwo dostępne 3 Zużytą tarczę szlifierską ściągnąć z wrzeciona 4 Na wrzeciono nałożyć nową tarczę szlifierską Należy się upewnić że tarcza szlifierska nie jest uszkodzona i spełnia wymagi techniczne szlifierki podwó...

Page 13: ...rzeżenie Nie wolno używać zniekształconych lub uszkodzonych tarcz szlifierskich których wady są odczuwalne poprzez wibracje Uruchomienie 1 Elektronarzędzie przewód wtyczkę i akcesoria sprawdzić pod względem uszkodzeń 2 Elektronarzędzia nie wolno w żadnym razie uruchamiać jeżeli posiada ono widoczne uszkodzenia 3 Zawsze należy nosić odpowiednią odzież i wyposażenie ochronne 4 Należy się upewnić że ...

Page 14: ...tarcz szlifierskich 3 i 7 Ze względu na to że po pewnym czasie tarcze szlifierskie zużywają się odstępy należy regularnie sprawdzać i jeżeli to konieczne regulować Nie wolno przekraczać następujących odstępów Podpórka tarcza maks 2 mm Osłona przeciwiskrowa tarcza maks 2 mm Szybka z osłona przeciwiskrową 1 W celu nastawienia poluzować nakrętkę 10a 2 Wedle potrzeby osłonę przeciwiskrową 5 można prze...

Page 15: ... zdejmować plastikowej pokrywy 1 Szlifierka stołowa podwójna włącza się przez przełączenie wł wyłącznika 1 na pozycję I 2 Szlifierkę pozostawić na parę sekund włączoną na biegu jałowym aż tarcze szlifierskie 3 i 7 osiągną swoją pełną prędkość 3 W celu wyłączenia wł wyłącznik 1 ustawić na pozycji 0 Szlifowanie Ostrzenie 1 Jeżeli to możliwe nożyce należy rozdzielić W ten sposób można łatwiej i bezpi...

Page 16: ...bierać osobno i oddać do punktu zbiórki surowców wtórnych Recykling jako alternatywa wobec obowiązku zwrotu urządzenia Alternatywnie do obowiązku zwrotu urządzenia elektrycznego po zakończeniu jego użytkowania właściciel jest zobowiązany do współuczestnictwa w jego prawidłowej utylizacji Wycofane z eksploatacji urządzenie można oddać również do punktu zbiórki surowców wtórnych który przeprowadzi u...

Page 17: ... 30 UE EMC z dnia 26 lutego 2014 roku w sprawie harmonizacji ustawodawstw państw członkowskich odnoszących się do kompatybilności elektromagnetycznej Dz Urz UE L 96 79 z 31 12 2004 dyrektywą Parlamentu Europejskiego i Rady 2011 65 UE ROHS z dnia 8 czerwca 2011 roku w sprawie ograniczenia stosowania niektórych niebezpiecznych substancji w sprzęcie elektrycznym i elektronicznym Dz Urz UE L 174 88 z ...

Page 18: ...AWY DATA NAPRAWY DATA ZGŁOSZENIA ZAKRES NAPRAWY DATA NAPRAWY PIECZĄTKA I PODPIS PIECZĄTKA I PODPIS DATA ZGŁOSZENIA ZAKRES NAPRAWY DATA NAPRAWY DATA ZGŁOSZENIA ZAKRES NAPRAWY DATA NAPRAWY PIECZĄTKA I PODPIS PIECZĄTKA I PODPIS DATA ZGŁOSZENIA ZAKRES NAPRAWY DATA NAPRAWY DATA ZGŁOSZENIA ZAKRES NAPRAWY DATA NAPRAWY PIECZĄTKA I PODPIS PIECZĄTKA I PODPIS ...

Page 19: ...y poinformuje klienta o warunkach dalszej gwarancji Klient w ciągu 21 dni od daty otrzymania pisma powinien ustosunkować się do przesłanego pisma Naprawa towaru zostaje wydłużona o czas dostarczenia wszystkich dokumentów do serwisu 12 W sytuacji gdy klient nie posiada wszystkich dokumentów powinien poinformować serwis o podjętej przez siebie decyzji w sprawie naprawy urządzenia oraz podać w formie...

Page 20: ...arnings and instructions may result in electric shock fire and or serious injury Save all warnings and instructions for future reference In warnings provided herein the expression power tool means a power tool powered from the mains with a power cord or a battery powered power tool cordless 1 Work area a Keep work area clean and well lit Cluttered and dark areas invite accidents b Do not operate p...

Page 21: ...ence of drugs alcohol or medication A moment of inattention while operating power tools may result in serious personal injury b Use safety equipment Always wear eye protection Protective equipment such as dust mask non skid safety shoes hard hat or hearing protection used for appropriate conditions will reduce personal injuries c Prevent unintentional starting Ensure the switch is in the off posit...

Page 22: ...er tools operation If damaged have the power tool repaired before use Many accidents are caused by poorly maintained power tools f Keep cutting tools sharp and clean Properly maintained cutting tools with sharp cutting edges are less likely to bind and are easier to control g Use the power tool accessories and tool bits etc in accordance with these instructions taking into account the working cond...

Page 23: ...ct with or breathing in noxious toxic dust produced by grinding metal that is finished with lead paint can be dangerous for the user and surrounding people 4 This power tool must not be used for wet grinding Use for dry grinding only Coolant can weaken the bonding strength of the wheel and cause it to fail 5 This bench grinder should only be used when stationary Secure to a solid even surface 6 Do...

Page 24: ...power cable can be severed or tangled and your hands or arms may get caught in the spinning tool attachment 16 Do not leave the power tool running when you are not using it Your clothing can become entangled when it comes into contact with the spinning tool attachment causing the tool attachment to drill into your body 17 Clean the power tool s air vents regularly The motor s fan draws dust into t...

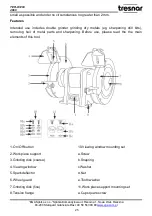
Page 25: ...es double grinder grinding dry metals eg sharpening drill bits removing hail of metal parts and sharpening Before use please read the the main elements of this tool 1 On Off button 2 Work piece support 3 Grinding disk coarse 4 Viewing window 5 Spark deflector 6 Wheel guard 7 Grinding disk fine 8 Tension flange 10 Viewing window mounting set a Screw b Snapring c Washer d Nut e Tooth washer 11 Work ...

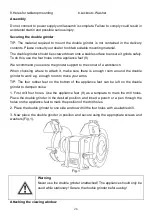
Page 26: ...attach it make sure there is enough room around the double grinder to work e g enough room to move your arms TIP The four rubber feet on the bottom of the appliance feet can be left on the double grinder to dampen noise 1 First drill four holes Use the appliance feet 9 as a template to mark the drill holes Place the double grinder in the desired position and insert a punch or a pen through the hol...

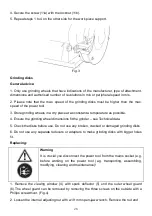
Page 27: ...a washer 10c on the screw 10a 3 Thread a screw 10a through the spark deflector slit 5 and the hole on the top of the wheel guard 6 Fig 2 4 Secure the screw 10a with a tooth washer 10e and nut 10d Fig 2 5 Repeats steps 1 to 4 for the two viewing windows Mounting the work piece support The work piece support 2 must be attached on both sides of the double grinder before use Use the mounting set 11 to...

Page 28: ... 4 Ensure the grinding wheel dimensions fit the grinder see Technical data 5 Check the disks before use Do not use any broken cracked or damaged grinding disks 6 Do not use any separate reducers or adapters to make grinding disks with bigger holes fit Replacing Warning It is crucial you disconnect the power tool from the mains socket e g before working on the power tool e g transporting assembling...

Page 29: ...new grinding disk on the spindle Before doing so ensure that the grinding disk is undamaged and that it meets the technical requirements of this double grinder Carry out a sound test Faultless grinding wheels will make a clear sound when struck gently with a plastic hammer or piece of wood Fig 5 5 Put the tension flange 8 back on the spindle and secure with the adjusting nut 5 6 Re attach the whee...

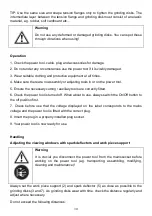
Page 30: ...ls are correctly fitted 6 Check the power tool is turned off When about to use always switch the On Off button to the off position first 7 Check before use that the voltage displayed on the label corresponds to the mains voltage and the power tool is fitted with the correct plug 8 Insert the plug in a properly installed plug socket 9 Your power tool is now ready for use Handling Adjusting the view...

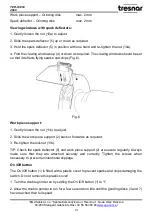
Page 31: ...it deflects flying sparks and chips Fig 6 Fig 6 Work piece support 1 Gently loosen the nut 11b to adjust 2 Slide the work piece support 2 back or forwards as required 3 Re tighten the locknut 11b TIP Check the spark deflector 5 and work piece support 2 are secure regularly Always make sure that they are attached securely and correctly Tighten the screws when necessary to prevent unintentional slip...

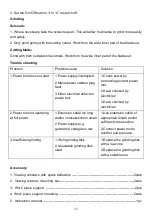
Page 32: ...ower tool 1 Check power by connecting another power tool 2 Have checked by electrician 3 Have checked by electrician 2 Power tool not operating at full power 1 Extension cable too long and or crosssectiontoo small 2 Power supply e g generator voltage too low 1 Use extension cable of appropriate length and or sufficient cross section 2 Connect power tool to another power source 3 Insufficient grind...

Page 33: ...This icon shows that WEEE should not be collected with household waste but separately We recommend you to consider the following Materials and components used when manufacturing this item are high quality materials which can bereused and recycled Do not throw away the item with household waste at the end of life Take the item to a collecting point where it will be collected for free Please contact...

Page 34: ......

Page 35: ...TBG 200 350 4673 ...

Reviews: