background image

8

3. Windows is unable to recognize my hardware. What should I do?

1. Make sure your computer meets the minimum requirements as specified in Section 1 of this 

quick installation guide.

2.  You must complete the installation 

installation of the TRENDnet Wireless Utility (as described in 

Section 2) before connecting the Wireless USB Adapter to your computer.

3. Connect the Wireless USB Adapter to a different USB port on your computer.
4. 

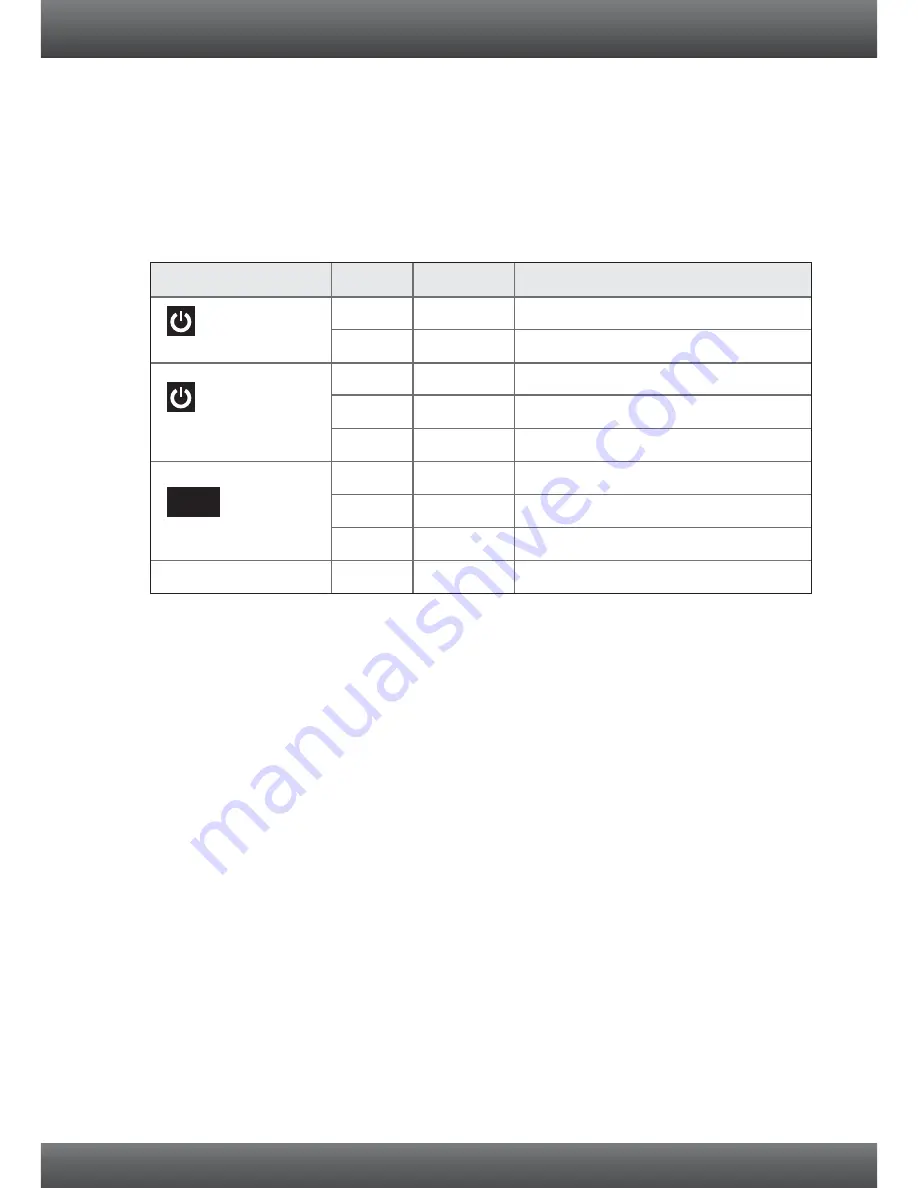
Verify the USB Adapter's LEDs are working properly.  Please see the table below:

4. I cannot open the 

TRENDnet Wireless Utility

. What should I do?

Access your device manager to make sure the adapter is installed properly.
1.

To access the device manager on Windows 7, click on the Windows icon on the bottom left-hand 
corner, click 

Computer

, click 

System Properties

 and then click 

Device Manager

.

2.

To access the device manager on Windows Vista, right-click 

Computer

, click 

Properties

 and 

then click 

Device Manager

.

3.

To access the device manager on Windows XP, right-click 

My Computer

, click 

Properties

, click 

the 

Hardware

 tab, and then click 

Device Manager

.  

If you see a networking device with a yellow question mark or exclamation point:

1. Uninstall the device from device manager
2. Remove the adapter from the computer
3. Click the Windows / Start icon, click All Programs, click TRENDnet and then click Uninstall.
4. Reinstall the adapter.  See Section 2.

 How to Install

.

If you still encounter problems or have any questions regarding the 

TEW-684UB,

 please refer to the 

User's Guide included on the Utility & User’s Guide CD-ROM or contact TRENDnet's Technical Support 
Department. 

LED/Button

Color

Sequence

Definition

Power

Wireless Link/Act LED

WPS LED

WPS Button

Green

Green

N/A

N/A

N/A

N/A

Green

Green

Green

On

Blinking

Blinking

Device is on

Off

Off

Off

Device is off

On

On

N/A

Wireless LAN is on or enabled

Wireless data transmission

Wireless LAN is off or disabled

WPS authentication process is complete

WPA authentication prociess is ongoing

WPS is not activated or disabled

Hold 3 seconds to activate WPS

WPS

Summary of Contents for TEW-684UB -

Page 1: ...Quick Installation Guide TEW 684UB 1 01 ...

Page 2: ...Table of Contents Version 03 30 2011 English 1 1 Before You Start 2 How to Install 2 3 Using the Wireless Adapter 5 1 Troubleshooting 7 Wireless Tips 8 ...

Page 3: ...Ÿ Ÿ CD ROM Utility and User s Guide Ÿ Multi Language Quick Installation Guide Ÿ USB cable 100 cm 3 28 ft TEW 684UB System Requirements 1 Supported Operating Systems CPU Memory Windows 7 32 64 bit Windows Vista 32 64 bit Windows XP 1GHz or above 800MHz or above 300MHz or above 1GB RAM or above 512MB RAM or above 256MB RAM or above Software Utility Requirements ...

Page 4: ...e Important DO NOT install the TEW 684UB in the computer until instructed to do so 2 Click Run Autorun exe Windows 7 Vista only 4 Click I accept the terms of the license agreement and then click Next 5 Select Install driver and TRENDnet WLAN utility and then click Next 3 Click Install Utility ...

Page 5: ...3 6 Select TRENDnet Configuration Tool and then click Next Windows XP 7 Click Install 8 Click Finish 9 With the provided USB cable connect the Micro B end of the USB cable into the TEW 684UB ...

Page 6: ...r 11 The computer will automatically detect and install the drivers Your installation is now complete For detailed information regarding the TEW 684UB configuration and advanced settings please refer to User s Guide included on the Utility Driver CD ROM or TRENDnet s website at http www trendnet com ...

Page 7: ... the Show hidden icons arrow 2 Click the Site Survey icon 3 Select a SSID and then click the connect icon The SSID is the wireless network name of your wireless network e g wireless router or access point 4 If Encryption is enabled on your wireless network e g access point or wireless router the correct Authentication and Encryption type should be selected Click the Next icon ...

Page 8: ...Online at www trendnet com register Thank you for choosing TRENDnet For detailed information regarding the TEW 684UB configuration and advanced settings please refer to User s Guide included on the Utility CD ROM or TRENDnet s website at http www trendnet com 5 Enter the Preshared Key wireless network password and then click the Next icon to save the wireless settings ...

Page 9: ...lick Start click Run and type D Autorun exe where D in D Autorun exe is the letter assigned to your CD ROM Drive and then press the ENTER key on your keyboard 2 I completed all the steps in the quick installation guide but my Wireless USB Adapter is not connecting to my wireless network e g wireless router or access point What should I do Verify that the SSID Network Name matches your wireless rou...

Page 10: ...n click Device Manager 3 To access the device manager on Windows XP right click My Computer click Properties click the Hardware tab and then click Device Manager If you see a networking device with a yellow question mark or exclamation point 1 Uninstall the device from device manager 2 Remove the adapter from the computer 3 Click the Windows Start icon click All Programs click TRENDnet and then cl...

Page 11: ...ing or enclosures Avoid stacking hardware on top of each other to prevent overheating issues Maintain enough free space around the hardware for good ventilation and airflow There should also be plenty of free space around the antennas to allow the wireless signal to propagate There are a number of other environmental factors that can impact the range of wireless devices 1 Adjust your wireless devi...

Page 12: ...pact your signal Position your wireless devices away from anything that generates RF noise such as microwaves HAM radios Walkie Talkies and baby monitors 6 Any device operating on the 2 4GHz frequency will cause interference Devices such as 2 4GHz cordless phones or other wireless remotes operating on the 2 4GHz frequency can potentially drop the wireless signal Although the phone may not be in us...

Page 13: ......

Page 14: ......

Page 15: ...Copyright 2011 All Rights Reserved TRENDnet ...

Reviews: