background image

Tx Rate:

 The factory setting is set to 22 Mbps; however, 

Tx Rate 

settings are 

automatically determined by the TEW-301PC depending on the

Channel:

 Displays the radio channel information. By default, the channel is set to 1.

Radio On/Off: 

When necessary, click on this button to turn off the wireless radio 

signal. Click on Radio On to enable the wireless signal transmission. 

Link Quality / Signal Strength:

 Displays the Link Quality for the TEW-301PC 

wireless connection to the Access Point. The Signal Strength represents the 
wireless signal between the Access Point and the TEW-301PC. The percentage 
coincides with the graphical bar.

Data Rate:

 Displays the statistics of data transmitted and received.

 distance and the Tx 

Rate of the access point.

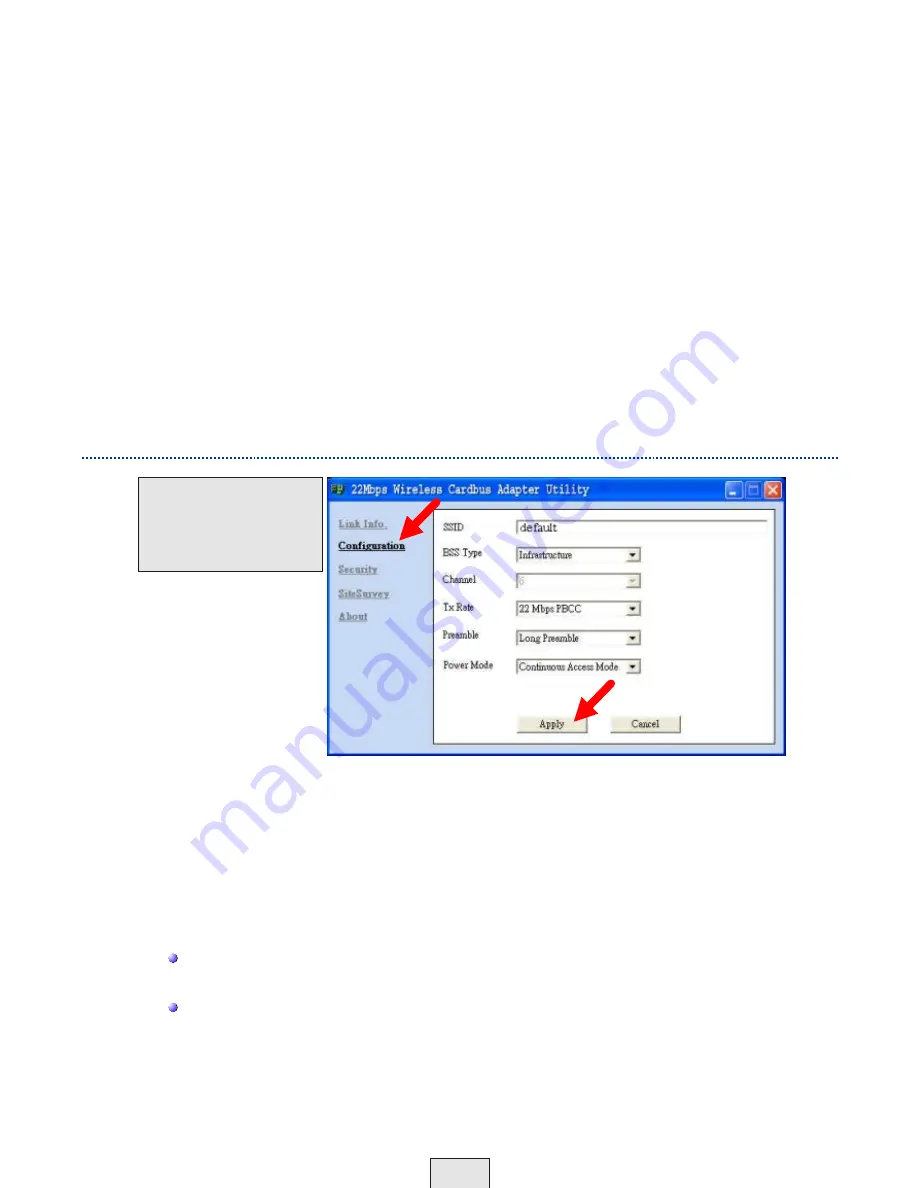
To communicate on the network all devices must have the same settings 
for the following properties:

SSID - 

(Service Set Identifier) is a name that identifies a wireless network.   Access 

Points and wireless clients attempting to connect to a specific WLAN (Wireless 
Local Area Network) must use the same SSID.  The default setting is 

default

.

BSS Type -

 Click on the pull-down menu; select from the following options:   

Infrastructure -

 connecting the WLAN using an Access Point (The 

default


setting.)  

Ad-Hoc - 

wireless mode used when connecting directly to computer 

equipped with a wireless adapter in a peer-to-peer environment.

Channel - 

The 

default

 channel setting is channel 1.  However, the TEW-30

1PC

will automatically select the channel to match the channel setting for the selected 
Access Point. In Ad-Hoc mode, the channel must be manually set to the same 
channel for each wireless adapter.

Configuration Utility - Configuration

17

Fig. 6.4

This Configuration 
Screen displays the 
default settings for 
the TEW-301PC.

Summary of Contents for TEW-301PC

Page 1: ...TEW 301PC 2 4 GHz Wireless LAN CardBus Network Adapter User s Guide Rev 050302 ...

Page 2: ...Introduction 3 Wireless Basics 4 Getting Started 5 Installing the TEW 301PC 6 Using the Configuration Utility 7 Troubleshooting 8 Networking Basics 9 Technical Specifications 10 Contacting Technical Support 3 4 6 9 12 16 21 25 44 46 ...

Page 3: ...ms are missing please contact your reseller A computer with an available 32 bit CardBus PC Card slot Windows XP Windows 2000 Windows Me or Windows 98 CardBus Controller properly installed and working At least 32 MB of memory and a 300 MHz processor recommended An 802 11bAccess Point or another 802 11b wireless adapter Not required for driver and utility installation System Requirements Contents 3 ...

Page 4: ...have the ability to share information and resources such as files and printers and take full advantage of a connected environment for work or play The TEW 301PC includes software drivers for the most popular Microsoft Windows operating systems Windows XP Windows 2000 Windows Me Windows 98 and can be integrated into a larger network running in either Ad Hoc mode without an Access Point or Infrastru...

Page 5: ...unication in ad hoc mode Built in dual diversity antenna for reduced interference in a multi path environment 32 bit CardBus Performance User friendly configuration and diagnostic utilities LED Indicators LED stands for Light Emitting Diode The TEW 301PC has two LED 1 Power Orange LED lights on steady to indicate a proper connection to a power source 2 Link Green LED flashes to indicate activity o...

Page 6: ...ter cards used on laptop and desktop systems support the same protocols as Ethernet adapter cards For most users there is no noticeable functional difference between a wired Ethernet desktop computer and a wireless computer equipped with a wireless adapter other than the added benefit of the ability to roam within a wireless cell Under many circumstances it may be desirable for mobile network devi...

Page 7: ...tFlash Network Adapter TEW 302CF 2 4GHz Wireless LAN PCI Adapter TEW 303PI 2 4GHz Wireless LAN USB Network Adapter TEW 304UB Wireless Access Point Wireless Bridge TEW 310APB Wireless Internet Router Access Point TEW 311BRP Standards Based Technology The IEEE802 11b standard based technology assures that the TRENDware Products are interoperable with existing compatible 2 4GHz wireless technology Th...

Page 8: ...tion 3 Building Materials make a difference A solid metal door or aluminum studs may have a negative effect on range Try to position Access Points and computers with wireless adapters so that the signal passes through drywall or open doorways and not other materials 4 Make sure that the device s antenna is positioned for best reception by using the software signal strength tools included with your...

Page 9: ...twork contains an Access Point The Infrastructure Network example shown on the following page contains the following TRENDware network devices A wireless Internet Router Access Point DHCP enabled TEW 311BRP A laptop computer with a wireless network adapter TEW 301PC A desktop computer with an Ethernet adapter TEW 303PI A xDSL Cable modem for accessing Internet access DHCP stands for Dynamic Host C...

Page 10: ...l the drivers for the wireless network adapter such as the TRENDware TEW 301PC into the computer See the Quick Installation Guide included with the TEW 301PC Please refer to the following sections of this manual for additional information about setting up a network Networking Basics learn how to check your IP Address share printers and files Using the Configuration Utility learn the settings you m...

Page 11: ...ox below When assigning IP Addresses to the computers on the network please remember that the IP Address for each computer must be in the same IP Address range as all the computers in the network and the subnet mask must be exactly the same for all the computers in the network For example If the first computer is assigned an IP Address of 192 168 0 2 with a Subnet Mask of 255 255 255 0 then the se...

Page 12: ...ing screen shots are taken from Windows XP Windows 2000 Me and 98 will have a similar screenshots for installing the drivers Turn on the laptop computer Insert the TRENDware TEW 301PC Driver CD into the CD ROM Drive the CD ROM will autorun and display a menu screen Click on the device Model Name and then click on Install on the installation screen If the CD Autorun function on your computer does n...

Page 13: ...Click Next Click Next Click Finish Click No I will restart my computer later 13 Fig 5 2 1 Fig 5 2 2 Fig 5 2 3 ...

Page 14: ...Click Next and then For Windows XP Fig 5 2 5 may appear after the computer restarts Click Continue Anyway to finalize the installation This device has been successfully tested to work on Windows XP as well as Windows 2000 Windows Me and Windows 98 Microsoft certification is pending For Windows 2000 Fig 5 2 6 may Appear after the laptop computer restarts Select Yes to finalize the installation 14 F...

Page 15: ...estarts it will ask you to reboot the computer once more to finalize the driver installation Select Yes to finalize the installation YOU HAVE COMPLETED THE INSTALLATION OF THE DRIVERS SEE NETWORKING BASICS IN THIS MANUAL FOR INFORMATION ON SETTING UP YOUR NETWORK 15 Fig 5 2 7 Fig 5 2 8 ...

Page 16: ... on the right After double clicking on the icon Fig 6 1 the 22M WLAN Adapter Utility window will appear If the utility icon does not appear on the Taskbar double click the shortcut icon 22M WLAN Adapter Utility on your desktop Or click on Start select Programs 22M WLAN 22M WLAN Adapter Utility Configuration Utility Link Info 6 Using the Configuration Utility Status Displays the MAC Address of theA...

Page 17: ...rk all devices must have the same settings for the following properties SSID Service Set Identifier is a name that identifies a wireless network Access Points and wireless clients attempting to connect to a specific WLAN Wireless Local Area Network must use the same SSID The default setting is default BSS Type Click on the pull down menu select from the following options Infrastructure connecting ...

Page 18: ...st power Power Save this setting consumes a moderate amount of power If any changes are made to the configuration of the wireless adapter click Apply to save the changes Please note that all devices must share the same Security Encryption settings to communicate on the network Data Encryption enable Encryption by clicking on the box The TEW 301PC has Encryption disabled as the default setting Auth...

Page 19: ...Scroll up and down the list and highlight the network to which you wish to connect Click on the Connect button to connect to the desired network Profiles In the lower half of the screen you can manage the profiles that you have created for the wireless network at home at the office and in public places Scroll up and down and highlight the profile that you wish to configure You can ADD or REMOVE a ...

Page 20: ...e all the properties of a profile in order to connect with a network of your choice After you have entered your changes in this window click OK to save the changes The ABOUT screen gives you information about the Firmware and Utility Versionsof the TEW 301PC Configuration Utility About 20 Fig 6 7 ...

Page 21: ...trated in Windows XP If you have another operating system these solutions will still apply although the appearance on your computer screen may differ 1 Checking the Installation of the Drivers for the Wireless Adapter Go to Start Right click on My Computer Click Properties If the My computer icon is on your desktop you can simply right click on it and click on Properties Select the Hardware Tab Cl...

Page 22: ...apters Right click on 22M Wireless Adapter Select Properties to check that the drivers are installed properly Look under Device Status and check that the device is working properly Click OK to close this window 22 Fig 7 3 Fig 7 4 ...

Page 23: ...ompletely remove drivers that were previously loaded To remove the drivers do the following A Under Tools select Folder Options select View under Hidden files and folders select Show hidden files and folders B Uncheck Hide extension for known file types click on Apply C Search for the files TIACXLN INF and TIACXLN SYS Remove these files from the INF and SYSTEM32 DRIVERS folders in the Windows dire...

Page 24: ...establish a BSS at the same time which can result in multiple singular BSSs being established rather than a single BSS with multiple clients associated to it Check that the Network Connection for the wireless client is configured properly Select AP Infrastructure when connecting to an access point and select Ad Hoc mode when connecting without an access point Double click on the WLAN icon in the t...

Page 25: ...how to establish a network at home or work using Microsoft Windows XP Go to Start Control Panel Network Connections Select Set up a home or small office network When this screen appears click Next Using the Network Setup Wizard in Windows XP 25 Fig 8 1 ...

Page 26: ...tions in this window Click Next In the following window select the best description of your computer If your computer connects to the Internet through a gateway router select the second option as shown Click Next 26 Fig 8 2 Fig 8 3 ...

Page 27: ...r description and a Computer name Click Next Note Each computer should have a unique Computer name Enter a Workgroup name All computers on your network should havethe same Workgroup name Click Next 27 Fig 8 4 Fig 8 5 ...

Page 28: ...Please wait while the wizard applies the changes When the changes are complete click Next Please wait while the wizard configures the computer This may take a few minutes 28 Fig 8 7 Fig 8 6 ...

Page 29: ...example Create a Network Setup Disk has been selected You will run this disk on each of the computers on your network Click Next Insert a disk into the Floppy Disk Drive in this case drive A Format the disk if you wish and click Next 29 Fig 8 9 Fig 8 8 ...

Page 30: ...ad the information under Here s how in the screen below After you complete the Network Setup Wizard you will use the Network Setup Disk to run the Network Setup Wizard once on each of the computers on your network To continue click Next 30 Fig 8 11 Fig 8 10 ...

Page 31: ...ct when you restart the computer Click Yes to restart the computer You have completed configuring this computer Next you will need to run the Network Setup Disk on all the other computers on your network After running the Network Setup Disk on all your computers your new wireless network will be ready to use 31 Fig 8 12 Fig 8 13 ...

Page 32: ... click on My Computer Click Properties If the My computer icon is on your desktop you can simply right click on it and click on Properties Select the Computer Name Tab in the System Properties window You may enter a Computer description if you wish this field is optional To rename the computer or join a domain Click Change 32 Fig 8 14 Fig 8 15 ...

Page 33: ...Select Workgroup and enter the name of the Workgroup All computers on your network must have the same Workgroup name Click OK Checking the IP Address in Windows XP 2000 Go to Start All Programs Accessories Command Prompt 33 Fig 8 16 Fig 8 17 ...

Page 34: ... configuration settings are displayed as shown below Type ipconfig renew at the prompt to get a new IP Address shown below Windows 98 ME users go to Start Run Type Command Type winipcfg at the prompt Click Release and Renew to obtain a new IP Address 34 Fig 8 18 Fig 8 19 Fig 8 20 ...

Page 35: ...hnology If you are using a DHCP capable Gateway Router you will not need to assign Static IPAddresses however you need to set the TCP IP protocol to automatically obtain IP F you are not using a DHCP capable Gateway Router or you need to assign a Static IPAddress please follow these instructions Go to Start Double click on Control Panel Double click on Network Connections 35 Fig 8 21 Fig 8 22 ...

Page 36: ... Right click on Local Area Connections Click Properties Highlight Internet Protocol TCP IP Click Properties 36 Fig 8 23 Fig 8 24 ...

Page 37: ...s that are between 192 168 0 3 and 192 168 0 254 No two computes can have the same IP Address The subnet mask must be the same for all the computers on the network Input your DNS server address only if you plan to use the Internet Note If you are entering a DNS server address you must also enter the IP Address of the Default Gateway The DNS server information will be provided by your ISP Internet ...

Page 38: ... on the Wireless Network Connection associated with the 22M wireless Adapter Select Properties select Internet Protocol TCP IP click Properties Connecting to a Wireless Network with a Wireless Router or an Access Point using a DHCP server in Windows XP Select Obtain an IP address automatically if the Wireless Router or Access Point has DHCP server enabled Select Obtain DNS server address automatic...

Page 39: ...er or Access Point IP address 192 168 0 51 Subnet mask 255 255 255 0 Default Gateway Enter the LAN IP address of the Wireless Router Select Use the following DNS server address Enter the ISP provided DNS addresses Click OK Connecting to a Wireless Network in Windows 2000 Go to Start Settings Network and Dial up Connections Double click on the Local Area Connection associated with the 22M Wireless ...

Page 40: ...twork with a Wireless Router or an Access Point using static IP address in Windows 2000 Select Use the following IP address Input a static IP Address within the same IP Address range as the wireless router or the access point IP address 192 168 0 51 Subnet mask 255 255 255 0 Default Gateway Enter the LAN IP address of the Wireless Router Select Use the following DNS server address Leave this secti...

Page 41: ...Wireless Adapter click Properties select Internet Protocol TCP IP click Properties Connecting to a Wireless Network with a Wireless Router or an Access Point using a DHCP server in Windows Me and 98 Select the IP Address tab Then select Obtain an IP address automatically Select Detect connection to network media Click OK 41 Fig 8 32 Fig 8 33 ...

Page 42: ...255 255 255 0 Default Gateway Enter the LAN IP address of the Wireless Router Select Detect connection to network media Checking the Wireless Connection by Pinging Go to Start Run type cmd A window similar to Fig 8 35 will appear Type ping xxx xxx xxx xxx and hit Enter where xxx is the IP address of the Wireless Router or Access Point A good wireless connection will show four replies from the wire...

Page 43: ... Wireless Router or Access Point A good wireless connection will show four replies from the wireless router or access point as shown File and Printer Sharing For help with other tasks in home or small office networking see Using the Shared Documents folder and Sharing files and folders in the Help and Support Center in Microsoft Windows XP 43 Fig 8 36 ...

Page 44: ...it WEP Wired Equivalent Privacy Encryption Data Rate Mbps channel 22 PBCC 11 CCK PBCC 5 5 CCK PBCC 2 QPSK 1 BPSK Key Management Automatic Dynamic Key Allocation ADKA through public key Range Indoors up to 328 feet 100 meters Outdoors up to 1 312 feet 400 meters Diagnostic LED Power solid green light indicates power connection Link Activity green solid blinking light indicates Link Activity Power S...

Page 45: ...ting diversity Mobility Seamless roaming across cell boundaries within access point range Frequency Range 2 4 2 4835 GHz Direct Sequence Spread Spectrum DSSS Operating Channels 1 11 United States Physical Dimensions L 114 mm 4 50 inches W 54 mm 2 25 inches H 6 mm 0 25 inches Temperature Operating Temperature 0C to 50C 32ºF to 122ºF Storage Temperature 20C to 70C 4ºF to 158ºF Humidity Up to 95 Non ...

Page 46: ...iod on this product U S customers can contact TRENDware technical support through our web site by e mail or by phone TRENDware Technical Support over the Telephone Tel 1 310 891 1100 TRENDware Technical Support E mailAddress E mail support trendware com When contacting technical support please provide the following information Serial number of the unit Model number or product name Software type an...

Reviews: