TrekStor SatReceiver Odan S Operating Instructions Manual Download Page 19

 EN

19

A)  LNB Loop Through: Output socket for forwarding the satellite signals to a TV or an 

additional receiver.

B)  LNB In: Cable input for your satellite dish.

C)  VCR SCART connection: To that connection you can connect a video recorder or a DVD 

player and forward their audio and video signals to your TV.

D)  TV SCART output: Audio/video output for TVs.

E)  S/PDIF output (coaxial): You can connect this output with a surround sound capable 

amplifier or a TV.

F)  Power connection.

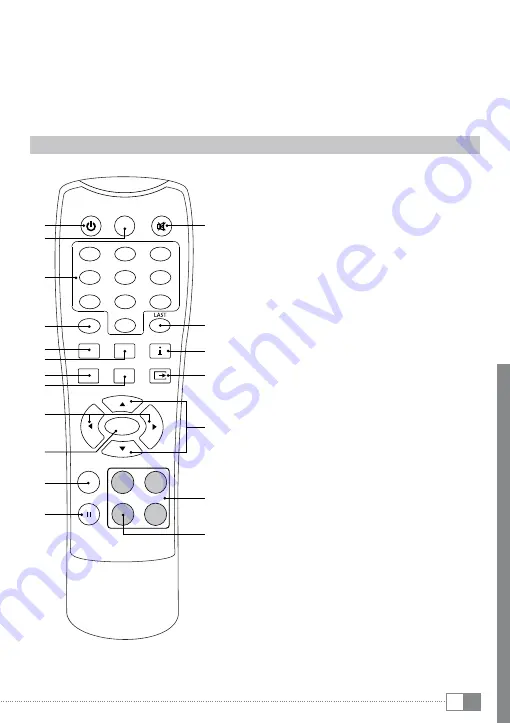
1.3) The remote control of the TrekStor SatReceiver Odan S

B

H

K

O

M

1

2

3

4

5

6

7

8

9

0

FAV

AUDIO

SUBTITLE

MENU

EPG

EXIT

CH+

V L+

VO

O

L-

CH-

OK

TEXT

PAUSE

TV/RADIO

STANDBY

MUTE

DTV/VCR

A

E

G

D

F

I

J

P

Q

L

N

R

S

C

A) 

a

 button: Switches between operation and 

standby mode.

B)  DTV/VCR: Used to switch between the VCR 

SCART input and the DTV output mode.

C) 

b

 button: Switches the sound reproduction 

mute.

D)  Number pad: Buttons 

0

 until 

9

 for choosing 

the channel and other user inputs.

E)  FAV: For a fast switching between your favourite 

channels.

F) 

j

 button: Used to switch between the last 

two viewed channels.

G)  AUDIO: Used to set the sound output 

H)  SUBTITLE: For selecting subtitles.

I) 

G

 button: For displaying information about the 

current channel and the running program.

J) 

F

 button: Opens the main menu.

K) 

J

 button: Opens the EPG (Electronic 

Program Guide). Pressing once again the button 

closes the EPG.

L) 

D

 button: For leaving a menu and saving the 

current settings.

M) 

M

 or 

N

 button: Increases respective decreases 

the volume. These buttons help also to choose 

submenus of the main menu as well as settings 

inside the submenus.

N) 

K

 or 

L

 button: Switches to the next respective 

to the previous channel within the current 

channel list. These buttons help also to choose 

menu items and submenus.

O) 

k

 button: Confirms a choice respective opens 

the current channel list.

P)  TEXT button: Starts or stops displaying the  

video text.

Q)  PAUSE button: Used to pause or playback the 

program being viewed.

R)  Colored buttons: These buttons help to choose 

functions and actions within the screen menus. 

S)  Yellow key: Changes between the playback of 

TV and radio stations.

Summary of Contents for SatReceiver Odan S

Page 1: ...DE EN...

Page 2: ...en mit Ihrer Satellitenanlage 6 2 2 Verbinden mit Ihrem Home Entertainment System 7 2 3 Anschluss an die Stromversorgung 7 3 Schnellinstallation des TrekStor SatReceiver Odan S 7 4 Bedienung des TrekS...

Page 3: ...Stellen Sie Ihren SatReceiver auf eine ebene und feste Unterlage Er darf nicht in der N he von Heizungen oder unter direkter Sonneneinstrahlung stehen Achten Sie auf ausreichende Bel ftung Ihres SatRe...

Page 4: ...ernseher sind besonders anf llig hierf r Vermeiden Sie es daher unbewegte Bilder f r lange Zeitr ume auf solchen Ger ten darzustellen 1 Bedienelemente und Anschl sse des SatReceiver Odan S 1 1 Bediene...

Page 5: ...enlisten F j Taste Mit dieser Taste k nnen Sie schnell zwischen den beiden zuletzt gesehenen Sendern umschalten G AUDIO Zur Regelung der Soundwiedergabe H SUBTITLE Dient der Auswahl von Untertiteln I...

Page 6: ...rbinden mit Ihrer Satellitenanlage Bei einer Einzelteilnehmerinstallation verbinden Sie bitte Ihren SatReceiver und den Universal LNB der Satellitenantenne mit einem Koaxialkabel an dessen Ende ein F...

Page 7: ...ler an Ihren Fernseher weiterleiten wollen schlie en Sie die Audio Video Quelle bitte an der zweiten SCART Buchse VCR Ihres SatReceiver an Wenn Sie die Ausgabe Ihres SatReceivers mit einem Videorekord...

Page 8: ...dies der Satellit Astra auf der Position 19 2 E e Dr cken Sie anschlie end entweder die blaueTaste um eine Einzelsatellitensuche zu starten oder die roteTaste f r eine Multisatellitensuche W hrend des...

Page 9: ...eln Sie k nnen auch mit der k Taste die Senderliste ffnen Dort k nnen Sie mit den Tasten K L M und N einen Sender markieren und mit einem erneuten Druck auf die k Taste diesen Sender ausw hlen i Sie k...

Page 10: ...en Sie dazu einfach den Datentr ger ber den USB Anschluss an der Frontseite Ihres SatReceivers an und w hlen Sie aus welche Dateien Sie wiedergeben m chten i Welche Dateien sich auf dem SatReceiver a...

Page 11: ...iedliche Aktionen die jeweils am unteren Ende des Bildschirms erkl rt werden auf den markierten Sender angewendet werden Auf der rechten Seite des Bildschirms befinden sich eine Vorschau des aktiven S...

Page 12: ...verbleibt an der aktuellen Position Sortieren der Sender Diese Funktion erlaubt es Ihnen Kan le entweder alphabetisch zu ordnen rote Taste oder nach verschl sselten bzw unverschl sselten Sendern gr n...

Page 13: ...bzw Ihr Fernseher die nderungen umgesetzt haben Ich sehe auf meinem Fernseher nur die Nachricht Kein Signal Was ist die Ursache i Der SatReceiver hat keine Verbindung zu Ihrer Satellitenanlage 1 berp...

Page 14: ...len Sie deshalb bitte sicher dass Sie die aktuellste Version der Firmware installiert haben Wann sollte ich bei meinem SatReceiver ein Firmware Update durchf hren Ein Firmware Update ist empfehlenswer...

Page 15: ...anderen chemischen Produkten erfolgen nutzen Sie stattdessen ein weiches trockenes Tuch bzw einen weichen Pinsel a Batterien Akkus enthalten chemische Substanzen und m ssen ordnungsgem entsorgt werden...

Page 16: ...ction with your satellite system 20 2 2 Connection with your Home Entertainment System 21 2 3 Connection to the power supply 21 3 Quick installation of the TrekStor SatReceiver Odan S 21 4 Operating t...

Page 17: ...r TrekStor SatReceiver Odan S Putting up your SatReceiver Please run your SatReceiver only within buildings Put your SatReceiver onto a plane and solid base It must not stay next to a heater and shoul...

Page 18: ...ly susceptible for that Therefore please avoid presenting standing pictures for a longer time period on such devices 1 Controls and connections of the SatReceiver Odan S 1 1 Controls on the front side...

Page 19: ...For a fast switching between your favourite channels F j button Used to switch between the last two viewed channels G AUDIO Used to set the sound output H SUBTITLE For selecting subtitles I G button F...

Page 20: ...h your satellite system In case of a single participant installation please connect your SatReceiver and the universal LNB of the satellite dish with a coaxial cable of which end an F jack is installe...

Page 21: ...he audio video source to the second SCART socket VCR of your SatReceiver When you would like to record the output of your SatReceiver with a video recorder please connect the input of your video recor...

Page 22: ...e Now press either the blue button in order to start a single satellite search or the red button for a multi satellite search While the channel search is running you will be informed about the progres...

Page 23: ...respective the previous channel You can as well open the channel list by pressing the k button There you can mark a channel by pressing K L M or N and choose it with the k button i With this method yo...

Page 24: ...e you would like to playback i You can find information about the files which can be played on the product page on www trekstor de Accessory Calculator When you choose this function a calculator appea...

Page 25: ...an action by pressing the k button with D you will be able to leave the channel list editor or to cancel an action Add a channel to the favorite list All together you have the choice between eight dif...

Page 26: ...tton Skipping a channel With this function you will be able to skip a marked channel which means the channel will not be displayed any more when changing the channels with K or L The channel will only...

Page 27: ...ystem is adjusted 2 Check the satellite dish as well as the cable which is connected to the SatReceiver I only see the message Scrambled What is the reason With the SatReceiver you will not able to re...

Page 28: ...e can as well provide new functions or improve the already existing functions Therefore it is useful always to use the latest firmware You can find the version number of the installed firmware SW Vers...

Page 29: ...th or soft brush a Batteries rechargeable batteries contain chemical substances and must be disposed of properly Batteriesrechargeable batteries should not be thrown away in household garbage They can...

Page 30: ...g products Type Settop Box STB EN 55013 2001 A1 2003 A2 2006 Sound and television broadcast receivers and associated equipment Radio disturbance characteristics Limits and methods of measurement IEC C...

Page 31: ...805 TREKSTOR 01805 87357867 Die Nummer der Supporthotline f r andere L nder finden Sie auf unserer Website unter SERVICE 14 Cent Min aus dem deutschen Festnetz der DTAG max 42 Cent Min aus Mobilfunkne...

Reviews: