


3. Mate the 4 pin connector at the end of the white, violet, and orange swell harness with P-4
NOTE: The four grommets in the top of the SSP-3A chassis will be called #1, #2, #3 and #4 (from left to right).
4. Run the swell harness wires up through the #1 grommet, along the back of the chassis, through the nylon clips, to the
swell pot. Trim and strip leads. Solder the wires as follows: White to the lug nearest the back of the chassis, violet to
the center lug, and orange to the lug nearest the open side of the chassis.
5. Slide the swell arm bushing over the shaft of the swell pot and align the chassis assembly so that the swell rod is in the
center of the clearance hole in the generator shelf. Hold chassis in this position and operate the swell pedal and linkage
up and down, being sure that at no point in the travel does the swell rod rub against the shelf. Mark the 4 mounting hole
locations, but do not secure chassis at this time.
NOTE: Pre-amp wiring will be easier if the chassis is temporarily laid on its back. Refer to the 11 x 17 installation layout
sheet for the following steps.
6. If the organ has a pilot lamp, route its yellow wires through the #1 grommet and connect one to each of the PILOT LT.
terminals.
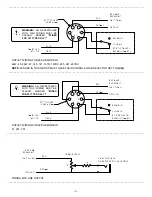
7. If a Leslie in the 122 family is being used, route the tremolo switch wires through the #2 grommet. Connect one
conductor to the pre-amp GROUND terminal and one conductor to the LC terminal.
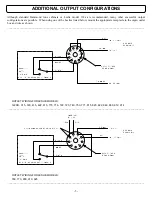
NOTE: If both Leslie and Hammond tone cabinets are being used it will be necessary to run separate black and red signal
wires for the second outlet.
8. Route the black, red and brown outlet box wires through the #3 grommet. Connect the brown wire to the pre-amp
GROUND terminal.
9. If the organ has an outlet for a Leslie in the 122 family, connect its black and red signal wires to the G1 and G2
terminals. If the organ has an outlet for a Hammond tone cabinet, connect its black and red signal wires to the G3 and
G4 terminals.
10. Route the solid brown vibrato drive wire through the #3 grommet and connect to the C terminal.
11. Route the shielded green and yellow cable without a ground termination through the #4 grommet. Connect the green
wire to the F terminal. Connect the yellow wire to the E terminal.
12. Route the shielded black cable through the hole nearest the D terminal. Connect the inner conductor to the D terminal.
NOTE: Do NOT alter the length of this cable. Poor balance between the vibrato and non-vibrato channels will result.
13. Route the remaining shielded yellow and green cable through the hole nearest the A and B terminals. Connect the
yellow wire to the A terminal and the green wire to the B terminal.
14. Route the green shielded wire through the hole nearest the P terminal. Connect the inner conductor to the P terminal.
15. Secure the ground terminations of the shielded wires installed in steps 12-14, with 4-40 x 1/4" screws.
16. Route the percussion harness through the upper notch in the pre-amp chassis and connect one yellow wire to the L
terminal, one yellow wire to the N terminal, the blue wire to the K terminal, the brown wire to the J terminal and the
green wire to the H terminal. The red wire will no longer be required and should be insulated.
17. Position chassis upright in mounting location. Replace the swell arm bushing over the shaft of the swell pot. Again, be
sure that at no point in its travel does the swell rod rub against the shelf. Secure chassis 4) #8 x 1/2" screws.
-2-


