


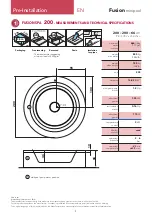


13
Fusion
minipool
EN
Pre-Installation
OPTIONAL
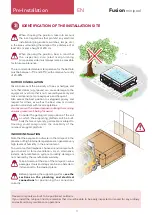
A
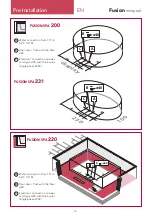
RECESSED INSTALLATIONS
As a base, create a reinforced concrete recess having
a thickness of at least 10 cm, perfectly flat and able to
support the weight of the minipool and the people using it.
The manufacturer suggests a minimum load of 350 kg/m
2
.
In any case contact a qualified construction engineer to
calculate the appropriate load for the installation site.
Wedges or shims cannot be placed under the bathtub
to level it, only the feet of the bathtub can be adjusted.
Remember to ground the structural reinforcement in
accordance with electrical codes.
If it was not possible to provide a technical
inspection port on all sides of the minipool, a
pneumatic lift is available (OPTIONAL - to be
requested from the Manufacturer) in order to simplify future
maintenance operations. It is recommended to provide a
removable inspection hatch "A" positioned on the side
where the bathtub
components are
situated.
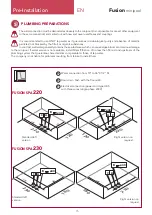
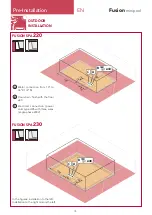
Prepare:
•
A
A technical inspection port at least 50 cm wide
on all sides of the minipool. This will make future
maintenance or repairs easier.
•
B
Drainage grating
around the perimeter and in
the recess to help preserve the equipment and the
structure
(even for indoor installations).
•
C
A non-slip flooring around the minipool.
•
D
Two Ø15 cm vents to ensure proper ventilation and
extraction of the heat and moisture from the technical
compartment.
FOR THE RECESSED OUTDOOR INSTALLATIONS, to
avoid damage due to freezing we recommend insulating
E
the minipool recess. This procedure prevents
excessive condensation that over time cause odours and
damage to all major internal components. The choice of
materials and thickness should be based on the minimum
temperatures reached in the country of installation.
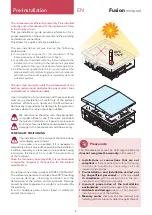
For the preparation of the water and electrical
connections see the pertinent section on page 15
and 23.
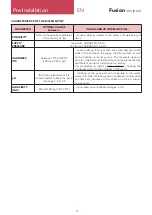
56,5
10
(measurements in cm)
See the plumbing and
electrical preparations on
page 15 and 23.
A
Technical compartment for
maintenance of operational
components: plan for 50 cm
on all sides of the minipool
B
Internal drainage grates
E
Insulation: prevents
damage from freezing and
condensation
D
2 Ø15 cm vents to ensure
proper ventilation of the
technical compartment
C
Non-slip flooring
CONCRETE SLAB h. 10 cm minimum
FUSION SP
A
220 - 230


