8
THE PRODUCT; ASSEMBLY
1.
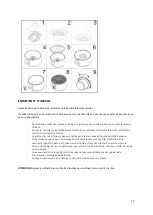
Open the battery case at the bottom of the outer bowl. Insert four AA batteries (not included)). Mind
polarity. Close the battery case. (fig. 1)
2.
Set up the charcoal rack on the vent pipe (fig. 2) and fill up the charcoal rack with charcoal. (fig. 6)
3.
When you have placed all parts together, p
our barbecue starter gel (not included) on the charcoal
rack in a circle of on about 10 mm. (fig. 3)
4.
Light the barbecue starter gel. (fig. 4)
5.
Put the tray into the base. (fig. 5)
6.
Insert the battery fan box into the plastic slot on the base (fig. 7) and turn on the knop on maximum
position.
7.
Place the cast iron grill plate on top of the base. (fig. 8)
8.
You can control the temperature by using the fan knob. (fig. 9)
9.
Including carrying bag
The cast iron grill can also be used as a stove rack for boiling and cooking. With the enclosed lifting tong,
you can lift up the grill rack.
ATTENTION
In order not to quench the flame, the ventilation needs to be turned on.
Do not touch the flame!
Place the charcoal container carefully and evenly on the ignition plate!


