4
3
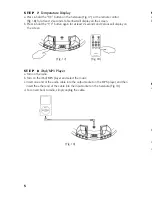
S T E P 4
Programming the Radio
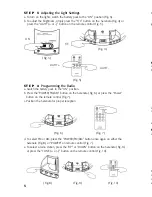
a. Switch the battery pack to the “ON” position.
b. Press the “POWER/FM/AM” button on the Serenata (Fig. 6) or press the “Power”
button on the remote control (Fig. 7).
c. Position the Serenata for proper reception.
d. To select FM or AM, press the “POWER/FM/AM” button once again on either the
Serenata (Fig. 8) or “POWER” on remote control (Fig. 7).
e. To select a radio station, press the “UP” or “DOWN” button on the Serenata (Fig. 9)
or press the “TUNE (+ or -)” button on the remote control (Fig. 10).
f. To scan the radio stations, simply
press & hold
the “UP” or “DOWN” button (Fig. 9)
or “TUNE (+ or -)” button (Fig. 10) for at least 3 seconds. Scanning will stop
automatically when a station is located.
g. To adjust the volume, press the “Vol. (+ or -)” button on the Serenata (Fig. 11) or
on the remote control (Fig. 12).
S T E P 5
Programming the Radio
a. Turn the radio on and tune-in the station you want to save.
b.
Press & hold
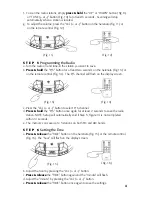
the “P/S” button for at least two seconds on the Serenata (Fig. 13) or
on the remote control (Fig. 14). The P/S channel will flash on the display screen.
c. Press the “Vol. (+ or -)” button to select P/S channel.
d.
Press & hold
the “P/S” button once again for at least 2 seconds to save the radio
station. NOTE: Setup will automatically void if Step 5, Figure 14 is not completed
within 10 seconds.
e. The memory can save up to 5 stations on both FM and AM bands.
(Fig. 6)
(Fig. 7)
(Fig. 8)
(Fig. 9)
(Fig. 10)
(Fig. 11)
(Fig. 12)
(Fig. 13)
(Fig. 14)
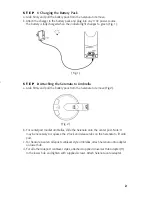
(Fig. 3)
(Fig. 4)
S T E P 3
Adjusting the Light Settings
a. To turn on the lights, switch the battery pack to the “ON” position (Fig. 3).
b. To adjust the brightness, simply press the “F/C” button on the Serenata (Fig. 4) or
press the “LIGHT (+ or -)” button on the remote control (Fig. 5).
(Fig. 5)
ON
F/C
LIGHT +
LIGHT -
b. Adjust the hour by pressing the “Vol. (+ or -)” button.
c.
Press & release
the “TIME” button again and the “minute” will flash.
d. Adjust the “minute” by pressing the “Vol. (+ or -)” button.
e.
Press & release
the “TIME” button once again to save the settings.
(Fig. 15)
(Fig. 16)
S T E P 6
Setting the Time
a.
Press & release
the “TIME” button on the Serenata (Fig. 15) or the remote control
(Fig. 16). The “hour” will flash on the display screen.


