Installation
(for qualified installers only)
7
Travis Industries
4 0 1 1 0 2 5
9 3 5 0 8 1 0 4
Insert Placement
•
Insert must be placed within
a code-conforming masonry
fireplace or tested and listed
zero-clearance (metal)
fireplace. Fix any fireplace
damage prior to installation.
•
Because the insert uses a
circulation blower, clean the
fireplace, smoke shelf, and
chimney prior to installation.
We recommend painting
the interior surface of the
fireplace with latex paint to
further eliminate dust.
•
This heater may be placed
in a bedroom. Please be
aware of the large amount of
heat this appliance
produces when
determining a location.
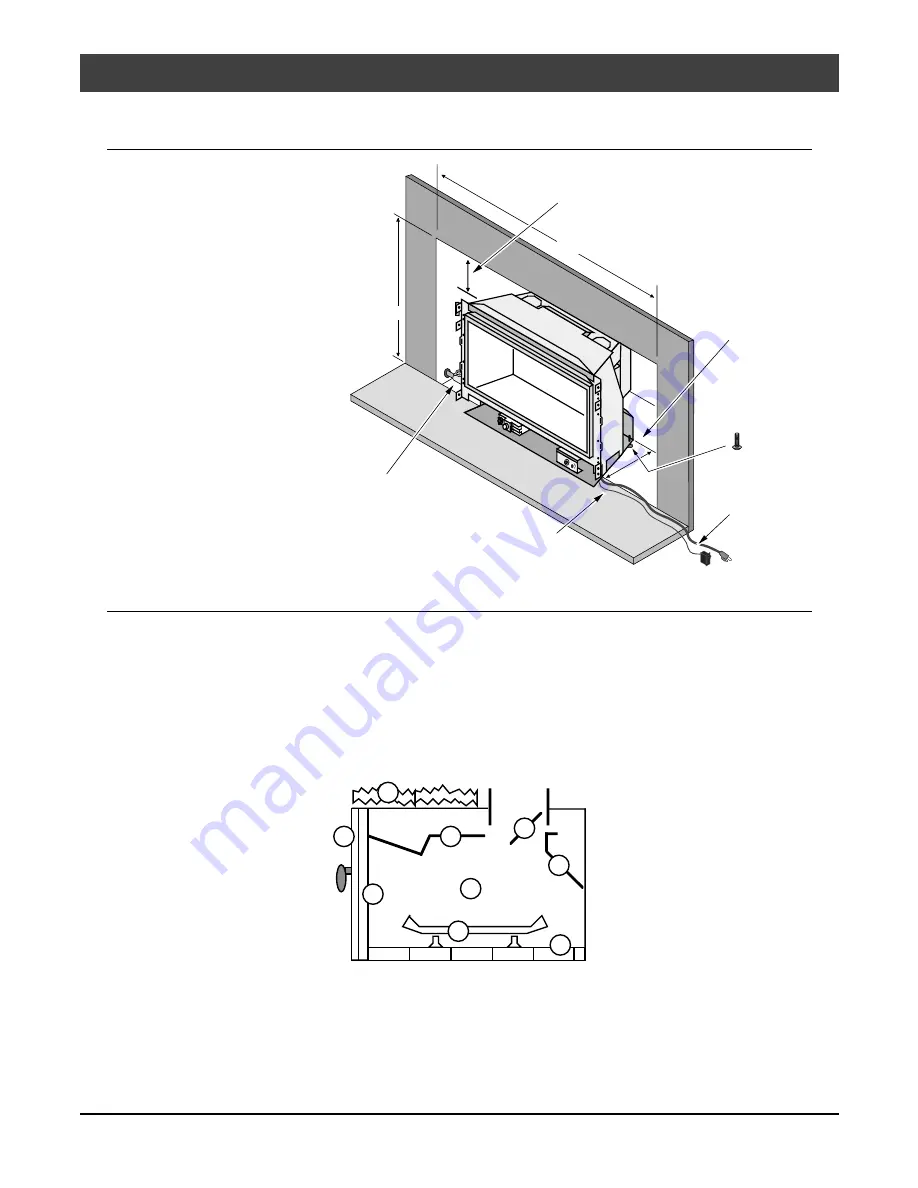
The DVL inserts 16"
into the fireplace.
Run the power cord to
either side of the
insert along the face.
Min. 38-1/4" - Includes 6" for gas line installation
For tight fits (under 28"), you may
remove the manifold. See the section
"Removing the Manifold"
Use the leveling
bolts for fireplaces
with recessed floors.
Min. 23-3/4"
Run the on/off switch wires to the
right, behind the surround panels.
The gas line and shutoff
valve should be installed
prior to insert placement.
Zero-Clearance (Metal) Fireplace Requirements:
•
The damper ("
A
") and grate (with log set) ("
B
") must be removed (see the illustration below)
•
The smoke shelf ("
C
"), internal baffles ("
D
"), screen ("
E
"), masonry lining or refractory ("
G
" & "I"), and
metal or glass doors ("
F
") may be removed (if applicable)
N O T E :
If any internal baffle is cut, bent, or removed, the fireplace must be permanently marked to
indicate that it has been altered and is no longer suitable for burning solid fuel (wood).
•
The insulation ("
H
"), and any structured rigid frame members (metal sides, floor, door frame, face of
the fireplace, etc.) must not be removed or altered.
A
A
A
A
A
A
C
B
F
I
D
E
A
AA
AA
AA
AA
AAA
AAA
AA
AA
AA
AA
A
A
G
AA
AAA
H
Summary of Contents for DVL Insert
Page 2: ......


