background image

20

Helpline No. UK/Ireland 00800 / 7877 2368

Web Support www.Traveler-service.com/uk

Model Number:DV5070

3. GETTING STARTED

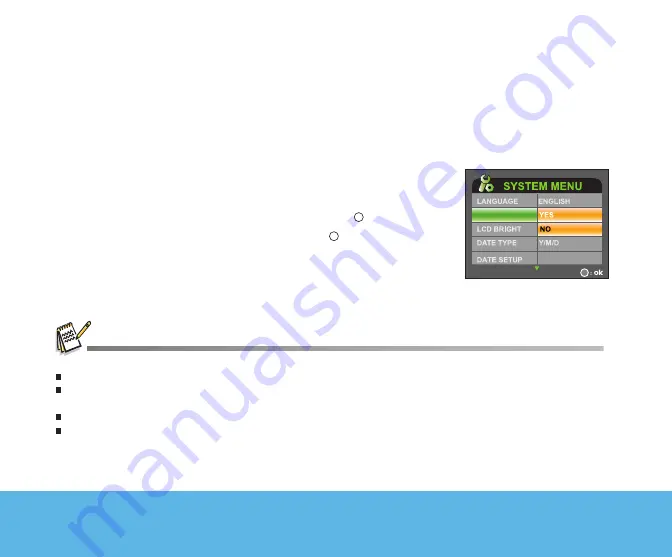
Formatting Internal Memory or an SD Memory Card

Formatting erases all images, videos, sound, MP3 files and folders that are stored on the SD memory card
or internal memory. Formatting is not possible if an SD memory card is locked.

1. Turn on your digital video camera.
2. Press the 

MENU

 button.

3. Move to [SYSTEM MENU] by using the 

W

 button.

4. Select [FORMAT] with the zoom lever, and press the   button.
5. Select [YES] with the zoom lever, and press the   button.

You should format an SD memory card before using it for the first time.
Formatting an SD memory card also erases the protected images. All data other than images are also erased. Before
formatting the card, make sure that all the images are unnecessary.
Formatting is an irreversible action and data cannot be recovered at a later time.
If an SD memory card has any problem, it cannot be properly formatted.

FORMAT

2005/08/24

Summary of Contents for DV-5070

Page 1: ...ay be different from those described in this manual This is due to the fact that different retailers often specify slightly different product inclusions and accessories to suit their market requiremen...

Page 2: ...ge or repair the camera This might cause fire or electric shock For repair or internal inspection refer to our website or contact our helpline Do not use the camera in areas near water This might caus...

Page 3: ...ult a physician to receive treatment This camera is a precision instrument Do not drop it strike it or use excessive force when handling it This might cause damage to the camera Do not use the camera...

Page 4: ...ing may cause the battery life to be shorter than optimum The battery may feel warm after long periods of continuous use of the digital video camera or the flash This is normal and not a malfunction T...

Page 5: ...hoosing the Display Language 19 Formatting an SD Memory Card 20 Setting Image Resolution and Quality 21 4 PHOTOGRAPHY MODES 24 Capturing Still Images 24 Recording Video Clips 24 Normal Mode 25 Macro M...

Page 6: ...0 Step 1 Install the USB driver requirement for Windows 98 users only 50 Step 2 Connect the digital video camera to your computer 51 Step 3 Download still images video clips and audio files 52 11 INST...

Page 7: ...LCD monitor 2 5 full colour LTPS LCD monitor 230K pixels makes it easy to frame your subject when capturing images It also displays the images you have captured Recording media 64 MB internal memory 5...

Page 8: ...it box and ensure that you have the following items In the event that any item is missing or if you find any mismatch or damage promptly contact our helpline Common product components Digital video ca...

Page 9: ...Traveler service com uk Model Number DV5070 2 GETTING TO KNOW YOUR DIGITAL VIDEO CAMERA Front View 1 Lens 2 Flash 3 Self timer LED 4 Focus switch Normal mode Macro mode 5 Speaker 6 Microphone 7 Batte...

Page 10: ...ver T Zoom in W Zoom out 4 Record button 5 Image button 6 X Right button Self timer button 7 W Left button Flash button 8 MENU Menu button 9 Status LED indicator 10 USB connector 11 A V OUT terminal 1...

Page 11: ...ium battery power Low battery power Virtually no battery power 4 SD memory card indicator An SD memory card is loaded No SD memory card is loaded SD memory card is full 8 Video quality SUPER FINE FINE...

Page 12: ...er of shots 6 Flash mode Flash off A Auto flash Auto flash with red eye reduction 7 Macro mode 8 ISO sensitivity AUTO ISO 100 ISO 200 ISO 400 9 EV compensation 10 AWB White balance 11 Image quality SU...

Page 13: ...recording Elapsed time While recording Video Playback 1 Folder and file name 2 Duration of current video Before playback Elapsed time During playback 3 Video playback mode icon 4 Battery power indica...

Page 14: ...ndicator 5 Audio MP3 status bar 6 Sound level speaker volume 7 Playback indicator 8 Play mode indicator Play one file Play all files Play the selected files 9 Repeat indicator 10 Elapsed time Still Im...

Page 15: ...tal video camera Charge the battery before using the digital video camera Make sure that the digital video camera is turned off before inserting or removing the battery 1 Slide the battery SD memory c...

Page 16: ...tration LED Indicators Indicator State Description Activity LED indicator Solid green 1 The digital video camera is powering up 2 The digital video camera is ready to record images or video clips LED...

Page 17: ...2 Insert the SD memory card If the card cannot be inserted check the orientation 3 Close the battery SD memory card firmly To remove the SD memory card make sure the camera is turned off Open the batt...

Page 18: ...irection Turning it too far or in the wrong direction may damage the hinge that connects the LCD monitor to the digital video camera Avoid contact with the LCD monitor when moving the LCD panel Do not...

Page 19: ...the W button 4 Select DATE SETUP with the zoom lever and press the button The DATE SETUP setting screen is displayed 5 Select the item s field with the W X buttons and adjust the date and time with t...

Page 20: ...the MENU button 3 Move to SYSTEM MENU by using the W button 4 Select FORMAT with the zoom lever and press the button 5 Select YES with the zoom lever and press the button You should format an SD memo...

Page 21: ...situations requiring the finest detail Lower resolution quality images take up less memory space and may be quite suitable for sharing images via e mail in a report or on a web page To change image re...

Page 22: ...9 154 309 632 FINE 15 39 79 158 308 616 1265 NORMAL 23 59 120 239 464 929 1878 2048 x 1536 SUPER FINE 11 30 62 124 241 483 984 FINE 23 60 123 247 479 959 1937 NORMAL 35 91 185 370 718 1438 2952 1280 x...

Page 23: ...conditions and settings 64MB 128MB 256MB 512MB 1GB 2GB 640 x 480 SUPER FINE 0 43 1 53 3 53 7 47 15 08 30 20 1 02 18 FINE 0 57 2 31 5 10 10 21 20 07 40 19 1 22 48 NORMAL 1 11 3 08 6 26 12 54 25 04 50 1...

Page 24: ...image The actual captured image appears to be larger than the one on the LCD preview after the image was captured Recording Video Clips In this mode you may record video clips 1 Turn on your digital v...

Page 25: ...tart recording and then press the button to end the recording After a macro shot is taken DO NOT FORGET to reset the lens to the normal position Flash mode is automatically set to OFF once you switch...

Page 26: ...ng the zoom lever to the T side The subject appears farther away by sliding the zoom lever to the W side 3 Press the button to capture a zoomed image To record video clips press the button to start re...

Page 27: ...a place where flash photography is prohibited or when the distance to the subject is beyond the effective range of the flash A Auto flash The flash fires automatically according to the ambient lighti...

Page 28: ...after the preset time has elapsed To cancel the self timer during operation press the button again Once the self timer has been activated and the button has been pressed you can not slide the zoom lev...

Page 29: ...us image slide the zoom lever to the T side To view the next image slide the zoom lever to the W side To start playing back the video clips follow the steps 1 4 above then press the button Press of th...

Page 30: ...video output system of the video equipment you are going to connect to the digital video camera then turn all devices off 1 Connect one end of the A V OUT cable to the A V OUT terminal of the digital...

Page 31: ...ages 1 0x 1 5x 2 0x 2 5x 3 0x 3 5x 4 0x 4 5x 5 0x 5 5x 6 0x 6 5x 7 0x 7 5x 8 0x and thumbnail display During zoom playback the outer frame indicates the entire image while the inner frame indicates th...

Page 32: ...he PLAYBACK MENU is displayed 6 Select PROTECT with the zoom lever and press the button 7 Select ONE FILE or ALL FILES with the zoom lever and press the button 8 Select LOCK by pressing the W X button...

Page 33: ...MAGE MOVIE with the zoom lever and press the button 4 Press the MENU button 5 Select SLIDE SHOW with the zoom lever and press the button 6 Set the playback interval with the zoom lever and press the b...

Page 34: ...e thumbnail display 5 Press the MENU button 6 Select DELETE FILE or DELETE ALL with the zoom lever and press the button DELETE FILE Delete the current still image video clip DELETE ALL Delete all stil...

Page 35: ...rn on your digital video camera 2 Toggle the MODE button to go to SELECT MODE 3 Select MP3 with the zoom lever and press the button The MP3 LIST appears on the screen Button operations Playlist During...

Page 36: ...video camera enables you to record and play back audio files anytime and anywhere Recording Audio Files 1 Turn on your digital video camera 2 Toggle the MODE button to select audio recording mode as i...

Page 37: ...ction MODE Back to LCD preview MENU Enter AUDIO menu Stop playing audio file Start to play voice file Pause playing audio file State Audio Playing Back Audio Files 1 Turn on your digital video camera...

Page 38: ...ppears on the screen 4 Press the MENU button The MP3 MENU or AUDIO MENU appears on the screen 5 Select DELETE with the zoom lever and press the button SELECT Delete the selected audio or MP3 file ALL...

Page 39: ...camera 2 Press the MENU button The MOVIE MENU is displayed on the screen 3 Select the desired option item with the zoom lever and press the button 4 Select the desired setting with the zoom lever and...

Page 40: ...y LAMP For recording under lamp light FLUORESCENT 1 Cool white fluorescent W3900 4500K FLUORESCENT 2 Day white fluorescent W4600 5400K SHADE For recording outdoors on a cloudy day EV Your digital vide...

Page 41: ...button The CAPTURE MENU is displayed on the screen 3 Select the desired option item with the zoom lever and press the button 4 Select the desired setting with the zoom lever and press the button 5 To...

Page 42: ...ised and the ISO figure is increased photography will become possible even in dark locations but the more pixelated grainier the image will appear AUTO Auto adjustment 100 Equivalent to ISO 100 200 Eq...

Page 43: ...the zoom lever and press the button 7 To exit from the menu press the MENU button ICON DISPLAY This sets whether or not to display the image with icons in the playback mode YES NO SLIDE SHOW Refer to...

Page 44: ...with the zoom lever and press the button 6 Select the desired setting with the zoom lever and press the button 7 To exit from the menu press the MENU button PLAY MODE Sets the method of the files play...

Page 45: ...zoom lever and press the button 5 Select the desired setting with the zoom lever and press the button 6 To exit from the menu press the MENU button FORMAT Please refer to the section in this manual ti...

Page 46: ...t range is from 5 to 5 DATE TYPE Sets the displayed type of date and time on the screen Y M D Year Month Day D M Y Day Month Year M D Y Month Day Year DATE SETUP Refer to section in this manual titled...

Page 47: ...nt you are going to connect to the digital video camera NTSC NTSC system PAL PAL system RESET Returns all basic settings to the digital video camera s default settings YES Returns to the default setti...

Page 48: ...MODE screen appears on the screen 3 Select PICTBRIDGE with the zoom lever and then press the button 4 Select SIZE or BORDERLESS with the zoom lever and select its print type with the W X buttons Then...

Page 49: ...t WITH to print the image with file name 7 Use the zoom lever to select PRINT Then press the button to confirm the print settings and start printing 8 The printing starts and the figure shown on the r...

Page 50: ...indows Pentium III 600 MHz or higher Windows 98 98SE ME 2000 XP 64MB RAM 128MB hard disk space CD ROM drive Available USB port Step 1 Install the USB driver requirement for Windows 98 only Windows 98...

Page 51: ...lever and press the button 5 From the Windows desktop double click on My Computer 6 Look for a new Removable disk icon This Removable disk is actually the memory or memory card in your digital video...

Page 52: ...these folders Select the files that you want and then choose Copy from the Edit menu Open the destination location folder and choose Paste from the Edit menu You may also drag and drop image files fr...

Page 53: ...effects and shares finished projects on diversified devices by supporting the latest formats To install VideoStudio 1 Insert the CD ROM that came with the camera into your CD ROM drive The welcome sc...

Page 54: ...w these steps Step 1 Install the webcam driver same CD ROM as USB driver see pg 55 Step 2 Connect the digital video camera to your computer see pg 56 Step 3 Run your application software i e Windows N...

Page 55: ...he CD ROM that came with the camera into your CD ROM drive The welcome screen appears 2 Click Install USB PC Cam driver Follow the on screen instructions to complete the installation After the driver...

Page 56: ...Start Video button to view live video 3 Click the Place Call button 4 Type the e mail address or the network address of the computer that you are calling 5 Click Call The person that you are calling m...

Page 57: ...orage Supports SD memory card up to 2 GB Compression format MPEG 4 SP Video IMA ADPCM Audio File format EXIF 2 1 DCF 1 0 JPEG ASF Video Lens Aperture range 3 3 Focal Length 6 95mm Focus range Normal 1...

Page 58: ...cted correctly The digital video camera was left unattended and unused so the auto power off cuts it off The battery is exhausted Digital video camera malfunction It is being used in extreme low tempe...

Page 59: ...unrecognized by the digital video camera The auto power off function is activated The power is not on The LCD monitor is dark The digital video camera is set to mode The flash is set to flash off Mea...

Page 60: ...formatted and stored on this camera Cancel protection Load a card that was formatted and stored on this camera Remove the write protection Load a new memory card Adjust the brightness of LCD monitor...

Page 61: ...ad correctly Recharge the battery Turn the power off and remove the battery then try again Set the correct date and time Set the date and time again Symptom Cannot download files Cause The free space...

Page 62: ...dangerous to the environmentand harmful to human health if waste of electrical and electronicequipment WEEE is not disposed of correctly Equipment which is marked with the WEEE logo as shown on thelef...

Reviews: