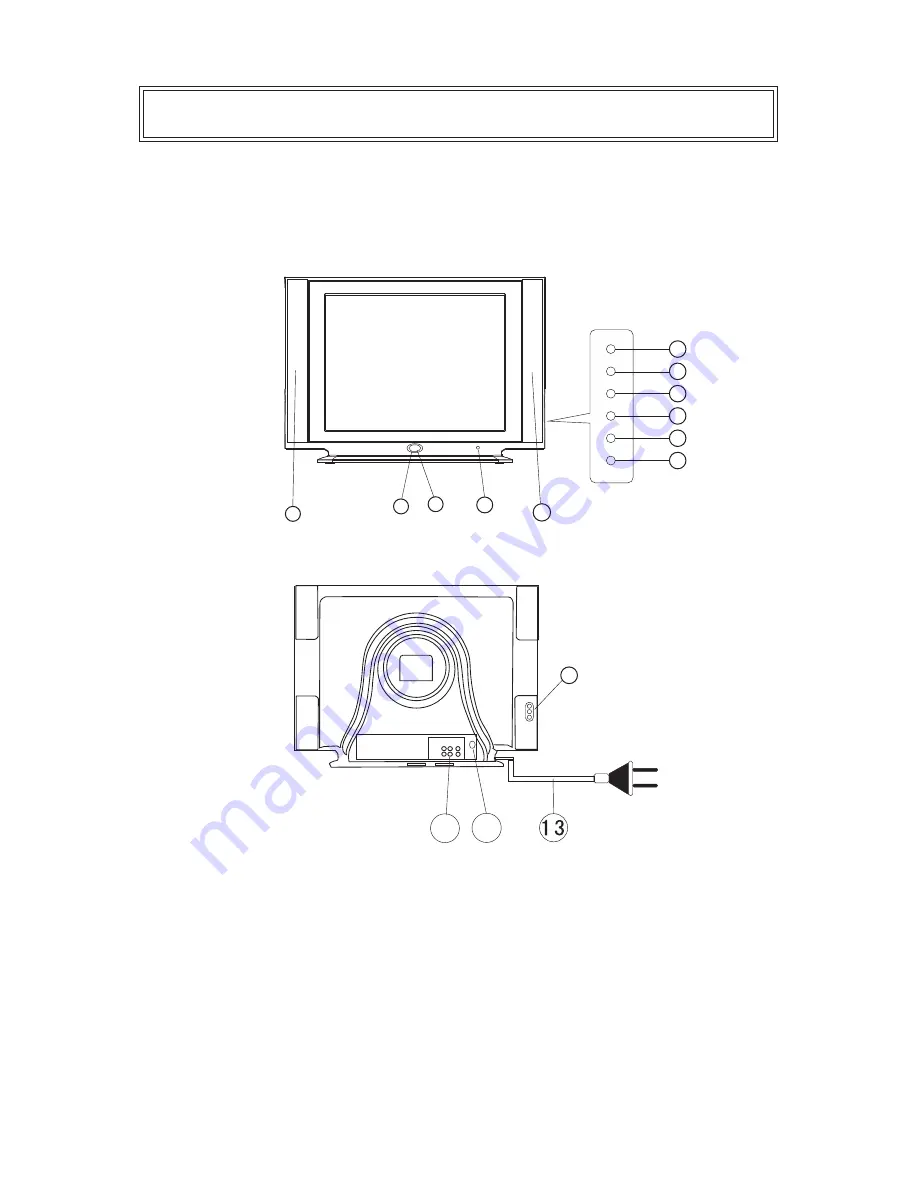
Transonic TC-29E9TV Instruction Manual Download Page 6

-5-

Control  Location

1. Speaker

2. Side AV In 

3. AV/TV Button

4. Menu Button

5. Volume Down Button

6. Volume Up Button

7.Program Down Button 

8. Program Up Button

9. Power Indicator

10. Remote Sensor

11. Main Switch

12. Speaker

13. AC power Cord

14. Audio/Video-input/output

15. Terminal Antenna(75 Ohm)

Front and Back Control Panel

15

14

2

2

1

1

12

12

9

9

10

10

11

11

3

3

4

4

5

5

7

7

6

6

8

8

Summary of Contents for TC-29E9TV

Page 1: ...6PR6 E259 29 inch Colour Television Instruction Manual Model TC 29E9TV Please read these instructions carefully and retain for future reference...

Page 2: ...d in this manual or on the back cover of the set mean the following Read this manual in full before use Class II Double insulated Appliance The lightning flash symbol is intended to alert the user to...

Page 3: ...as Install in accordance with any specific Manufacturer s instructions Always allow a sufficient gap around the apparatus to avoid overheating WARNING Do not install near any heat sources such as radi...

Page 4: ...l use WARNING If this apparatus is to be used by a third party please supply these instructions with it WARNING No liability will be accepted for any personal injury or damage caused by failure to fol...

Page 5: ...Colour Picture Tube 29 Pure Flat Viewable size 68cm diagonally Sound output Net weight 40kg Dimensions 780 W x480 D x575 H mm Note Design and specifications are subject to change without prior notice...

Page 6: ...tton 6 Volume Up Button 7 Program Down Button 8 Program Up Button 9 Power Indicator 10 Remote Sensor 11 Main Switch 12 Speaker 13 AC power Cord 14 Audio Video input output 15 Terminal Antenna 75 Ohm F...

Page 7: ...g 300 flat cable a 300 75 adapter should be used for a proper connection to RF socket The 300 75 adapter is not supplied 2 POWER CONNECTION Plug the power cord into an AC outlet AC 230 240V 50Hz Press...

Page 8: ...DVD player video camera game player or audio player NOTE Video Audio equipment can be connected to the rear AV in socket as well DVD PLAYER Y Cr Cb TV Connection to Other Equipment L IN OUT V R L V R...

Page 9: ...n of automatic search 2 Press button to start automatic search Press to stop automatic search 3 It will return to 0 automatically after the end of automatic search 2 2 Manual Search 1 Press button to...

Page 10: ...he unit Holding button will increase decrease the clock by ten minutes 4 Set the time for turning on the unit in the similar way 4 3 Position 1 Press button to choose the option of position 2 Press bu...

Page 11: ...is completed 5 2 Sound System Press button to enter the SOUND option of sound system to display current sound system 5 Channel Editing Press MENU button to choose the FUNCTION menu Press button to cho...

Page 12: ...choose year calendar month calendar and day calendar 7 Menu of Sound Setting 1 Volume Press button to adjust the volume The parameter may be adjusted in the range between 0 and 100 4 Balance Press but...

Page 13: ...RITE CHANNEL BUTTON PICTURE FORM BUTTON SLEEP TIMER BUTTON SYSTEM CHOOSING BUTTON P P MENU AV SYS SLEEP P P SCAN GAME SELECT AUDIO 3 15 6 2 13 7 12 16 11 17 9 8 14 10 5 4 1 Don t mix different battery...

Page 14: ...want for the channel 7 Press this key to fast browse your favorite program 8 SLEEP TIMER BUTTON Press SLEEP button the sleep time can be set as follows by minute When sleep time is set the switch off...

Page 15: ...ton is the same as that of and buttons on the panel 15 VOLUME BUTTON The function of this button is the same as that of and buttons on the panel 16 AUDIO BUTTON Press AUDIO BUTTON to enter audio funct...

Page 16: ...ference Local radiation however can create disturbances which visibly affect your picture Proper installation a good aerial are your best safe guards against these disturbances INTERFERENCE Moving rip...

Page 17: ...some channels Horizontal bars Picture rolls vertically Poor colour No colour Misoperation of Remotecontrol No Remote control On screen Display Control outside the screen Check aerial for broken wires...

Page 18: ......

Page 19: ...e a fee may be charged This Product is guaranteed against faulty materials and workmanship for a period of 12 months from date of purchase The obligation to the purchaser under this warranty is limite...

Page 20: ......

Reviews: