background image


P

RO

L

INE


C

ONNECTION


I

NSTRUCTIONS


2


98

0019

57


REV


1703.20


C

ONNECTIONS

,


S

TARTUP 

&


P

OWER 

D

OWN


WARNING! 

DO NOT start the ProLine PC/Laptop. All cables must be 

connected and equipment must be 

powered up and powered 

down in a specific order

. Otherwise, loss of DVI configuration 

settings could occur. 

A.


C

ONNECT 

C

ABLES


Refer


to


one


of


the


following


diagrams


that


match


your


equipment


and


connect


all


cables:


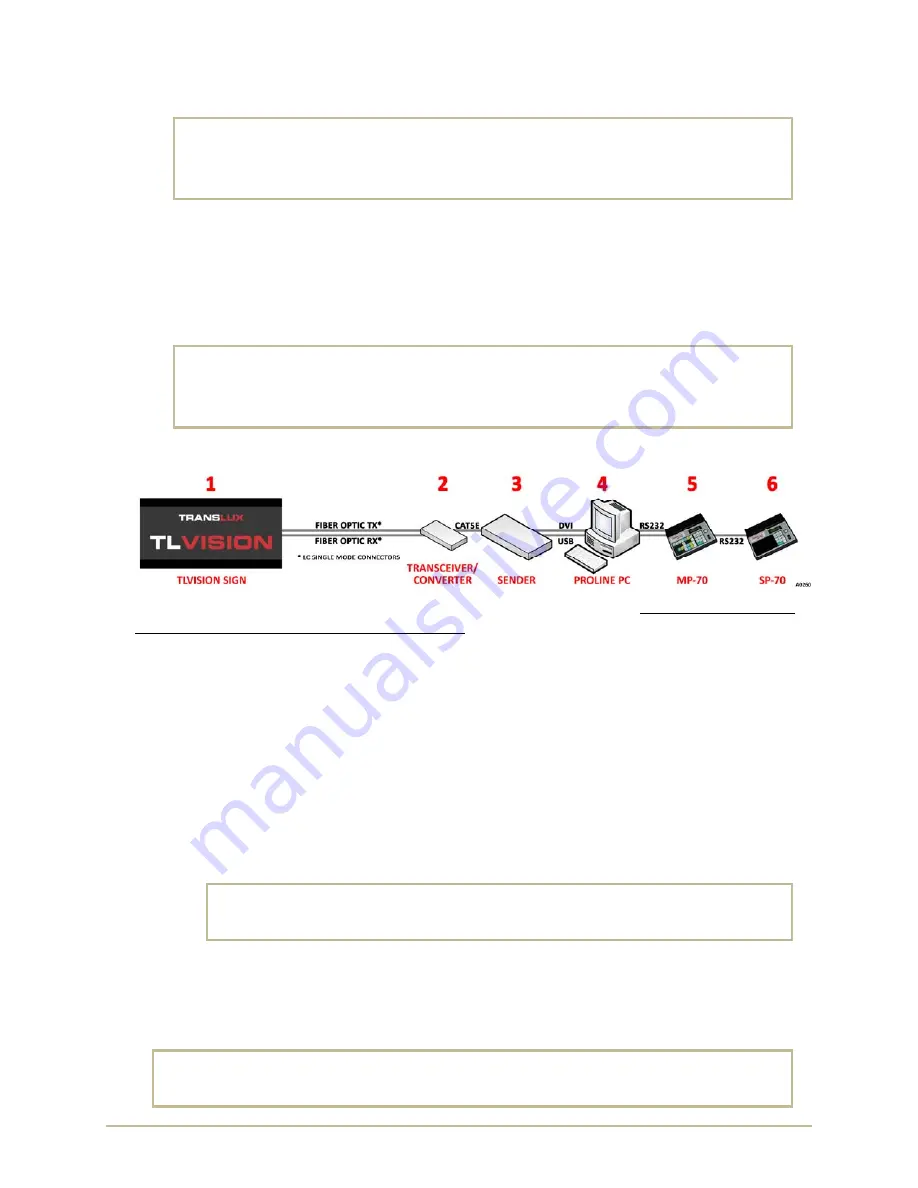
TL


Vision


/


Fiber


Optic


/


Epic


/


ProLine


refer


page


5.


TL


Vision


/


Fiber


Optic


/


Epic


/


ProLine


/


MP

70


refer


to


page6.


TL


Vision


/


Fiber


Optic


/


Epic


/


ProLine


/


MP

70


/


SP

70


refer


to


page


7.


WARNING! 

DO NOT start the ProLine PC/Laptop. All cables must be 

connected and equipment must be 

powered up and powered 

down in a specific order

. Otherwise, loss of DVI configuration 

settings could occur. 

B.


S

TARTUP


To


prevent


any


possible


loss


of


pre

programmed


configuration


settings


it


is


very


important


to


turn


on


the


equipment


in


the


following


specific


order

:


1.


Turn


ON


the


TLVision.


2.


Turn


ON


the


Transceiver/Converter.


3.


Turn


ON


the


Sender


Box


[and


Video


Processor


if


present].


4.


Turn


ON


the


ProLine


PC/Laptop.


TLVision


sign


should


display


the


following:


a.


Blue


screen


Windows


is


loading.


b.


Black


screen


wait


several


seconds


until


ProLine


starts


and


loads


message.


NOTE

:


ProLine


is


set


at


the


factory


to


start


automatically


but


if


it


does


not


then


manually


start


ProLine.


c.


Display


Message


ProLine


displays


the


default


message.


5.


Turn


ON


the


MP

70.


WARNING! 

Powering up the MP-70 ahead of the ProLine PC/Laptop may cause 

the ProLine PC/Laptop to load the MP-70 as a mouse or pointing 

device. 

6.


Turn


ON


the


SP

70.


C.


P

OWER 

D

OWN 

I

R

EVERSE 

O

RDER


Power


down


in


reverse


order

.


Wait


until


the


ProLine


PC/Laptop


is


completely


powered


down


before


turning


off


the


Video


Processor,


Sender,


and


TLVision


Sign.


WARNING! 

Wait until the ProLine PC/Laptop is completely powered down

 before turning 

off the Sender, Video Processor and TLVision Sign. Otherwise, loss of DVI 

configuration settings could occur. 

Summary of Contents for TL Vision

Page 1: ...TL VISION TL VISION EPIC PROLINE MESSAGE CONTROLLER CONNECTION INSTRUCTIONS PN 98 0019 57 REV 1703 20 ...

Page 2: ...rranties as to performance or merchantability or any other warranties whether expressed or implied In particular Trans Lux does not warrant that operation of ProLine will be error free or uninterrupted including interruption to other programs that may be installed on the same computer PC Good data processing procedures dictate that any program is thoroughly tested with non critical data before rel...

Page 3: ...VERSE ORDER 2 WIRING DIAGRAMS 3 TL VISION CAT5 EPIC PROLINE 3 TL VISION CAT5 EPIC PROLINE 4 TL VISION FIBER OPTIC EPIC PROLINE 5 TL VISION FIBER OPTIC EPIC PROLINE MP 70 6 TL VISION FIBER OPTIC EPIC PROLINE MP 70 SP 70 7 TROUBLESHOOTING 8 CABLES CONNECTIONS 9 RS232 DVI USB CAT5 9 FIBER OPTIC CABLES 9 COMPONENT OPERATION 9 SENDER BOX MCTRL300 9 FIBER TRANSCEIVER CONVERTER CVT320 9 RECEIVER MRV300 9...

Page 4: ...PROLINE CONNECTION INSTRUCTIONS IV 98 0019 57 REV 1703 20 This page intentionally left blank ...

Page 5: ...SETUP INFORMATION ORDER INFORMATION If Help Desk assistance is ever needed the following information will be used to aid you in your discussions with the service representatives and expedite your call Please record the following information Trans Lux Sales Order Number This number is found in the upper right hand corner of the packing slip or invoice Model Number This number is found on the lower ...

Page 6: ...turn on the equipment in the following specific order 1 Turn ON the TLVision 2 Turn ON the Transceiver Converter 3 Turn ON the Sender Box and Video Processor if present 4 Turn ON the ProLine PC Laptop TLVision sign should display the following a Blue screen Windows is loading b Black screen wait several seconds until ProLine starts and loads message NOTE ProLine is set at the factory to start auto...

Page 7: ...98 0019 57 REV 1703 20 3 PROLINE CONNECTION INSTRUCTIONS WIRING DIAGRAMS TL VISION CAT5 EPIC PROLINE ...

Page 8: ...PROLINE CONNECTION INSTRUCTIONS 4 98 0019 57 REV 1703 20 TL VISION CAT5 EPIC PROLINE ...

Page 9: ...98 0019 57 REV 1703 20 5 PROLINE CONNECTION INSTRUCTIONS TL VISION FIBER OPTIC EPIC PROLINE ...

Page 10: ...PROLINE CONNECTION INSTRUCTIONS 6 98 0019 57 REV 1703 20 TL VISION FIBER OPTIC EPIC PROLINE MP 70 ...

Page 11: ...98 0019 57 REV 1703 20 7 PROLINE CONNECTION INSTRUCTIONS TL VISION FIBER OPTIC EPIC PROLINE MP 70 SP 70 ...

Page 12: ...ver Converter Is the USB cable connected from the PC to the Sender Box Is the DVI cable connected from o PC to Sender Box or o PC to Video Processor and from Video Processor to Sender Box Is the PC powered ON Is ProLine or Epic Management running a display message The PC is ON and the main monitor is displaying the message instead of the TL Vision display If The DVI cable was not connected to the ...

Page 13: ...d SP 70 are all running SENDER BOX MCTRL300 STATUS red light indicates power is ON RUN flashing green light indicates data is being transmitted FIBER TRANSCEIVER CONVERTER CVT320 POWER red light indicates power ON FX ACT when optical fiber between both CVT320 are normal the indicators at two sides are ON when there are communications problems between optical fibers only one indicator is ON or two ...

Page 14: ...be used on step 4c 3 Plug the DVI cable to PC Wait for the PC to recognize the TL Vision as a Display 2 4 Open Epic Management and relocate the message window from Display 1 to Display 2 as follows a Windows Start Programs Trans Lux epic management epic management b epic management Settings S Display Settings S c Display Setting Start X enter the width value from step 2 Start Y 0 d Click OK button...

Page 15: ...elp Desk is organized to assist with all types of questions and issues including Request for Return Material Authorization RMA of equipment to be repaired Request for Warranty Parts Exchange Product selection and upgrade assistance When you call the Help Desk you can expedite your calls by having the following information refer to CUSTOMER SETUP INFORMATION on page 1 immediately available Sales or...

Page 16: ...PROLINE CONNECTION INSTRUCTIONS 12 98 0019 57 REV 1703 20 NOTES ...

Reviews: