background image


16 

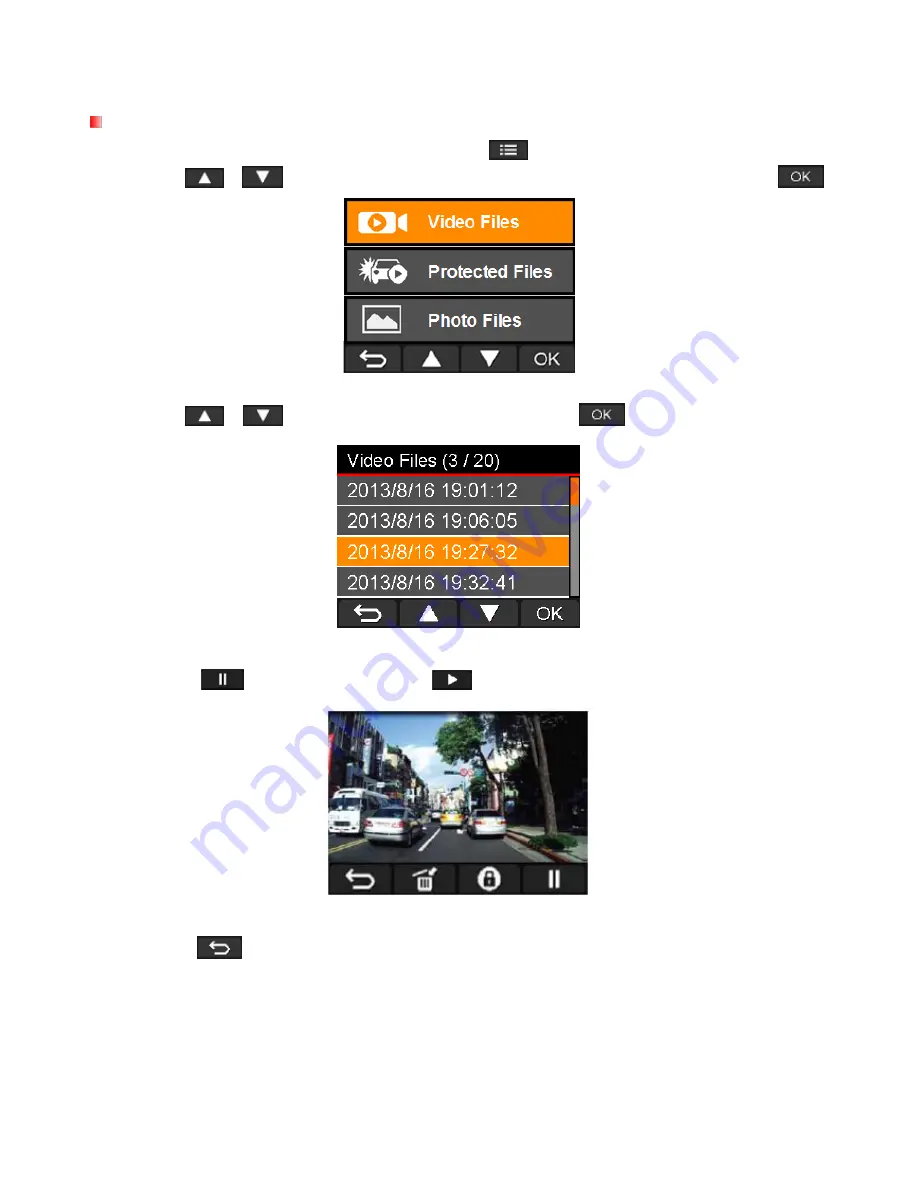
Browse and Play Videos


  Playing Videos / Browsing Photos 

1. 

During video recording, press the Browse button 

.


2. 

Use 

  / 

  to select either 

Video Files, or Protected Files or Photos

, and press 


3. 

Use 

  / 

  to select the desired video file, and press 


4. 

Press


to pause playback. Press

  again to resume playback. 


5. 

Press 

  to return to the video file list. 

Summary of Contents for DrivePro 220

Page 1: ...User s Manual DrivePro 220 Car Video Recorder Version 1 0...

Page 2: ...ing 14 Low Battery 15 Browse and Play Videos 16 Playing Videos Browsing Photos 16 Protecting Videos 17 Settings 18 Installing the DrivePro App 22 Connecting to the DrivePro using iOS and Android Devic...

Page 3: ...to record your driving history In addition the WI FI connection allows you to adjust the settings and download the recorded videos from your mobile devices Videos are saved on a microSD memory card a...

Page 4: ...e Contents The DrivePro Car Video Recorder package includes the following items A DrivePro Car Video Recorder An Adhesive Mount or a Suction Mount A Car Adapter A 16GB microSD Memory Card A Quick Star...

Page 5: ...4 A Warranty Card...

Page 6: ...in camera to capture real time images while recording Hi Speed USB 2 0 connector for easy computer connectivity and fast file transfers Record videos in MP4 file format with 15Mbps high video bit rat...

Page 7: ...performance Transcend does not guarantee the accuracy of GPS data which should not influence your personal judgment while driving GPS signals cannot penetrate buildings and metallic tinted films The...

Page 8: ...Socket J USB Connector K Built in Microphone L Built in Speaker Inserting a microSD Memory Card You must insert a microSD memory card into the DrivePro before you can start recording Please use a Clas...

Page 9: ...t not NTFS 2 To remove push to eject the memory card out of the slot WARNING Do not remove the memory card during shutdown to avoid damages to the memory card and loss of recorded videos The following...

Page 10: ...ro in the middle of the windshield near the rear view mirror for the best field of view 3 Peel off the protective film from the mount bracket s foam sticker and firmly attach the DrivePro to the winds...

Page 11: ...3 After the car engine is switched on the DrivePro will automatically turn on and start recording 4 After the car engine is switched off the DrivePro will automatically save the current recording and...

Page 12: ...ecording Power On Off Browse Files Settings Take Photos Browse Settings Back Up Down OK Video Playback Back Delete Protected Unprotected Play Pause View Photos Back Up Down Delete Press and hold the P...

Page 13: ...Flashing Red Recording Setting the Date and Time To set the current date and time 1 During video recording press the Settings button 2 Use to select Date Time Settings and press 3 Use to adjust value...

Page 14: ...ideo file is saved for every 3 minute of recording To adjust the recording length please refer to the Settings section in this manual c After the car engine is switched off the DrivePro will automatic...

Page 15: ...will appear on the screen when activated G Sensor Event Recording During video recording the DrivePro will automatically activate Emergency Recording mode when detecting a collision If the G Sensor se...

Page 16: ...harge the DrivePro immediately after viewing the Low Battery warning to avoid errors happening to the system time Please avoid using the built in battery to record videos directly Note Please fully ch...

Page 17: ...ng video recording press the Browse button 2 Use to select either Video Files or Protected Files or Photos and press 3 Use to select the desired video file and press 4 Press to pause playback Press ag...

Page 18: ...sure you want to delete this file will pop up 2 Use to select Yes and press to delete the file Protecting Videos 1 During playback of a normal video file press The message Are you sure you want to pr...

Page 19: ...sensitivity You can also set the date time change the interface language format the memory card and upgrade firmwares 1 During video recording press the Settings button 2 Use to select the desired me...

Page 20: ...ideo recording Available options Enable Disable Volume Set the speaker volume level Available options 0 1 2 3 4 5 You can choose 0 to switch on Silent Mode G Sensor Adjust the sensitivity of the G Sen...

Page 21: ...ate and time Date Time Format Set the date format to Y M D or M D Y and the time format to AM PM or 24H This setting applies to both Time Stamp and System Time Language Set the on screen display menu...

Page 22: ...DrivePro will automatically find the latest firmware file WARNING NEVER remove the power cord or the microSD memory card while the firmware is being upgraded If the DrivePro cannot be turned on due t...

Page 23: ...device to search for the DrivePro App 2 Select the suitable DrivePro App 3 Tap FREE to start the download process 4 Tap INSTALL to complete installation Installing the App on an Android device 1 Open...

Page 24: ...o appear on your iOS device 4 Tap Settings to turn on Wi Fi 5 Select DrivePro 220 from Choose a Network 6 Enter the Wi Fi security key 12345678 on your Android device 4 Tap System Settings to turn on...

Page 25: ...eo footages recording format microphone status current time and recording status Browse 1 Tap Browse from the DrivePro App home page WARNING After tapping Browse the DrivePro will automatically stop r...

Page 26: ...appear below the video file File function bar 2 From the file function bar tap the download icon For iOS The file will be downloaded to the Camera Roll in the iOS device For Android The file will be d...

Page 27: ...ormation 1 Tap the information next to the thumbnail image of the desired video The file function bar will appear below the video file 2 From the file function bar tap the information icon to view the...

Page 28: ...e large end of the cable into an available USB port on your desktop or laptop DP220 package does not contain any USB cable The DrivePro will display the following screen when connected to a computer W...

Page 29: ...ay 2 A Safely Remove Hardware window will pop up Click to continue 3 A window stating The USB Mass Storage Device device can now be safely removed from the system will pop up Unplug your DrivePro from...

Page 30: ...ro is connected to a computer it can only be used for transferring files You will not be able to use any of the DrivePro s features at this time Please disconnect your DrivePro from the computer to re...

Page 31: ...USB port If not unplug and connect it again Make sure that both ends of the USB cables are properly connected as shown in the User s Manual 2 Is your DrivePro connected to the Mac keyboard If yes try...

Page 32: ...g button 1 reset button Dimensions 70 2 mm L 63 1mm W 34 5mm H Weight 90g Power Supply car charger Input DC12V 24V Output DC5V 1A Operating Temperature 20 C 4 F 65 C 149 F Video Formats H 264 MP4 up t...

Page 33: ...The correct disposal of your old product helps prevent potential negative consequences on the environment and human health Battery Disposal Your product contains a built in rechargeable battery covere...

Page 34: ...pment does cause harmful interference to radio or television reception which can be determined by turning the equipment off and on the user is encouraged to try to correct the interference by one or m...

Page 35: ...g prolonged exposure to humidity acts of nature improper installation including connection to incompatible equipment or problems with electrical power including undervoltage overvoltage or power suppl...

Page 36: ...rant Transcend grants to Customer a personal non exclusive non transferable non distributable non assignable non sublicensable license to install and use the Licensed Software on the Product in accord...

Page 37: ...E OR ACCURACY OF THE LICENSED SOFTWARE OR WITH THE DELAY OR INABILITY TO USE THE LICENSED SOFTWARE OR THE PRODUCT WITH WHICH THE LICENSED SOFTWARE IS ASSOCIATED WHETHER BASED ON CONTRACT TORT NEGLIGEN...

Reviews: