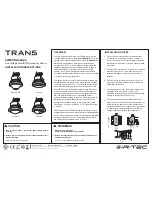


WIRING DIAGRAM
SPECIFICATIONS
www.irtec.com
LOD-509
DIM
L
N
Neutral
Line
DIM
DIM
N
L
Gray
Violet
Red
White
Black
LIGHT SOURCE
BALLAST
LED DRIVER
The LOD-509 series features 8 different control modes for
selection via rotary DIP switch. Please refer to the following
table for selecting the control mode.
MODE (Control mode selection)
TESTING
The SmartDIM level of each sensor is factory set at maximum
position. If necessary, the SmartDIM level can be decreased
by adjusting the potentiometer (DIM) counterclockwise. To
achieve proper lighting level, avoid setting the SmartDIM
when the space is having abundant daylight.
NOTE: If the ambient light level exceeds 2X of SmartDIM level
for more than 20 minutes, the sensor may switch off the light
even under occupancy.
SmartDIM setting
The sensor provides 7 different times via pointing the TIME
potentiometer to different positions (as above table). It is
the time period that sensor will activate SmartDIM control to
the connected light, starts from detecting the presence of
an occupant and ends if no movement is detected before
the time elapsed.
TIME setting
Remove the lens. Set the arrow of TIME potentiometer
pointing at position “1” (TEST) and MODE switch at the
desired control mode.
Walk within the expected range* at normal speed. The
sensor will switch ON (ALS and SmartDIM disabled) the
light for 10 seconds whenever sensor detects the
movement, and then switch OFF or dim to 1/2 output for 10
seconds as per the selected mode. The LED of sensor will
also blink to indicate every motion detected.
After testing complete, ensure to set the TIME
potentiometer to the position of desired time. NOTE: The
sensor will automatically control the light as per the
selected mode with factory set time delay (10 minutes) if
the TIME potentiometer has NOT been set to other position.
1.
2.
3.
*
The coverage may vary with the lens type and mounting height
applied. Refer to the attached LENS DATASHEET for more details.
SENSOR SETTINGS
MODE
A
B
C
G
F
D
E
H
T
3’
5’
10’
15’
30’
20’
TIME
1
2
3
4
5
6
7
POS.
MODE
A
B
C
F
D
E
G
H
TIME
DIM
4
5
1
2
6
7
3
(Factory set)
TIME
(10 minutes)
(Max)
DIM
(OSLATO)
4 5
1
2
6
7
3
Factory Set
NOTE:
1. The driver/ballast MUST be 0-10V dimmable to achieve
dimming control.
2. Ensure connection of LINE and NEUTRAL are not reversed
to avoid damaging the sensor.
3. Ensure TOTAL isolation between DIM+/DIM- and GROUND
to avoid damaging the sensor.
4. Conduct test with GROUND connected.
To verify sensor control function normal, please proceed with
the instructions as below to conduct test;
Mode
Sensor Control Description
A
(ON/OFF)
1. Ambient light sensor is disabled.
2. Turn the light to full-ON as per TIME set under occupancy.
3. Turn off the light after the delay time elapsed.
B
(OSO)
1. Ambient light sensor is disabled.
2. SmartDIM controls whenever sensor detects occupancy.
3. Dim to 1/2 of SmartDIM level after delay time elapsed.
C
(OSLA)
1. ALS inhibits lighting while ambient light > 50 lux.
2. Dim the light to 1/2 of SmartDIM if ambient light < 20 lux.
3. SmartDIM control as per TIME set under occupancy.
D
(OSMA)
1. ALS inhibits lighting while ambient light > 80 Lux.
2. Dim the light to 1/2 of SmartDIM if ambient light < 50 lux
3. SmartDIM control as per TIME set under occupancy.
E
(OSHA)
1. ALS inhibits lighting while ambient light > 130 lux.
2. Dim the light to 1/2 of SmartDIM if ambient light < 80 lux
3. SmartDIM control as per TIME set under occupancy.
F
(OSLATO)
1. ALS inhibits lighting while ambient light > 50 lux.
2. SmartDIM control as per TIME set under occupancy if
ambient light < 20 lux. Dim the light to 1/2 of SmartDIM level
for 10 min. as Time Off.
3. Turn to SmartDIM control as per TIME set if sensor detects
occupancy during Time Off. Turn off the light if no occupancy
detected during TO.
G
(OSMATO)
1. ALS inhibits lighting while ambient light > 80 lux.
2. SmartDIM control as per TIME set under occupancy if
ambient light < 50 lux. Dim the light to 1/2 of SmartDIM level
for 10 min. as Time Off.
3. Turn to SmartDIM control as per TIME set if sensor detects
occupancy during Time Off. Turn off the light if no occupancy
detected during TO.
H
(OSHATO)
1. ALS inhibits lighting while ambient light > 130 lux.
2. SmartDIM control as per TIME set under occupancy if
ambient light < 80 lux. Dim the light to 1/2 of SmartDIM level
for 10 min. as Time Off.
3. Turn to SmartDIM control as per TIME set if sensor detects
occupancy during Time Off. Turn off the light if no occupancy
detected during TO.
Power supply
Infrared sensor
Photo sensor
HIC protection
Dim control
Detectable speed
Mounting height
Detection range
Delay time setting
Time-off delay
Op. humidity
Op. temperature
Dimensions
100/120/230/277VAC, 50/60 Hz
Omni-directional quad element pyroelectric
Digital ambient light sensor
Max. 80A for 16.7msec.
0-10V, non-isolated, max. 25 mA
0.15 ~ 3 m/sec. (0.5~10 ft./sec.)
Subject to the lens applied
As per lens applied and mounting height
T/3/5/10/15/20/30 min., T: 10 sec.
10 min., OSxATO modes only
Max. 95% RH
-40°C~70°C (-40°F~158°F)
Ø60 x H37mm (Ø2.36”x H1.45”)
*Max load for operating temperature at 55°C~70°C (131°F~158°F)
100-120VAC
800/*500W(VA)
800/*500W(VA)
540/*500VA
5A
5A
5A
230VAC
1200/*750W(VA)
1200/*750W(VA)
1200/*750VA
277VAC
Maximum Load
-Incandescent/Halogen
-Fluorescent Ballast/CFL
-Ballast Electronic (LED)
NOTE:
Ensure to set the DIP switch at “click” position while
setting the control mode.