background image

11

20

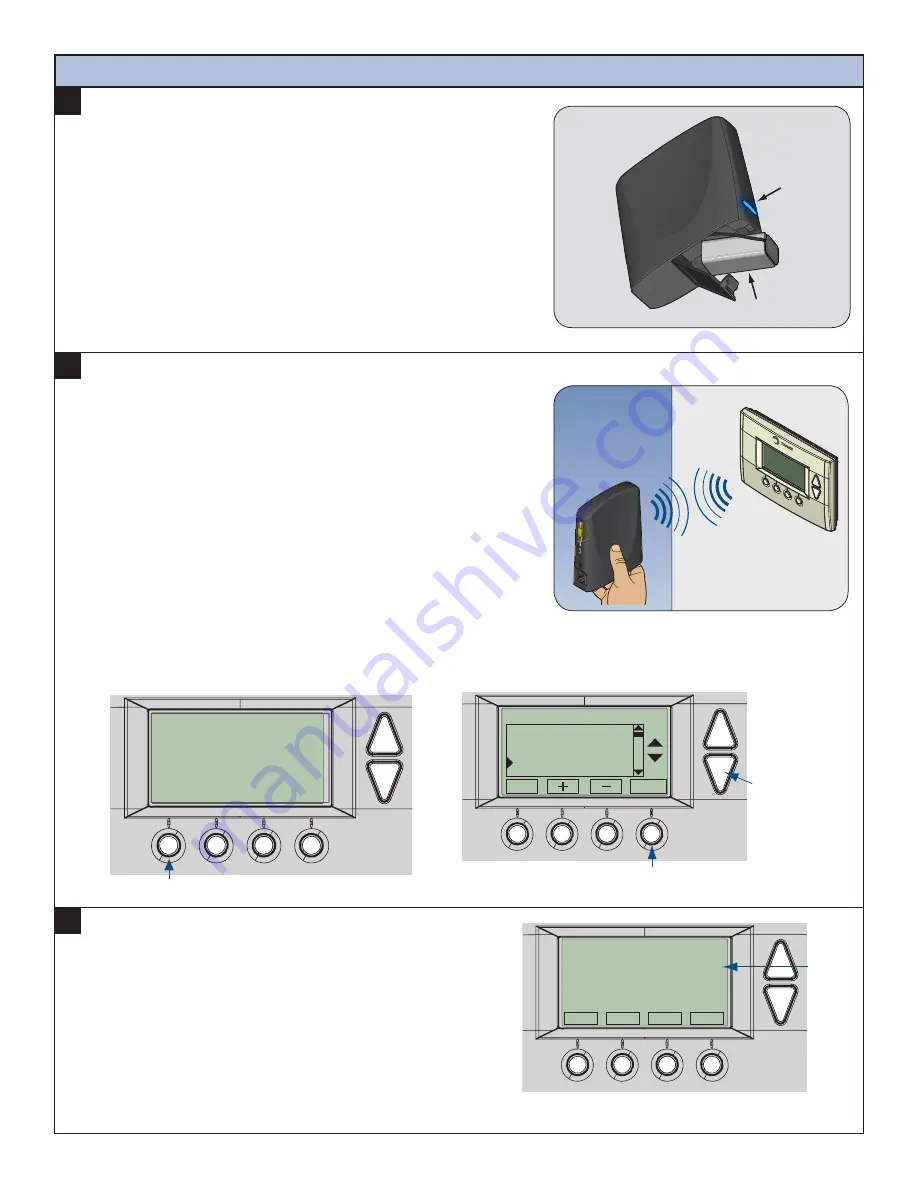
Prepare the Schlage Bridge for enrollment.

•  If you are using a controller that is not a Schlage Bridge, consult the 

instructions that came with the controller to find out how to enroll a 
new device.

a.  Unplug Ethernet and power cables from Schlage Bridge.
b.  Install a quality 9 volt battery.
c.  Verify that blue light is blinking. If blue light is solid, battery is dead.  

Replace with new 9 volt battery, if needed.

d.  Take the Schlage Bridge to the location where the thermostat is mounted.

Enroll Thermostat into existing Schlage LiNK

TM

 System

21

Enroll the thermostat into the Schlage Bridge.

a.  Hold the Schlage Bridge within 6 feet (1.8 meters) of the thermostat 

throughout steps “b” through “f”.

•  Important Note: After you begin the enrollment process, you have 

30 seconds to complete the remainder of the steps. Study the steps 
below before beginning.

b.  Press and release the plus 

(+) button on the Schlage Bridge.

c.  Press the 

MENU button on the thermostat.

d.  Scroll down to 

Z Wave Install, and press the Select button.

e.  Press the 

Yes button to enroll the thermostat.

f.  Observe the lights on the Schlage Bridge.  The orange light will blink 

while enrollment is taking place.  Enrollment is complete when the orange 
light becomes solid.

MENU   MODE     FAN       RUN

78

68 H
78 C

11:15 PM

MENU button

22

Verify enrollment of the thermostat.

a.  Scroll down to 

Thermostat Info, and press the Select button.

b.  Look at the number listed after 

ZNID.

•  If the number listed there is anything other than “000”, the 

thermostat has been successfully enrolled.

•  If the number listed there is “000”, the thermostat has NOT 

been successfully enrolled. In this case, repeat step 21 and 
verify again.

c.  Press 

Done button 2 times when finished.

Blue
light

Battery

Select button

Done

Select

Menu Selection

User Settings
Usage Graph
ESM Setpoints
ZWave Install

Scroll

down

ZNID

Done

Thermostat Info

TZEMT400BB32    Ver: 01.00.10

ZVER:02.00.0             ZNID: 013

ZHID: 01.07.37.a7

System Type:          Standard

Fan Type:                Gas

Gate

wa

y

Summary of Contents for Schlage LiNK TZEMT400BB32MAA

Page 1: ...patible with the following system types Radiant floor systems Wall heating systems Also the Trane Thermostat is not compatible with dual fuel systems gas furnace heat pump combined without adding a sp...

Page 2: ...the 24 VAC common terminal identified with the letter C X B or COM This terminal may already have a wire connected to it but it may not be a wire that goes to the thermostat 24 VAC common terminal C X...

Page 3: ...he label write down the terminal names and wire colors for later reference Y Y G W1 C R G R c R C Wire colors and letters may vary W 1 4 B C E F G O L Y1 Y2 Rc R Rh R X2 T W1 W W2 W3 X Y P516 001 Rev...

Page 4: ...Gas Furnace Multi Stage W2 label multi stage heating Y2 label multi stage cooling Electric Furnace Heat Pump Electric Furnace Single Stage Electric Furnace Multi Stage W2 label multi stage heating Y2...

Page 5: ...the Schlage Bridge 8 Mark two mounting holes using new wall plate a Pull wires through hole in center of wall plate b Locate the new wall plate over existing opening c Mark two holes with pencil d Us...

Page 6: ...x C X R RC VR V RH E X2 W W1 W2 Y AUX O R G F Y Y1 Y2 Connects to New Thermostat Terminals 24COM 24RC 24RH W1 W2 O B G Y1 Y2 Connect two wires to the W1 terminal If your existing thermostat has a V or...

Page 7: ...ay should turn on and begin displaying information If the thermostat display does not come on go back through the installation steps and look for problems Pay special attention to steps 3 3a and 11 14...

Page 8: ...t option then press the Select button c Scroll up or down to Set Clock it is the first option then press the Select button Done Select User Settings Set Clock Filter Service Maint Service Screen Timeo...

Page 9: ...on to change the setting to Y for Yes i If your system also has 2nd stage cooling scroll down to 2nd Stage Cool and press the button to change the setting to Y for Yes j Press the Done button 4 times...

Page 10: ...ct wires were connected to the wall plate and that each wire is securely attached to the appropriate terminal Also go back and verify that you have set up the Mechanical Settings to match your System...

Page 11: ...s button on the Schlage Bridge c Press the MENU button on the thermostat d Scroll down to Z Wave Install and press the Select button e Press the Yes button to enroll the thermostat f Observe the light...

Page 12: ...on Just Purchased A Schlage LiNK System For more information about the Schlage LiNK system visit www link schlage com Completing the setup a Remove the battery from the Schlage Bridge b Plug the Ether...

Reviews: