background image

10

18-CD19D5-25

Installer’s Guide

DUCT CONNECTIONS

Air duct systems should be installed in accordance with
standards for air conditioning systems, National Fire
Protection Association Pamphlet No.90. They should be
sized in accordance with ACCA Manual D or whichever
is applicable.
Central furnaces, when used in connection with cooling
units, shall be installed in parallel or on the upstream
side of the cooling coil to avoid condensation in the heat
exchanger. With a parallel flow arrangement, the damp-
ers or other means used to control flow of air shall be
adequate to prevent chilled air from entering the fur-
nace, and if manually operated, must be equipped with
means to prevent operation of either unit unless the
damper is in full heat or cool position.
On any job, flexible connections of nonflammable mate-
rial may be used for return air and discharge connections
to prevent transmission of vibration. Though these units
have been specifically designed for quiet, vibration free
operation, air ducts can act as sounding boards and could,
if poorly installed, amplify the slightest vibration to the
annoyance level.
When the furnace is located in a utility room adjacent
to the living area, the system should be carefully de-
signed with returns to minimize noise transmission
through the return air grille. Although these furnaces
are designed with large blowers operating at moderate
speeds, any blower moving a high volume of air will
produce audible noise which could be objectionable
when the unit is located very close to a living area. It is
often advisable to route the return air ducts under the
floor or through the attic. Such design permits the in-
stallation of air return remote from the living area
(i.e. central hall).
When the furnace is installed so that the supply ducts
carry air circulated by the furnace to areas outside the
space containing the furnace, the return air shall also
be handled by a duct(s) sealed to the furnace and termi-
nating outside the space containing the furnace.

RETURN AIR DUCT CONNECTION

NOTE:
On upflow 5 or 6 ton airflow models where the
airflow requirement exceeds 1800 CFM - Models will
require return air openings and  filters on:  (1) both
sides; or (2) one side and the bottom; or (3) just the
bottom.

All return air duct systems should provide for installa-
tion of return air filters.

1. Determine the appropriate position to set the

furnace in order to connect to the existing supply
and return ductwork.

2. For side return installations on upflow models,

remove the insulation around the opening in the
blower compartment.

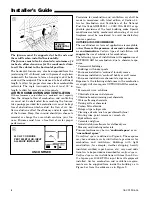
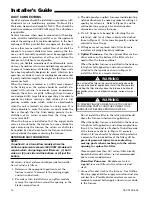
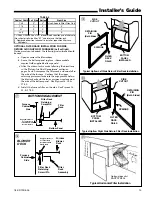
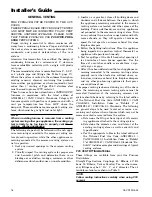
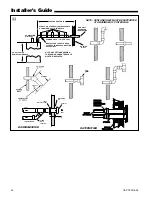
3. The side panels on upflow furnaces include locating

notches which may be used as guides for cutting an
opening for return air.  Refer to Figure 11 and the
outline drawing on page 5 for duct connection
dimensions for various furnaces.

4. If a 3/4" flange is to be used for attaching the air

inlet duct, add to cut where indicated by dashed
lines in Figure 11. Cut corners diagonally and bend
outward to form flange.

5. If flanges are not required, and a filter frame is

installed, cut along knockout guidelines.

6.

Upflow Furnaces:

  Use the optional filter rack on

either side or on the bottom if the filter is to be
used within the furnace cabinet.

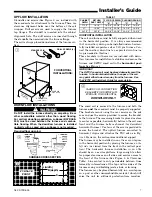
When the upflow furnace is installed in the horizon-
tal right or left application and a return duct is
attached to the top side as shown in Figure 10,
install the filter in a remote location.

WARNING

!

TO PREVENT INJURY OR DEATH DUE TO CONTACT 
WITH MOVING PARTS, TURN THE POWER TO THE 
FURNACE OFF BEFORE SERVICING FILTERS.

WARNING

!

Do not install the filter in the return duct directly above the 
furnace in horizontal applications. Install the filter remotely. 
Installing the filter directly above the furnace in horizontal 
applications may cause property damage, serious injury or 
death.

Do not install the filter in the return duct directly
above the furnace in horizontal applications.

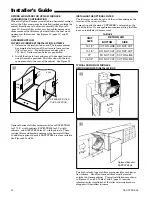
When the upflow furnace is installed in the horizon-
tal right or left application and a close coupled (less
than 36") return duct is attached to the bottom side
of the furnace as shown in Figure 10, securely
attach a 1/2" mesh metal hardware cloth protective
e screen to the inside bottom of the filter grill 

to

prevent personal injury from contacting
moving parts when reaching into the return
opening to replace the filter.

Close coupled (less than 36") return (filter directly
beneath bottom side return) is not recommended
due to noise considerations.

Downflow Furnaces: 

 Brackets are factory

supplied to mount filters in the return air duct
work.

7. Connect the duct work to the furnace.  See Outline

Drawing (pages 5&6) for supply and return duct size
and location.  Flexible duct connectors are recom-
mended to connect both supply and return air ducts
to the furnace.

Summary of Contents for DC1B040A9241A series

Page 1: ...Document is customer property and is to remain with this unit Please return to service information pack upon completion of work Installer s Guide UC1D100A9601A UC1D120A9601A DC1B040A9241A DC1B060A936...

Page 2: ...e WARNING CARBON MONOXIDE POISONING HAZARD Failure to follow the steps outlined below for each appli ance connected to the venting system being placed into operation could result in carbon monoxide po...

Page 3: ...to contents is found report the damage immediately to the de livering agency Codes and local utility requirements governing the installation of gas fired equipment wiring plumbing and flue connection...

Page 4: ...nel and any closed panel or door provided 5 Are the vent pipe and combustion air inlet pipe within vent table lengths Will the pipes remain un obstructed 6 Allow sufficient height in supply plenum abo...

Page 5: ...18 CD19D5 25 5 Installer s Guide UC1 OUTLINE DRAWING ALL DIMENSIONS ARE IN INCHES...

Page 6: ...6 18 CD19D5 25 Installer s Guide DC1 DOWNFLOW HORIZONTAL OUTLINE DRAWING ALL DIMENSIONS ARE IN INCHES...

Page 7: ...center as possible horizontally between the coil case front and the furnace bottom channel for downflow horizontal furnace Use four of the screws provided to secure the bracket The upflow furnace con...

Page 8: ...e spaces may have adequate air by infiltration to provide air for combustion and ventilation Buildings with tight construction for example weather stripping heavily insulated caulked vapor barrier etc...

Page 9: ...open ings one commencing within 12 inches of the top and one commencing within 12 inches of the bot tom of the enclosure The openings shall communi cate directly or by ducts with the outdoors or space...

Page 10: ...ould provide for installa tion of return air filters 1 Determine the appropriate position to set the furnace in order to connect to the existing supply and return ductwork 2 For side return installati...

Page 11: ...B080A9421A 17 1 2 1 17 X 25 X 1 UC1C100A9481A 21 1 20 X 25 X 1 UC1D100A9601A UC1D120A9601A 24 1 2 1 24 X 25 X 1 DC1B040A9241A DC1B060A9361A DC1B080A9421A 17 1 2 2 14 X 20 X 1 DC1C100A9481A 21 2 16 X 2...

Page 12: ...NSTALLATION FOR BOTTOM RETURN With the filter removed the filter rack is compressed and then inserted into the bottom of the furnace The retaining screw pin on each side inserts into engagement holes...

Page 13: ...side of the furnace Confirm that the upper retaining pin screw locks into the engagement hole in the blower deck and the lower pin screw rests against the side of the bottom panel See Figures 14 15 17...

Page 14: ...E RETURN AIR BOTTOM SIDE 14 1 2 CUT ON LINE DO NOT CUT 17 1 2 DO NOT CUT DO NOT CUT 21 DO NOT CUT CUT ON LINE 24 1 2 DO NOT CUT CUT ON LINE Airflow Airflow d TABLE 6 INSTALLING THE OPTIONAL FILTER The...

Page 15: ...T HORIZONTAL CLOSET HORIZONTAL ALCOVE ATTIC SIDES 0 1 0 BACK 0 3 6 TOP 1 1 1 FRONT 3 3 18 VENT 0 0 0 NOTE CLEARANCE REQUIRED AT TOP OF PLENUM IS 1 TABLE 7 TABLE 8 CABINET WIDTH FILTER SIZE FILTER BRAC...

Page 16: ...ows and all doors between the space in which the appliances remaining connected to the common venting system are located and other spaces of the building Turn on clothes dryers and any appliances not...

Page 17: ...t be vented to the exterior of the house and combustion air MUST come through the inlet air pipe FROM OUTSIDE AIR For NONDIRECT VENT APPLICATION The furnace shall be vented to the exterior of the hous...

Page 18: ...he vent pipe must adhere to the maximum length limit shown in the table above See Note 7 below for exception The inlet pipe can be of a larger diameter but never smaller than the vent pipe 3 MAXIMUM P...

Page 19: ...aximum length limit shown in the table above See Note 7 below for exception The inlet pipe can be of a larger diameter but never smaller than the vent pipe 3 MAXIMUM PIPE LENGTHS MUST NOT BE EXCEEDED...

Page 20: ...ck or balcony is fully open on a minimum of two sides beneath the floor Clearance in accordance with local installation codes and the requirements of the gas supplier and the manufacturer s Installati...

Page 21: ...ed space HORIZONTAL VENTING THROUGH WALL These furnaces may be installed as direct vent as shipped or as nondirect vent Installation must conform to national state and local codes The vent inlet termi...

Page 22: ...18 IN FOR CANADA MINIMUM CLEARANCE ABOVE HIGHEST ANTICIPATED SNOW LEVEL OR GRADE WHICHEVER IS GREATER 1 2 BAYAIR30AVENTA Sidewall COMBUSTIBLE MATERIAL WALL A minimum clearance of 1 to combustible mate...

Page 23: ...detector with alarm and battery back up may be installed on the next adjacent floor level b In the event that the requirements of this subdivision can not be met at the time of completion of installa...

Page 24: ...FIRST SUPPORT SHOULD BE AS CLOSE TO FURNACE CONNECTION AS POSSIBLE UPWARD PITCH 1 4 PER FOOT STRAPS OR OTHER SUITABLE SUPPORTS AT MAXIMUM OF 3 0 INTERVALS COMBUSTION AIR INLET USE ONLY APPROVED TERMIN...

Page 25: ...st be connected into a condensate drain pump an open or vented drain or it can be connected to the outlet hose of the furnace s condensate trap Outdoor draining of the furnace and coil conden sate is...

Page 26: ...OUGH CEILING CEILING SUPPORT FLANGE FLUE PIPE COUPLING SEAL BETWEEN FLANGE PIPE COUPLING AND METAL PANEL WITH HI TEMP RTV SILICONE SEALANT CLEARANCE 0 ACCEPTABLE FOR PVC VENT PIPE 1 ACCEPTABLE FOR TYP...

Page 27: ...the top side of the pipe The straight side must be on bottom for proper conden sate drainage This coupling is factory supplied only with the following models UC120 DC120 UX120 UY120 UX100 UY100 UX808C...

Page 28: ...the trap from its present location and reposition the trap outside of the unit through the long circular hole next to the secondary recuperative cell Remove the larger drain line from the secondary c...

Page 29: ...leg of the 120V power supply must be con nected to the black power lead as indicated on the wir ing diagram Provision for hooking up an electronic air cleaner and or humidifier is provided on the inte...

Page 30: ...ing B340388 Rv 2 SEE NOTE 8 FURNACE B C B C TO 115 V 1 PH 60 HZ POWER SUPPLY PER LOCAL CODES HUM SEE NOTE 5 EAC SEE NOTE 5 FIELD WIRING DIAGRAM FOR 1 STAGE FURNACE 1 STAGE HEATING 1 STAGE COOLING USIN...

Page 31: ...TWIN400A WARNING EXPLOSION HAZARD PROPANE GAS IS HEAVIER THAN AIR AND MAY COLLECT IN ANY LOW AREAS OR CONFINED SPACES IN ADDITION ODORANT FADE MAY MAKE THE GAS UNDETECTABLE EXCEPT WITH A WARN ING DEVI...

Page 32: ...P LEG AUTOMATIC GAS VALVE WITH MANUAL SHUTOFF MAIN MANUAL SHUTOFF VALVE GROUND UNION JOINT DRIP LEG THE DOWNFLOW VERTICAL MAY BE INSTALLED LEFT OR RIGHT SIDE GAS PIPING W GAS PIPING The upflow horizon...

Page 33: ...ating Gas Valve Adjustment Changes can be made by adjusting the manifold pres sure See Table 15 or changing orifices orifice change may not always be required To adjust the manifold pressure 1 Turn of...

Page 34: ...is required to correct the furnace input rating refer to Table 17 TABLE 15 FINAL MANIFOLD PRESSURE SETTINGS inches w c FUEL PRESSURE NATURAL GAS 3 5 W C LP GAS 10 5 W C HIGH ALTITUDE DERATE Input rati...

Page 35: ...N MONOXIDE POISONING HAZARD Failure to follow the installation instructions for the venting system being placed into operation could result in carbon monoxide poisoning or death START UP AND ADJUSTMEN...

Page 36: ...signaling the control module to run its self check routine After the control module has verified that the pressure switch contacts are open and the limit switch es contacts are closed the draft blower...

Page 37: ...furnace wiring diagram found in the SER VICE FACTS or inside the furnace casing INSTRUCTIONS TO THE OWNERS In the event that electrical fuel or mechanical failures occur the owner should immediately t...

Page 38: ...ire and smoke detectors per the manufacturers installation in structions to help alert dwelling occupants of the pres ence of fire smoke or unsafe levels of carbon monoxide These devises should be lis...

Page 39: ...ed 3 Flashes Draft Pressure Error Possible problems a Venting problem b Pressure switch problem c Inducer problem 4 Flashes Open Temperature Limit Circuit 5 Flashes Flame sensed when no flame should b...

Page 40: ...data improvement it reserves the right to change design and specifications without notice Trane 6200 Troup Highway Tyler TX 75707 For more information contact your local dealer Literature Order Numbe...

Reviews: