background image

5

3270 3319 Rev B

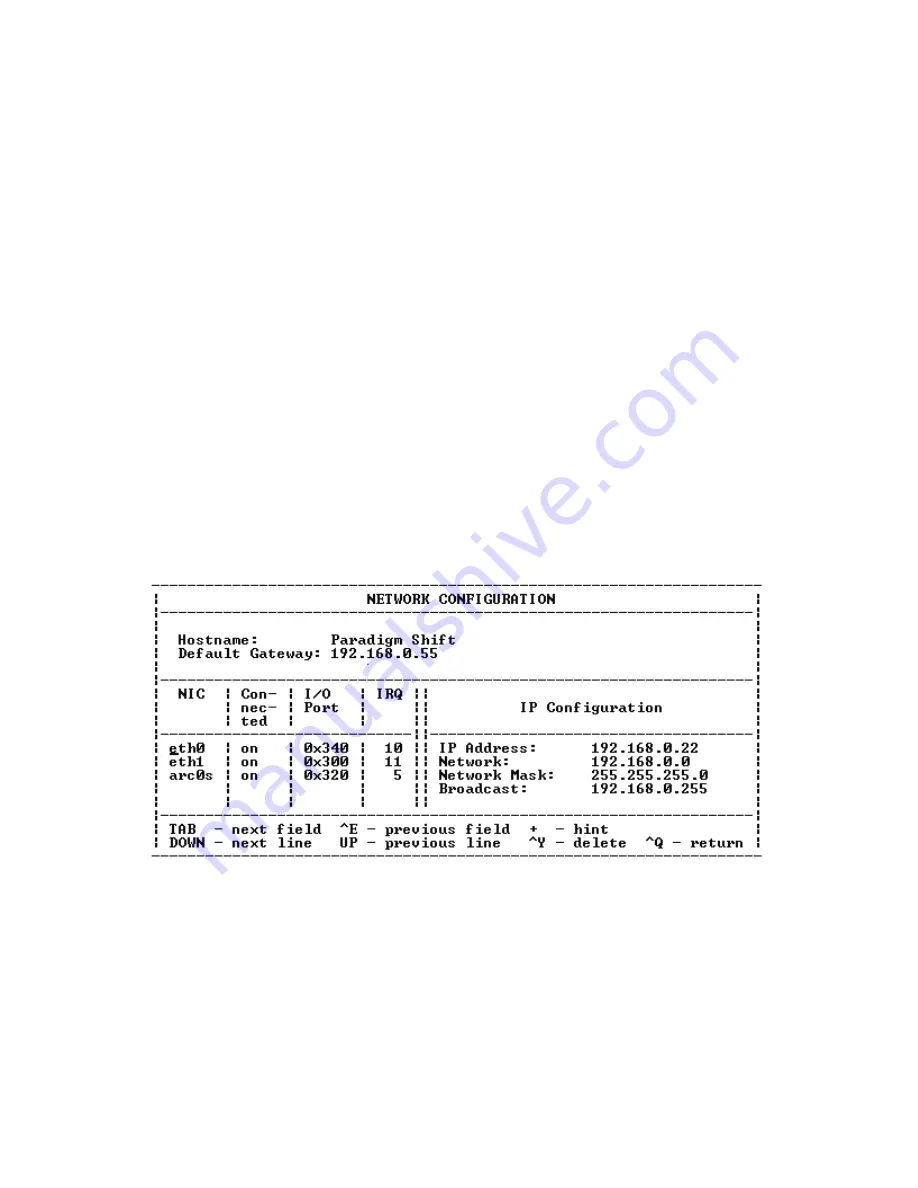
Configure eth0 from the NETWORK 
CONFIGURATION screen

Configure the Ethernet 0 (eth0) network interface 
card (NIC) at the NETWORK CONFIGURATION 
screen: 

1.

At the setup menu (Figure 4 on page 4), use the 

TAB

 key to move the cursor to Network 

Configuration. 

2.

Press 

ENTER

. The NETWORK 

CONFIGURATION screen displays (Figure 6).

Note: 

The bottom of the NETWORK 
CONFIGURATION screen shows the navigation 
commands. The most commonly used commands 
are 

TAB

+

, and 

^

Q

 (

CTRL

 key and 

Q

 key pressed 

simultaneously). The 

^

Q

 (return) command 

steps the display back through the program.

3.

Use the 

TAB

 key to move the cursor to eth0.

4.

Use the 

TAB

 key to move the cursor to the IP 

Address field in the IP Configuration column. 

5.

Type the IP address that you received from the 
network administrator. 

6.

Press the 

TAB

 key to move the cursor to the 

Network field in the IP Configuration column. 

7.

Type the same address that you entered in the 
IP Address field, but substitute a 

0

 for the last 

number. 

8.

Press the 

TAB

 key to move the cursor to the 

Network Mask field in the IP Configuration 
column. 

9.

Type the subnet mask address that you received 
from the network administrator. 

10. Press the 

TAB

 key to move the cursor to the 

Broadcast field in the IP Configuration column. 

11. Type the same address that you entered in the 

IP Address field, but substitute 255 for the last 
number.

12. Use the 

^

Q

 command to return to the setup 

menu (Figure 4 on page 4).

13. Go to 

Configure eth1 from the NETWORK 

CONFIGURATION screen

 on page 6

Figure 6: 

Sample NETWORK CONFIGURATION screen for eth0


Summary of Contents for 4950 0471

Page 1: ... For more information about BACnet IP network installations see engineering bulletin Tracer Summit BACnet IP Network Installations BAS PRB004 EN When you have the TCP IP information refer to the topics that follow The topics provide router specifications and wiring information They also provide information and procedures for connecting configuring and troubleshooting the router Router specificatio...

Page 2: ...used for system configuration and operation As part of the construction specifications Trane is required to use the TCP IP network for communications Tracer Summit communications use the BACnet protocol ASHRAE ANSI 135 95 and IP communications follow annex J 1999 of this standard The critical networking requirements are IP communications using UDP at port 47808 or other user designated port Each B...

Page 3: ...ort Figure 3 with the provided crossover cable Properties set to 9600 baud 8 bits 1 stop bit and no parity ANSI command and character sets installed VT100 compatible Tracer Summit PC Workstation v10 0 BACnet Ethernet or ARCNET LAN BMTW BCU IP 192 168 0 23 Subnet mask 255 255 255 0 Gateway 192 168 0 55 BMTS BCU Tracer Summit PC Workstation v11 0 IP 192 168 0 20 Subnet mask 255 255 255 0 Gateway 192...

Page 4: ...se the TAB key to move the cursor to Port Table 2 Press ENTER The PORT TABLE screen displays Figure 5 Note The bottom of the PORT TABLE screen shows the navigation commands The most commonly used commands are TAB and Q CTRL key and Q key pressed simultaneously The Q return command steps the display back through the program 3 At the BACnet Network column verify that each BACnet LAN has a network nu...

Page 5: ...d in the IP Configuration column 5 Type the IP address that you received from the network administrator 6 Press the TAB key to move the cursor to the Network field in the IP Configuration column 7 Type the same address that you entered in the IP Address field but substitute a 0 for the last number 8 Press the TAB key to move the cursor to the Network Mask field in the IP Configuration column 9 Typ...

Page 6: ...down arrow key to move the cursor to eth1 5 Use the TAB key to move the cursor to the IP Address field in the IP Configuration column 6 Type the IP address that the manufacturer used to configure the router Or use the screen default 7 Press the TAB key to move the cursor to the Network field in the IP Configuration column 8 Type the same address that you entered in the IP Address field but substit...

Page 7: ...d steps the display back through the program 3 Use the TAB key to move the cursor to the Default Gateway field 4 Type the Default Gateway address that you received from the network administrator 5 Use the Q command to return to the setup menu Figure 4 on page 4 6 Go to Configure BBMDs Configure BBMDs Configure the BBMDs at the broadcast distribution table BDT For detailed information about BBMDs a...

Page 8: ...s are set save changes exit the editor and reboot the router 1 Repeat the Q command until a message appears asking if you want to save and write to the disk 2 Select Y yes 3 When asked if you want to reboot select Y yes The router reboots Note When the write operation completes the screen returns to the command prompt 4 Disconnect from the terminal emulator and close the screen Troubleshooting Aft...

Reviews: