Page 5
1. Introduction
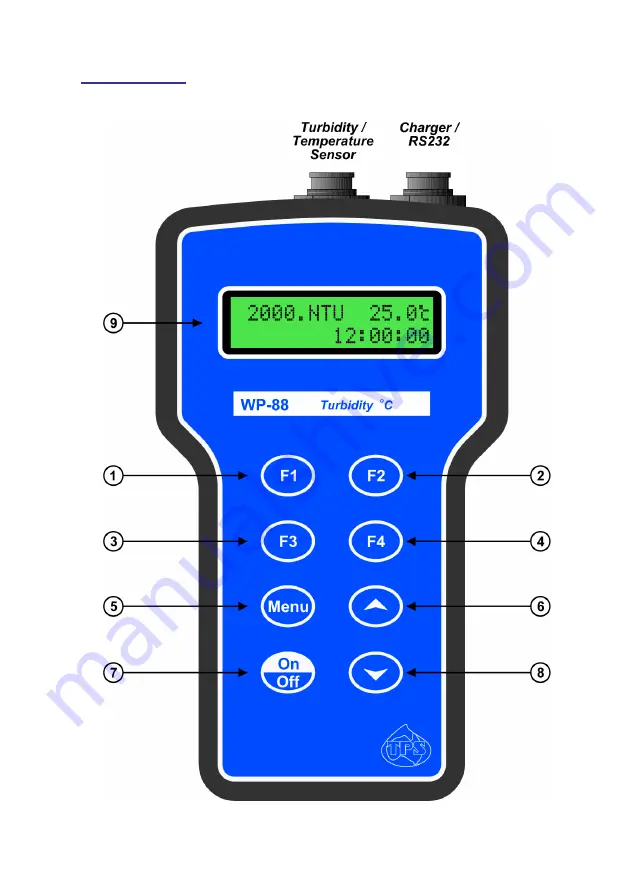
1.1 WP-88 Display and Controls
Page 1: ...ave also been included to enable you to find the information you need at a glance 2 Introduction The introduction has a diagram and explanation of the display and controls of the WP 88 It also contains a full listing of all of the items that you should have received with your WP 88 Please take the time to read this section as it explains some of items that are mentioned in subsequent sections 3 Ma...
Page 2: ...rendale QLD Australia 4500 Phone 07 32 058 027 International 61 7 32 058 027 Fax 07 3808 4871 International 61 7 3808 4871 Email tps tps com au Web www tps com au The optical components contained within the Turbidity Sensor are covered by US Patent number 6 842 243 ...
Page 3: ...rmation on the display 19 8 2 Failed Calibration 20 8 3 Printing GLP Information to the RS232 Port 20 8 4 Instrument Serial Number 20 8 5 Additional GLP Features 20 9 Notepad Function 21 9 1 Recording Readings into the Notepad 21 9 2 Recalling Records from the Notepad 21 9 3 Erasing Records from the Notepad 22 9 4 Printing Records from the Notepad to the RS232 Port 22 10 Automatic Data logging 23 ...
Page 4: ...ck Function 33 14 1 Setting the Clock 33 14 2 Displaying or Hiding the Clock 33 15 Initialising the WP 88 34 16 Instrument firmware version number 34 17 Troubleshooting 35 17 1 General Errors 35 17 2 Turbidity Troubleshooting 36 18 Warranty 37 ...
Page 5: ...Page 5 1 Introduction 1 1 WP 88 Display and Controls ...
Page 6: ...ress to access the user friendly menu system which makes the WP 88 a breeze to operate and The and keys are used when setting the clock section 14 1 setting the automatic logging period section 10 and displaying GLP information section 8 1 The key is also used to initialise the WP 88 at turn on See section 15 Switches the WP 88 on and off Display 32 character alpha numeric display with user friend...
Page 7: ...condary Standard 200mL 125216 6 Black Calibration Bottles 250mL 2 supplied 125300 7 Battery charger 130037 8 Manual Options that may have been ordered with your WP 88 1 Protector cover for field use 125189 2 Extended cable 130040 3 RS232 Serial Interface Cable 130041 4 Communication software for Windows 95 and later 130086 5 USB to Serial Adaptor requires 130041 also 130087 6 Hard Carry Case 13005...
Page 8: ...ion Turbidity Standard Low Range 30 0 to 180 0 NTU High Range 200 to 2000 NTU Turbidity Zero Cal Range 0 to 15 0 NTU Turbidity Span Cal Range 90 to 110 Temperature Factory calibrated when manufactured Memory 3600 readings including date and time Automatic Logging User set for one reading every 1 to 90 seconds 1 to 90 minutes or 1 to 24 hours RS232 Output 300 1200 9600 19200 baud 8 bits no parity 1...
Page 9: ...ubleshooting Good Laboratory Practices Date Time and Value of last Turbidity calibration are stored and can be recalled or sent to the RS232 port at any time Power 6V NiMH Rechargeable Battery for approx 40 hours operation Dimensions 195 x 110 x 55 mm Mass Instrument only Approx 520g Full Kit Approx 2 5kg Environment Temperature 0 to 45 O C Humidity 0 to 95 R H ...
Page 10: ... cable plug into the socket in the rear of the Turbidity Sensor Be sure to align the pins of the plug and socket before inserting 2 Screw on the retaining nut Finger tighten only as over tightening may cause damage to the sensor body DO NOT USE A SPANNER ...
Page 11: ...a To fit the protector 1 Slide the protector onto the Turbidity Sensor until the countersunk holes line up with the tapped holes in the sensor s four feet 2 Screw in the 4 supplied countersunk 1 8 BSW x 1 4 stainless steel screws Do not over tighten as the sensor feet may be damaged DO NOT USE AN ELECTRIC SCREWDRIVER ...
Page 12: ...provides a quick reference for the menu functions available for the WP 88 F1 Cal F2 Notepad F1 Recall F2 Erase F3 Print F4 Prog F1 Min F2 Sec F3 Hr Set Period F3 Stds F4 Setup F1 Batt F1 OFF Disable Battery Saver F2 ON Enable Battery Saver F2 Clock F3 GLP F1 Recall F3 Print F4 Baud F1 300 F2 1200 F3 9600 F4 19200 ...
Page 13: ...ocket 2 Switch the meter on 3 Select the Set Standards menu F3 Stds 4 The Turbidity standard for the Low Turbidity mode can entered for example 90 0 NTU Low Set F1 Save Press the and keys until the display shows the value of the Turbidity standard The allowable range is 30 0 to 180 0 NTU Press to save the Turbidity standard value Press to retain the current setting and move to the high range Turbi...
Page 14: ...eading Ensure that there is a minimum of 30mm clearance to the floor and walls of the vessel as per the following diagram Take care to ensure that there are no bubbles trapped on the underside of the sensor Bubbles can interfere with Turbidity measurements Gently stir the sample or the sensor to dislodge any bubbles 5 Select Calibration F1 Cal The following screen will be displayed 0 1NTU 25 0 c F...
Page 15: ...een will be displayed 901 NTU 25 0ºc F1 Cal at 900 NTU 9 When the reading has stabilised press to calibrate The will now be replaced by a decimal point if calibration was successful 10 The WP 88 is now calibrated for Turbidity and is ready for use in this mode Ensure that the WP 88 is calibrated on the range in which it will be used Discard the used samples of distilled water and standard Ensure t...
Page 16: ...hat the value of the Turbidity standard displayed during calibration corresponds to the standard that is actually being used 5 4 Calibration Messages 1 If a Zero calibration has been successfully performed the WP 88 will display the following message and the Low and High range Zero values of the sensor For example Calibrate OK Lo Zero 0 1NTU then Calibrate OK Hi Zero 1 NTU 2 If a Zero calibration ...
Page 17: ...Page 17 6 Temperature Calibration The Temperature reading from the Turbidity sensor is calibrated in the factory No user calibration is therefore required ...
Page 18: ...r and walls to avoid reflection affecting the reading Ensure that there is a minimum of 30mm clearance to the floor and walls of the vessel as per the following diagram Take care to ensure that there are no bubbles trapped on the underside of the sensor Bubbles can interfere with Turbidity measurements Gently stir the sample or the sensor to dislodge any bubbles 5 The measurement may be recorded w...
Page 19: ...rmware version number and instrument serial number are displayed along with a prompt describing how to scroll through the GLP information For example WP88 V2 0 T1234 More Back 5 Press the key to sequentially scroll through the GLP information for all parameters Press the key to scroll back to previous data The sequence of information displayed is shown below Press to abort at any time WP88 V2 0 T1...
Page 20: ... port in formatted ASCII text For example WP88 V2 0 T1234 Probe V1 1 T4321 31 08 11 12 00 Turbidity Low Zero 1 0NTU 31 08 11 11 10 Turbidity Low Span 100 2 31 08 11 11 20 Turbidity High Zero 1 NTU 31 08 11 11 30 Turbidity High Span 100 2 31 08 11 11 40 ENDS 8 4 Instrument Serial Number In case the serial number that is fitted to the rear of the WP 88 is removed or becomes illegible it is also avai...
Page 21: ...often as required The maximum number of readings that can be stored in the Notepad is 3600 9 2 Recalling Records from the Notepad To recall records from the Notepad onto the WP 88 display 1 Select the Notepad menu F2 Notepad 2 Select F1 Recall from the menu 3 Record number 1 is now displayed for example 900 NTU 25 0ºc 1 F2 Clock 4 Press to alternatively display the date and time or the data for th...
Page 22: ...e Charger RS232 socket of the WP 88 The charger optional solar panel or optional car battery lead can be connected into the spare socket on the cable for long term use if required 2 Connect the other end of the RS232 cable to an RS232 Printer or to COM1 or COM2 of a PC 3 Ensure that the baud rate for the printer or PC and the WP 88 are the same If necessary alter the baud rate of the WP 88 see sec...
Page 23: ...has been correctly set select whether this period is in minutes seconds or hours Press to save the period as minutes Press to save the period as seconds Press to save the period as hours eg If the period was set to 05 followed by then the WP 88 will automatically log a record every 5 seconds 5 The WP 88 will ask if the records are to be logged into the Notepad or sent directly to the RS232 port Pr...
Page 24: ...0 The WP 88 will beep each time a record is sent to the RS232 port 8 Press to stop automatic logging Notes 1 The clock must be set before the WP 88 will allow automatic logging to start The message Clock Not Set is displayed if the clock is not set 2 The Battery Saver function section 12 is disabled while the meter is in Automatic Data logging mode to stop the meter switching off while logging dat...
Page 25: ...cords can be sent directly to the RS232 port rather than stored in memory during automatic data logging See section 10 for details 11 3 RS232 Configuration The WP 88 RS232 configuration is 8 bits No Parity 1 Stop Bit XON XOFF Protocol 11 4 Communication and Statistical Software Communication between the WP 88 and a PC can be handled with any RS232 communication software WinTPS RS232 communication ...
Page 26: ... ends with the message ENDS cr Erase logged data E cr Erases all logged records from the WP 88 memory Returns the message ERASED cr to confirm that the records have been erased Request status information S cr Returns the model name firmware version number instrument serial number and number of logged readings in memory eg WP88 V2 0 T1234 3600 cr where are spaces Note that the number of logged read...
Page 27: ...erature data 6 characters right justified oC is the Temperature unit description 2 characters dd mm yy is the date month and year data hh mm ss is the hours minutes and seconds data Notes 1 When requested by a PC with the D or R commands section 11 5 the data is terminated with a carriage return 2 When the data is sent by the WP 88 using the Print function section 9 4 or the Send function section ...
Page 28: ... command section 11 5 the computer must respond with a character after receiving each line For example WP88 V2 0 T1234 Probe V1 1 T4321 31 08 11 12 00 Turbidity Low Zero 1 0NTU 31 08 11 11 10 Turbidity Low Span 100 2 31 08 11 11 20 Turbidity High Zero 1 NTU 31 08 11 11 30 Turbidity High Span 100 2 31 08 11 11 40 ENDS ...
Page 29: ...le Open 2 In the Files of type pull down box choose Text Files prn txt csv 3 Navigate to the folder where your data file is stored and double click it to start the Text Import Wizard Note The default data folder for the WinTPS software is C My Documents WinTPS 4 In step 1 of the Text Import Wizard select Fixed width as per the sample screen below then press Next Continued over the page ...
Page 30: ...line if WinTPS was used to download the data from the instrument Press Next after the column breaks have been inserted 6 Simply press Finish at step 3 of the Text Import Wizard TPS recommends that the data format for each column be set once the data is in spreadsheet format For help on formatting the data columns charting graphing or other operations please consult the Microsoft Excel help file Al...
Page 31: ...e battery saver function for continuous use Press to enable the battery saver function The meter will switch itself off if no key has been pressed for five minutes Press to quit the battery saver menu and retain the current setting Notes 1 For troubleshooting purposes the battery volts can also be displayed in the battery saver menu Press to display battery volts 2 The symbol flashes when the batt...
Page 32: ...charge the battery 1 Plug the battery charger solar panel or car cigarette lighter adaptor into the Charger RS232 socket DO NOT plug into the Temperature socket as this will damage the WP 88 2 Charge for approximately 8 hours for full capacity The WP 88 has special circuitry to prevent overcharging so the charger can be used continuously 3 To ensure optimum battery life and capacity the WP 88 shou...
Page 33: ...hour is correct 6 Press to move the cursor to the minutes Press the and keys until the minutes are correct 7 Check that the date and time are correct Press to save the settings If any changes are needed press the key to move left to the desired position Press to quit without resetting the clock Notes 1 The WP 88 does not test for a valid day of the month when setting the clock eg attempting to ent...
Page 34: ...NTU 5 1 Battery Saver On 12 Baud Rate 9600 11 1 Auto Logging Period Zero 10 Logged Data Erased 9 3 Press to initialise the Turbidity sensor calibration data to factory defaults The calibration data is stored within the Turbidity sensor itself Note the in place of the decimal point indicating that the Turbidity sensor requires recalibration 4 The meter will return to normal display mode Re enter an...
Page 35: ...tch itself off when the battery falls below 5 00 volts Meter displays the word OFF and switches off Battery is below 5 00 volts Recharge the battery If this fails check the charger If charger OK replace the battery Meter will not turn on Battery is exhausted Recharge the battery If this fails check the charger If charger OK replace the battery Battery does not charge up when charger is connected 1...
Page 36: ...rds Zero calibration must be performed in fresh Distilled water Check that the Turbidity standard has been correctly entered section 5 1 Clean tip of Turbidity sensor with a clean soft cloth Avoid scratching the sensing surface Turbidity sensor must be at least 30mm above the floor of the sample vessel Meter displays No Probe when the sensor is connected 1 Faulty cable 2 Faulty sensor Repair or re...
Page 37: ...ipment incorrect calibration incorrect operation or from interpretation of information derived from the equipment Specifications are subject to change without notice This warranty becomes invalid if modifications or repairs are carried out on this unit by unauthorised persons There are no express or implied warranties which extend beyond the face hereof Procedure for Service Please read service de...
Page 38: ...ur equipment will be repaired and returned to you by express air freight where possible For instruments beyond warranty period a repair cost will be calculated from parts and labour costs and emailed to you If you decline to have the equipment repaired the complete instrument will be returned to you freight paid not serviced TPS Pty Ltd has only one service location which is located at our factory...