background image

14

Unmanaged/Easy Smart Rackmountable Switch

Connection


The device is correctly connected to other network devices.

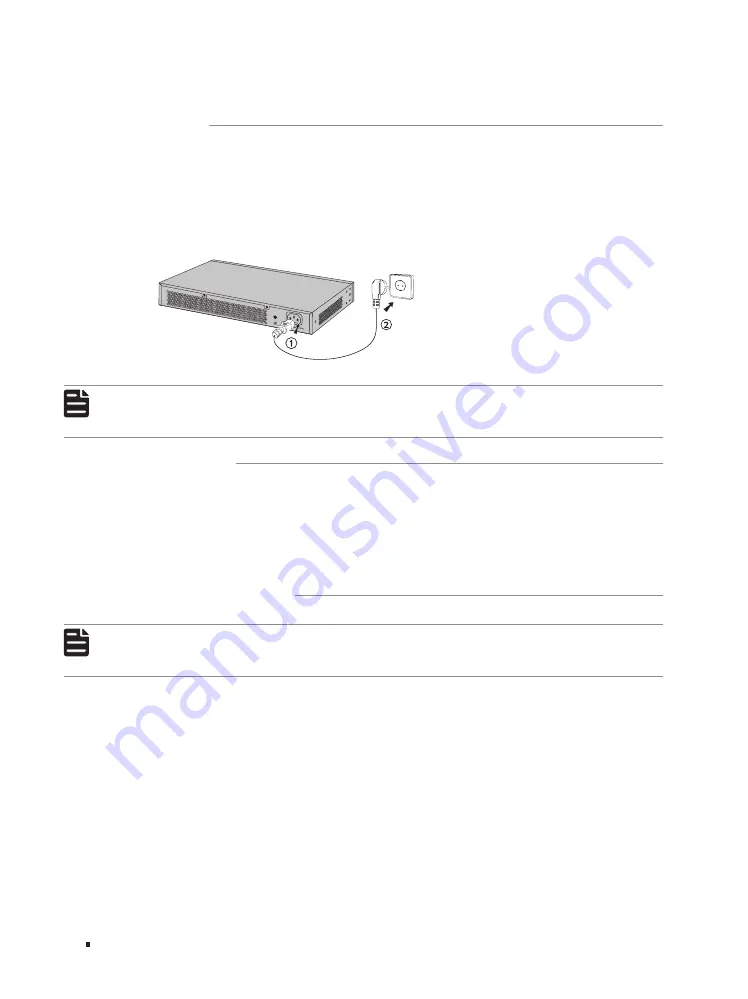
3.4  Power On

Plug the negative connector of the provided power cord into the power socket of the device and plug 

the positive connector into a power outlet as the following figure shows.

Figure 3-3 

Connecting to Power Supply

Note: 

The figure is to illustrate the application and principle. The provided plug and the socket in 

your region may differ from the figures above.

3.5  Initialization

After the device is powered on, it begins the Power-On Self-Test. A series of tests run automatically 

to ensure the device functions properly. During this time, the LED indicators will respond as follows:
1. The PWR/Power LED indicator will light up.
2. The LED indicators of all the ports will flash momentarily and then turn off again after the 

initialization.

3.6  Accessing the Switch

Note: 

Only for TL-SG1016DE/TL-SG1024DE/TL-SG1016PE/TL-SG1218MPE, you can access and 

manage the switch.

After the initialization finished, you can access and manage the switch using the Web-based GUI 

(Graphical User Interface) or using the Configuration Utility. 

Using the Web-Based GUI

To access and manage the switch using the Web-Based GUI, take the following steps:
1. Find the IP address of the switch.


By default, the switch receives an IP address from a DHCP server (or a router that functions as a 

DHCP server) in your network. You can find this IP address on the DHCP server.


If the switch cannot receive an IP address from a DHCP server, it uses the static IP address of 

192.168.0.1, with a subnet mask of 255.255.255.0.

Summary of Contents for TL-SG1008PE

Page 1: ...Installation Guide Unmanaged Easy Smart Rackmountable Switch Business Networking Solution...
Page 2: ......

Page 3: ...inistrator Conventions Some models featured in this guide may be unavailable in your country or region For local sales information visit https www tp link com The figures in Chapter 2 and Chapter 3 ar...

Page 4: ...age Contents 9 2 2 Safety Precautions 9 2 3 Installation Tools 11 2 4 Product Installation 11 Chapter 3 Connection 13 3 1 Ethernet Port 13 3 2 SFP Port 13 3 3 Verify Installation 13 3 4 Power On 14 3...

Page 5: ...d devices PDs complying with IEEE 802 3af and IEEE 802 3at Note PSE is a device switch or hub for instance that will provide power in a PoE setup PoE is a technology that describes a system to transmi...

Page 6: ...e following figure Figure 1 4 Front Panel of TL SF1016DS 10 100Mbps RJ45 Port LEDs The front panel of TL SF1024D is shown as the following figure Figure 1 5 Front Panel of TL SF1024D 10 100Mbps RJ45 P...

Page 7: ...e front panel of TL SG1024 is shown as the following figure Figure 1 8 Front Panel of TL SG1024 10 100 1000Mbps RJ45 Port LEDs The front panel of TL SG1048 is shown as the following figure Figure 1 9...

Page 8: ...nt panel of TL SG1016D is shown as the following figure Figure 1 12 Front Panel of TL SG1016D 10 100 1000Mbps RJ45 Port LEDs The front panel of TL SG1024D is shown as the following figure Figure 1 13...

Page 9: ...l of TL SG1008PE is shown as the following figure Figure 1 16 Front Panel of TL SG1008PE 10 100 1000Mbps RJ45 Port LEDs The front panel of TL SG1016PE is shown as the following figure Figure 1 17 Fron...

Page 10: ...ng data Off No device is linked to the corresponding port Note Only for TL SG1048 and ports 1 to 16 of TL SG1218MPE The port 17 and port 18 of TL SG1218MPE which only support 1000M SFP module connecti...

Page 11: ...lasts for more than 2 minutes Off Total power supply is less than 185 W Note Only for TL SG1218MPE FAN Green The fan works properly Yellow The fan doesn t work properly Note Only for TL SG1016PE and...

Page 12: ...switch already comes with lightning protection mechanism You can also ground the switch through the PE Protecting Earth cable of AC cord or with Ground Cable For detailed information refer to the Ligh...

Page 13: ...y injury caused by improper use you should observe the following rules Safety Precautions Keep the power off during the installation Wear an ESD preventive wrist strap and make sure that the wrist str...

Page 14: ...nts Some measures have been taken for the device to prevent static electricity but too strong static electricity can cause deadly damage to the electronic elements on the internal circuit board To avo...

Page 15: ...e configurationId 2962 Installation Site When installing the device on a rack or a flat workbench attach much importance to the following items The rack or workbench is flat stable and sturdy enough t...

Page 16: ...f the device with supplied screws as illustrated in the following figure Figure 2 2 Bracket Installation Rack mounting Bracket Screw 3 After the brackets are attached to the device use suitable screws...

Page 17: ...SFP port to an SFP module Figure 3 2 Inserting the SFP Module SFP Slot SFP Module Note TL SG1218MPE features 2 individual SFP ports which support 1000M SFP module connection only 3 3 Verify Installati...

Page 18: ...ollows 1 The PWR Power LED indicator will light up 2 The LED indicators of all the ports will flash momentarily and then turn off again after the initialization 3 6 Accessing the Switch Note Only for...

Page 19: ...min as both user name and password Now you can configure the switch using the Web based GUI For further information refer to the User Guide on the resource CD You can find the latest version of this g...

Page 20: ...net of the switch 5 If you still cannot access the configuration page please reset the switch to its factory defaults Then the IP address of your PC should be set as 192 168 0 x x is any number from 2...

Page 21: ...F1024 TL SF1024D TL SF1048 1000BASE SX 62 5 m MMF Minimum range 2 m 275 m or 50 m MMF Minimum range 2 m 550 m for TL SG1218MPE 1000BASE LX 62 5 m 50 m MMF Minimum range 2 m 550 m or 10 m SMF Minimum r...

Page 22: ...Temperature 0 C to 40 C 32 to 104 F 0 C to 50 C 32 to 122 F for TL SG1218MPE Storage Temperature 40 C to 70 C 40 to 158 F Operating Humidity 10 to 90 RH Non condensing Storage Humidity 5 to 90 RH Non...

Page 23: ...65 EU The original EU declaration of conformity may be found at https www tp link com en ce Safety Information Keep the device away from water fire humidity or hot environments Do not attempt to disas...

Page 24: ...2019 TP Link 7106508362 REV13 1 0 For technical support the user guide and more information please visit https www tp link com support or simply scan the QR code...

Reviews: