background image

4

Set Up Your Smart Wi-Fi Power Strip

Follow the steps below to set up your Smart Wi-Fi Power Strip via 

Kasa Smart

 app.

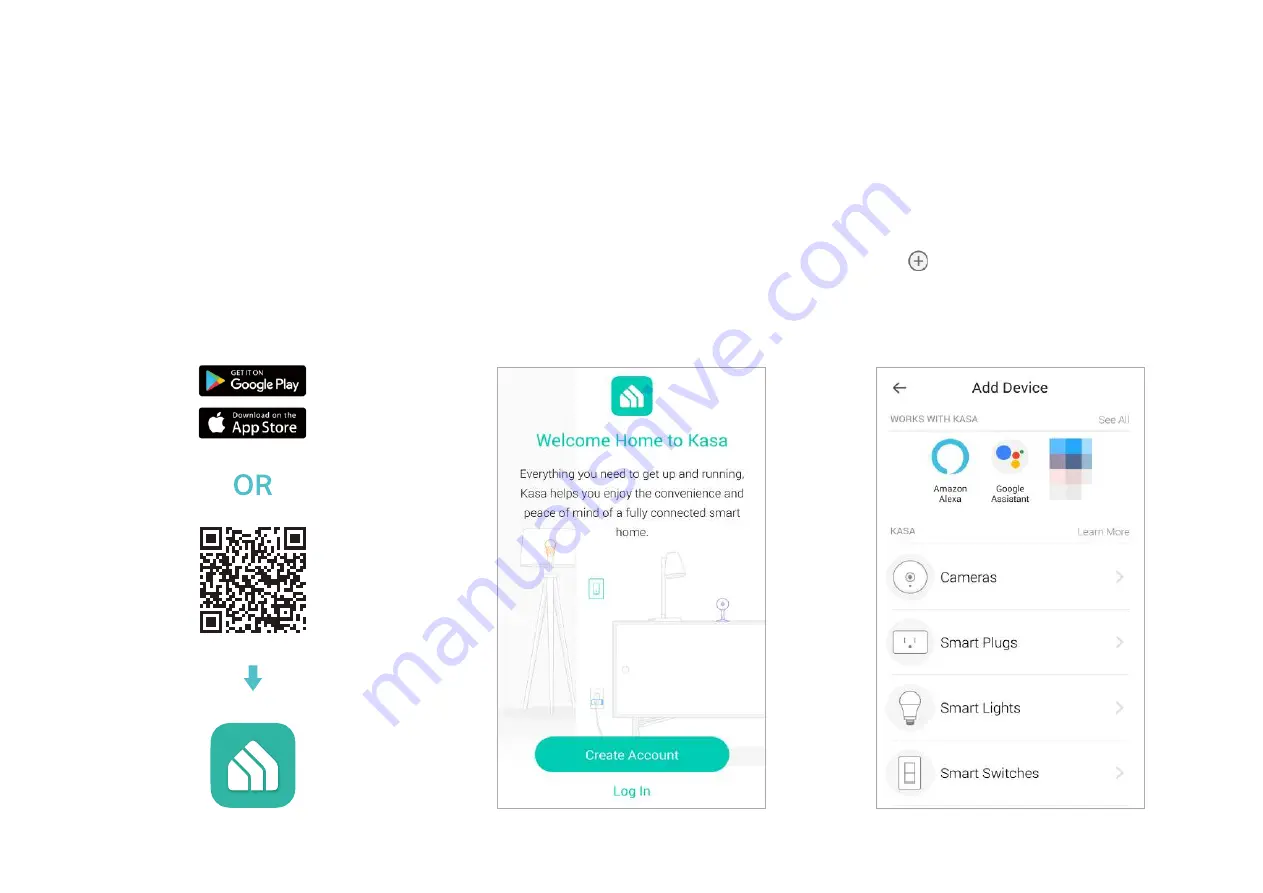
1. Install Kasa Smart app

Get the 

Kasa Smart

 app from Google Play or 

the Apple App Store, or scan the QR code 

below to download it.

2. Log in or sign up with TP-Link ID

Open the 

Kasa Smart

 app and log in with 

your TP-Link ID. If you don’t have an account, 

create one first.

3. Add Device

Tap the 

 button in the Kasa Smart app, 

select 

Add a Device 

>

Smart Plugs 

Smart 

Power Strip

 and then follow step-by-step app 

instructions to complete the setup.

Summary of Contents for KP303

Page 1: ...User Guide Kasa Smart Wi Fi Power Strip 3 Outlets KP303 1910012741 REV1 0 1...

Page 2: ...ents About This Guide 1 Introduction 2 Appearance 3 Set Up Your Smart Wi Fi Power Strip 4 Main Device Controls 5 Configure Your Smart Wi Fi Power Strip 6 Create Scenes 8 Discover Kasa 9 Authentication...

Page 3: ...ps and descriptions in this guide are only examples and may not reflect your actual experience Conventions In this guide the following convention is used Convention Description Teal Key information ap...

Page 4: ...dently control 3 smart outlets with the Kasa Smart app Surge Protection Surge protection shields electronics from power surges 2 USB Ports Charge your tablet smartphone or other devices using the alwa...

Page 5: ...ent LED of Smart Outlet 1 3 from left to right Lit up when the corresponding smart outlet is on Control Button 1 3 from left to right Press the control button to turn on or off the corresponding outle...

Page 6: ...e Play or the Apple App Store or scan the QR code below to download it 2 Log in or sign up with TP Link ID Open the Kasa Smart app and log in with your TP Link ID If you don t have an account create o...

Page 7: ...ccessfully set up your Smart Wi Fi Power Strip you will see the home page of the Kasa Smart app Here you can view and manage all devices that you ve added to Kasa Tap a smart power strip to control an...

Page 8: ...t Timer check Usage and change the settings of your smart outlet Set Schedule Tap to set a schedule for your smart outlet to simplify your daily routine by creating automatic On Off action Preset Away...

Page 9: ...et the timer and your smart outlet will automatically be turned on off after the time ends Device Settings Tap to view and change the settings of your smart outlet Check Usage Tap to view and keep tra...

Page 10: ...med customized and activated simultaneously at the touch of a button from your smartphone or tablet allowing you to easily set your mood activity or fit any special occasion This page allows you to pr...

Page 11: ...nd enjoy a full hands free experience Kasa helps manage the rest of your smart home too working with Samsung SmartThings to trigger changes when you arrive home or leave for the day Launch the Kasa Sm...

Page 12: ...s and product names are trademarks or registered trademarks of their respective holders No part of the specifications may be reproduced in any form or by any means or used to make any derivative such...

Page 13: ...ns may cause harmful interference to radio communications However there is no guarantee that interference will not occur in a particular installation If this equipment does cause harmful interference...

Page 14: ...device and its antenna must not be co located or operating in conjunction with any other antenna or transmitter To comply with FCC RF exposure compliance requirements this grant is applicable to only...

Page 15: ...protection The device complies with RF specifications when the device used at 20 cm from your body Canadian Compliance Statement This device contains licence exempt transmitter s receiver s that compl...

Page 16: ...m between the radiator your body D claration d exposition aux radiations Cet quipement est conforme aux limites d exposition aux rayonnements IC tablies pour un environnement non contr l Cet quipement...

Page 17: ...Keep the device away from water fire humidity or hot environments The socket outlet shall be installed near the equipment and shall be easily accessible Please read and follow the above safety inform...

Page 18: ...To reduce the hazardous condition Unplug the appliance that is plugged into the receptacle s controlled by the timer before servicing Explanation of the symbols on the product label Symbol Explanatio...

Reviews: