TP-Link External ADSL ROUTER TD-8810B User Manual Download Page 15

TD-8810 

External ADSL Router User Guide


10

need, and then click the 

edit

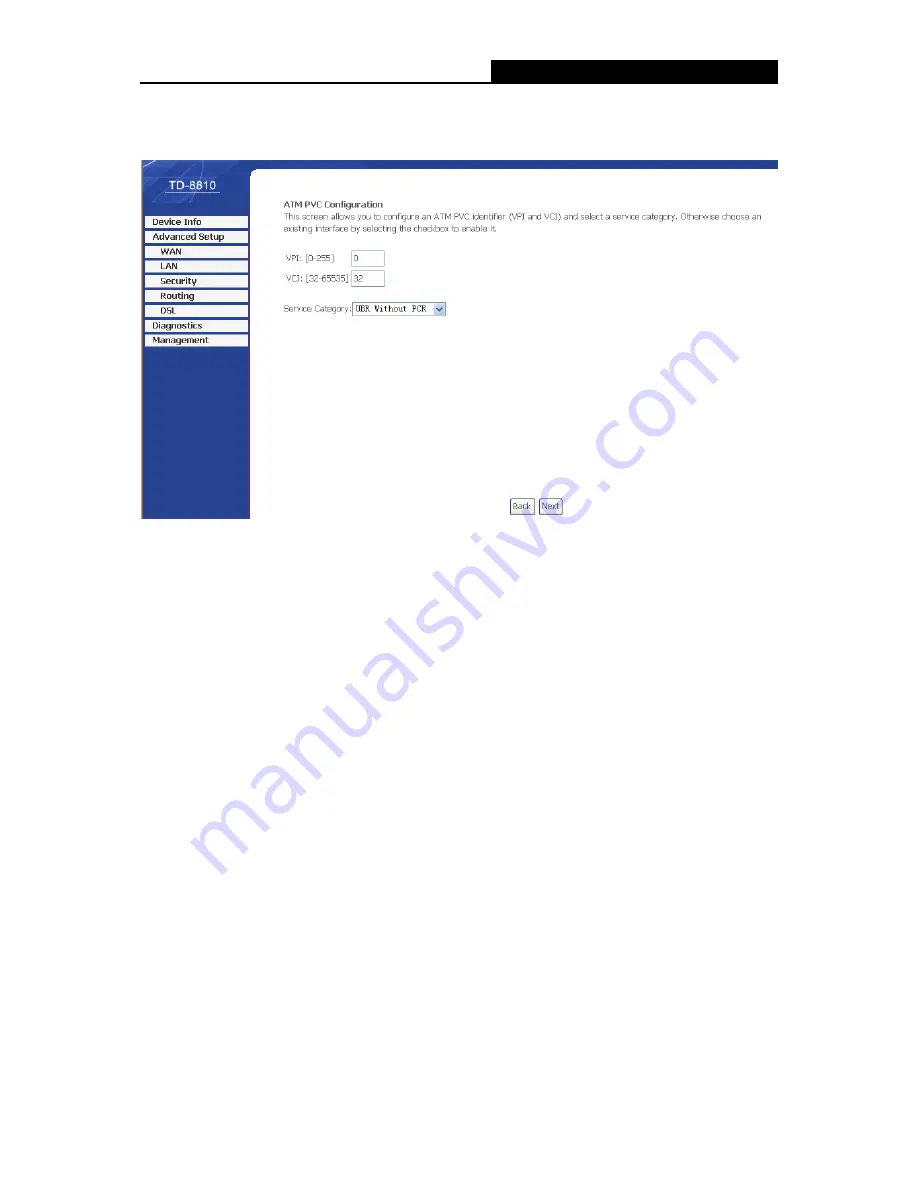
 button, you will enter the page of ATM PVC Configuration (See 

Figure 3-8) 


Figure 3-8 

Enter 

VPI/VCI

 value and service category which is provided by your ISP, click 

next 

to enter the 

next step. You will see the Figure 3-9. 

)


Note: 

The type of network protocol selected may be different in different areas, there are five types

Figure 3-9

, So you should ask your ISP to acquire the local type of network protocol and 

Encapsulation mode. 

Summary of Contents for External ADSL ROUTER TD-8810B

Page 1: ...TD 8810 TD 8810B User Guide External ADSL ROUTER Rev 1 0 1...

Page 2: ...roduct names are trademarks or registered trademarks of their respective holders No part of the specifications may be reproduced in any form or by any means or used to make any derivative such as tran...

Page 3: ...pment off and on the user is encouraged to try to correct the interference by one or more of the following measures Reorient or relocate the receiving antenna Increase the separation between the equip...

Page 4: ...OUTER One Resource CD for TD 8810 External ADSL ROUTER including This Guide Quick installation Guide Program Other Helpful Information Quick installation Guide One RJ45 cable Two RJ11 cable One ADSL s...

Page 5: ...nventions 3 Chapter 2 Hardware Installation 4 2 1 System requirement 4 2 1 1 LED explanation 4 2 2 Rear panel 4 2 3 Hardware installation procedures 5 Chapter 3 System Configuration 6 3 1 Computer Con...

Page 6: ...Ethernet devices support Auto MDIX The TD 8810 TD 8810B not only uses html web mode through Ethernet port to configure the ROUTER but also uses external utility software You can download it from our...

Page 7: ...6Km 1 5 ATM propert AAL0 AAL5 OAM RM and raw cell types supported Direct hardware support for 4 Receive VCs with additional RX VCs and TX VCs supported in software Full 24 bit Virtual Path Identifier...

Page 8: ...1 9 Conventions The Router or TD 8810 TD 8810B or device mentioned in this User guide stands for TD 8810 TD 8810B External ADSL ROUTER without any explanations Parameters provided in the pictures are...

Page 9: ...RED and seven function indicators GREEN as explained in chart below Indicator Description Status Function Details On Power OK PWR Power Off Power fail Slow flash Self detecting when power up Quick fl...

Page 10: ...wing steps First Step Connect the MODEM port of Splitter with the TD 8810 TD 8810B ADSL ROUTER LINE port by telephone line While you need to use a telephone please attach telephone line into the phone...

Page 11: ...92 168 1 Note is any value between 2 to 254 Net mask is 255 255 255 0 Gateway is 192 168 1 1 DNS address is the value provided by ISP Figure 3 1 Note Users of Windows 98 can open TCP IP Properties acc...

Page 12: ...ING command Enter Ping 192 168 1 1 If the screen looks like the following you have been successful Figure 3 2 If the screen looks like the following the connection has failed Please try again Figure 3...

Page 13: ...3 4 You will then see the Figure 3 5 you will see some information such as link rate and so on Figure 3 5 Default user name and password is admin if you want to change them please go to Management Ac...

Page 14: ...e 9 Figure 3 6 3 3 Web Setup Choose Advanced Setup WAN you will enter the page of Wide Area Network WAN Setup you will see the Figure 3 7 Figure 3 7 There are 7 PVC links in the WAN setup page choose...

Page 15: ...re 3 8 Enter VPI VCI value and service category which is provided by your ISP click next to enter the next step You will see the Figure 3 9 Note The type of network protocol selected may be different...

Page 16: ...ed by your ISP Enable the configurations then you will go to Internet PPP over ATM PPPoA If you select the protocol of PPP over ATM PPPoA you will see the Figure 3 10 enter the value of user name and...

Page 17: ...Figure 3 10 You will see the Figure 3 11 then turn on the selected functions according to your demands Clicking the next button to enter the next step you will see the Figure 3 12 finally click save...

Page 18: ...ver Ethernet PPPoE If you select the protocol of PPP over Ethernet PPPoE you will see the Figure 3 13 enter the value of user name and password which is provided by your ISP after selecting the other...

Page 19: ...4 Figure 3 13 You will see the Figure 3 14 then turn on the selected functions according to your needs Clicking the next button to enter the next step you will see the Figure 3 15 finally click save t...

Page 20: ...ou select the protocol of MAC Encapsulation Routing MER you will see the page Figure 3 16 Enter the parameter and the way which is provided by your ISP then click the next button Figure 3 16 You will...

Page 21: ...ext button to enter the next step you will see the Figure 3 18 finally click save to complete the configuration Figure 3 17 Figure 3 18 IP over ATM IPoA If you select the protocol of IP over ATM IPoA...

Page 22: ...ur ISP then click the next button Figure 3 19 You will see the page Figure 3 20 then turn on the selected functions according to your needs Clicking the next button to enter the next step you will see...

Page 23: ...e 3 21 Bridging If you select the Bridging protocol you just open the bridge service function options you will see the Figure 3 22 then click the next button you will see the Figure 3 23 finally click...

Page 24: ...r you complete any setup the new setup must be saved and the Router must be restarted for the configuration to go into effect Please click the Save Reboot button to restart referring to the Figure 3 2...

Page 25: ...1 DHCP IP Reservation are not available for the connection type of Bridge here they won t display on the screen below since only Bridge is selected 2 DHCP IP Reservation are not available for the con...

Page 26: ...ress 00 13 8F A9 E6 CA for instance of the computer which you want to reserve an IP 192 168 1 100 for instance for in the MAC Address text box 4 Type the IP Address 192 168 1 100 for instance you have...

Page 27: ...DNS When you select the connection type PPPoE PPPoA MER or IPoA for WAN configuration you will see the DNS menu in the Web based Utility shown in Figure 3 29 It includes DNS Server and Dynamic DNS su...

Page 28: ...save the new configuration Note You have to reboot the Router to make the new configuration take effect 3 3 2 2 Dynamic DNS Choose Advanced Setup DNS Dynamic DNS you can see the Dynamic DNS screen th...

Page 29: ...ure 3 31 then you will set the DDNS in the next screen shown in Figure 3 32 Figure 3 32 Note This page allows you to add a Dynamic DNS address from DynDNS org TZO or No IP 2 Select D DNS provider DynD...

Page 30: ...r the configuration page Please you select the connect to the internet and then click the Next button to enter the next page and select the set up my connection manually click Next to enter the next p...

Page 31: ...he Advantage application and online software upgrades The functions of the Web management interface are as follows Upgrade software Modify the default IP address of the port of LAN 192 168 1 1 Modify...

Page 32: ...he Virtual Channel Identifier the value of VCI VPI must be compatible with the value that provided by ISP 3 Encapsulation mode of AAL5 include LLC SNAP and VC_MAX often using LLC SNAP 3 Why the LAN s...

Page 33: ...his product has the PPP dial procedure inside so you will not need to use the dial software if your protocol is PPPoA or PPPoE ADSL Modem will connect automatically 4 You can check whether your ADSL M...

Page 34: ...TD 8810 External ADSL Router User Guide 29 Appendix B Default Config User name admin Password admin IP Address 192 168 1 1...

Page 35: ...TD 8810 External ADSL Router User Guide 30 Appendix C Contact Information For help with the installation or operation of TP LINK Product please visit our website http www tp link com...

Reviews: