background image

149

5

YARIS_NAVIGATION AND MULTIMEDIA SYSTEM OWNER’S MANUAL_Europe_MK0019_en

5-1. Speech command system operation

Speec

h c
om

m

and s

ys

tem

Wait for the confirmation beep before 
speaking a command.

This system may not operate immedi-
ately after the engine switch <power 

switch> is turned to ACC or ON.

1

Press the talk switch.

The speech command system is 
activated.

Pressing the talk switch while a 
voice prompt is playing, will stop 
the voice recognition prompt and 
immediately play the start listen-
ing tone.

While in voice recognition mode, 
pressing and holding the talk 
switch for 1 or more seconds 
cancels voice recognition mode.

2

After a beep sounds, say the 
desired command or select the 
desired command.

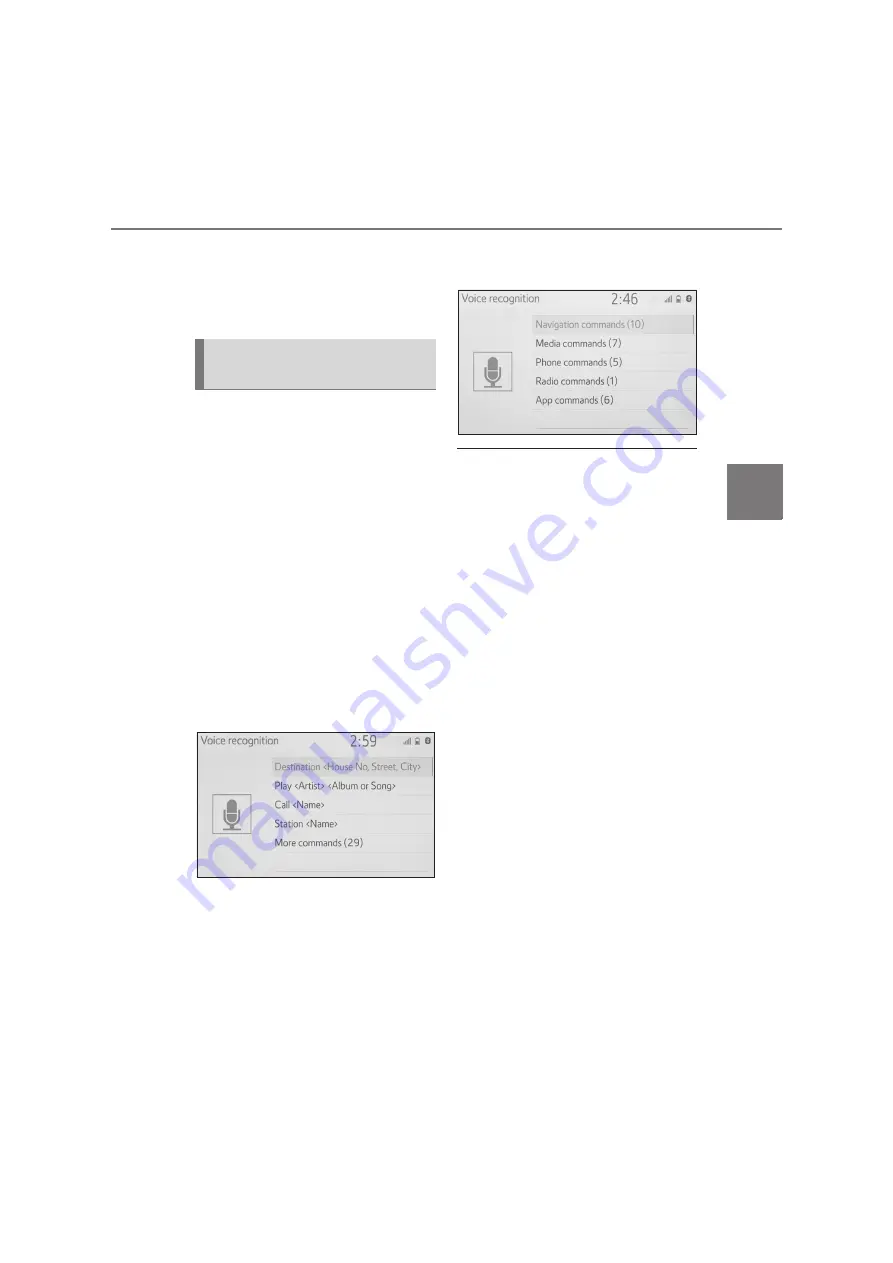
Displaying the command list 
screen

1

Say “More commands” or select 
“More commands” on the 
speech command main menu 
screen.

2

Say the desired command or 
select the desired command.

The command list is read out and the 

corresponding command is high-
lighted. To cancel this function, press 

the talk switch.

Speech command system 
operation

Summary of Contents for YARIS 2020

Page 1: ...n Connecting the Bluetooth device Navigation system Operating the map screen Searching the map Activating the route guidance Audio visual system Listening to the radio Enjoying music and video Speechc...

Page 2: ...ooth device 34 Setting Bluetooth details 38 Connecting to internet Mira cast via Wi Fi 45 2 3 Apple CarPlay Android Auto Apple CarPlay Android Auto 50 2 4 Other settings General settings 57 Voice sett...

Page 3: ...rmation 138 5 1 Speech command system operation Speech command system 148 Command list 150 6 1 Rear view monitor system Rear view monitor system 154 Rear view monitor system pre cautions 156 Things yo...

Page 4: ...online Toyota online 194 Settings required for using the service 197 Toyota online applications oper ation 198 Online search 199 Importing favourites and stored routes 199 Street View 201 Weather 201...

Page 5: ...5 YARIS_NAVIGATION AND MULTIMEDIA SYSTEM OWNER S MANUAL_Europe_MK0019_en TABLE OF CONTENTS 1 7 6 5 4 3 2 8...

Page 6: ...s one of the most technologically advanced vehicle accessories ever devel oped The system receives satel lite signals from the Global Positioning System GPS operated by the U S Department of Defense U...

Page 7: ...ur eyes on the road and are timed to provide enough time to allow you to maneuver change lanes or slow down Please be aware that all current vehicle navigation systems have certain limitations that ma...

Page 8: ...Symbols in this manual Symbols Meanings WARNING Explains something that if not obeyed could cause death or serious injury to people NOTICE Explains something that if not obeyed could cause damage to o...

Page 9: ...fe driving The first priority while driving should always be the safe opera tion of the vehicle While driving be sure to observe all traffic regula tions Prior to the actual use of this sys tem learn...

Page 10: ...osures etc frequently change Therefore before following any instructions from the system look to see whether the instruction can be done safely and legally This system cannot warn about such things as...

Page 11: ...TEM OWNER S MANUAL_Europe_MK0019_en 1 Quick guide Quick guide 1 1 Basic function Buttons overview 12 Menu screen 15 Status icon 16 Setup screen 18 1 2 Navigation operation Operating the map screen 19...

Page 12: ...12 YARIS_NAVIGATION AND MULTIMEDIA SYSTEM OWNER S MANUAL_Europe_MK0019_en 1 1 Basic function 1 1 Basic function 7 inch display model Buttons overview Operations of each part...

Page 13: ...en an Apple CarPlay connection is established press to display the phone application screen Press to display the Setup screen P 18 Turn to change the radio station or skip to the next or previous trac...

Page 14: ...ction Press to display the Menu screen P 15 Press to display the home screen P 27 1 Models with navigation function only 2 Models without navigation function only This illustration is for left hand dr...

Page 15: ...tion screen 1 2 3 P 194 When an Apple CarPlay connection is established select to display the home screen of Apple CarPlay 3 P 50 When an Android Auto connection is established select to display the h...

Page 16: ...s not always correspond with the level displayed on the cellular phone The level of reception may not be displayed depending on the phone you have When the cellular phone is out of the service area or...

Page 17: ...e and the system may not function when a Bluetooth phone is used in the fol lowing conditions and or places The cellular phone is obstructed by certain objects such as when it is behind the seat or in...

Page 18: ...nd Bluetooth system set tings P 38 Select to set audio settings P 137 Select to set the phone sound contacts settings etc P 180 Select to set the voice settings P 60 Select to set vehicle information...

Page 19: ...D map P 70 1 Select the desired point on the map screen Move the desired point on the centre of the map screen It is possible to do the drag or flick operation on the screen Press the MAP button to re...

Page 20: ...tion 1 Press the MAP button 2 Select on the map screen 3 Search for a destination There are different kinds of methods to search for a destina tion P 78 4 Select Go Check that the route overview is di...

Page 21: ...stopped 1 Press the MAP button 2 Select on the map screen 3 Select Stop guidance Models with navigation function 1 Press the MAP button 2 Select on the map screen 3 Select Favourites 4 Select Home 5 S...

Page 22: ..._en 1 2 Navigation operation 1 Press the MAP button 2 Select on the map screen 3 Select Home Selecting routes other than the one recommended P 87 Guidance to the destination is displayed on the screen...

Page 23: ...Touch screen 25 Home screen operation 27 Entering letters and num bers list screen operation 28 Screen adjustment 31 Linking multi information dis play and the system 33 2 2 Connectivity settings Reg...

Page 24: ...ically switches to the next screen When system response is extremely slow the system can be restarted 1 Press and hold the POWER VOLUME knob for 3 seconds or more Initial screen When the engine switch...

Page 25: ...en Touch screen gestures Operation method Outline Main use Touch Quickly touch and release once Selecting an item on the screen Drag 1 Touch the screen with your finger and move the screen to the desi...

Page 26: ...d on the screen select to return to the previous screen The operable areas of the capaci tive touch screen buttons use capacitive touch sensors and may not operate properly in the following situations...

Page 27: ...ng touched when the engine switch power switch is changed to ACC or ON the but ton may not operate properly In this case remove anything touching the button turn the engine switch power switch off and...

Page 28: ...searching by an address name etc or entering data letters and numbers can be entered via the screen Text field Entered character s will be displayed Select to erase one character Select and hold to co...

Page 29: ...Select 2 Select the desired character and keyboard and select OK 1 Select Change type 2 Select the desired character Depending on the screen being dis played it may not be possible to change keyboard...

Page 30: ...age Select and hold to scroll through the displayed list Indicates the position of the dis played entries in the entire list To scroll up down pages drag the bar If appears to the right of an item nam...

Page 31: ...elect 2 Input text 3 Select Search The list is displayed 1 Press the MENU button 2 Select Display 3 Select the desired items to be set Select to turn the screen off To Searching a list Screen adjustme...

Page 32: ...screen changes to day or night mode This feature is available when the head light is switched on 1 Select Day mode If the screen is set to day mode with the headlight switch turned on this condition...

Page 33: ...and the sys tem The following functions of the system are linked with the multi information display in the instrument cluster Phone Audio etc These functions can be oper ated using multi information d...

Page 34: ...etooth device If the desired Bluetooth device Registering Connecting a Bluetooth device To use the hands free system it is necessary to register a Bluetooth phone with the system Once the phone has be...

Page 35: ...ing on the type of Bluetooth device being con nected a message confirming registration may be displayed on the Bluetooth device s screen Respond and operate the Bluetooth device according to the confi...

Page 36: ...firming registration may be displayed on the Bluetooth device s screen Respond and operate the Bluetooth device according to the confirmation message 4 Follow the steps in Registering a Bluetooth phon...

Page 37: ...0 Recommended Ver 1 2 This is a profile to transfer phone book data MAP Message Access Profile Ver 1 0 Recommended Ver 1 2 This is a profile to use phone mes sage functions SPP Serial Port Profile Re...

Page 38: ...Bluetooth is a registered trademark of Bluetooth SIG Inc 1 Press the SETUP button 2 Select Bluetooth 3 Select the desired item to be set Connecting a Bluetooth device and editing the Bluetooth device...

Page 39: ...evice P 41 Preferred device settings Select to change the automatic connection prior ity of the registered Bluetooth devices P 43 Remove Deleting a Bluetooth device P 41 Phone Audio player Phone Smart...

Page 40: ...onnect with the registered device that was last connected if it is nearby When automatic connection priority is set to on and there is more than one registered Bluetooth phone available the system wil...

Page 41: ...the steps in Registering a Bluetooth phone for the first time from step 5 P 34 This operation cannot be performed while driving 1 Display the Bluetooth settings screen P 38 2 Select Remove device 3 S...

Page 42: ...e Bluetooth device Select to reset all setup items If 2 Bluetooth devices have been registered with the same device name the devices can be distin guished by referring to the device addresses Dependin...

Page 43: ...of the regis tered Bluetooth devices P 43 Select to edit the system infor mation P 44 Select to reset all setup items 1 Select Bluetooth power When Bluetooth power is on The Bluetooth device is autom...

Page 44: ...and select Move up or Move down to change the pre ferred order A newly registered Bluetooth device will automatically be given the highest automatic connection priority 1 Select System information 2 S...

Page 45: ...System name 2 Enter a name and select OK Editing the PIN code 1 Select System PIN code 2 Enter a PIN code and select OK 1 Press the SETUP button 2 Select Wi Fi 3 Select the items to be set G Connecti...

Page 46: ...with navigation function 2 Miracast status should be dis played only for Miracast supported models When turned on Available net works and Easy setup can be selected 1 Display the Wi Fi settings screen...

Page 47: ...it can be connected to more quickly 1 Display the Wi Fi settings screen P 45 2 Select Easy setup 3 Select PIN code or Push but ton as determined by the device 4 Operate the Wi Fi device to connect 1 D...

Page 48: ...IEEE 802 11g IEEE 802 11n 2 4GHz Security WPA WPA2 WEP Models without navigation function WPA WPA2 Wi Fi Protected Preferred network settings Wi Fi function operating hints WARNING Use Wi Fi devices...

Page 49: ...49 2 YARIS_NAVIGATION AND MULTIMEDIA SYSTEM OWNER S MANUAL_Europe_MK0019_en 2 2 Connectivity settings Basic function Setup and Miracast are trade marks of Wi Fi Alliance...

Page 50: ...ected it may take approxi mately 3 to 6 seconds before the system returns to previous screen The screen may change to step 6 depending on the system 4 Press the MENU button 5 Select the Apple CarPlay...

Page 51: ...lay Select to display the system screen 1 Check that the Android Auto application is installed to the device to be connected 2 Connect the device to the USB port P 116 3 Select On to enable the func t...

Page 52: ...h as location and vehicle speed will be shared with the respective application publisher and the cellular service provider By downloading and using each appli cation you agree to their terms of use Da...

Page 53: ...droid Auto are trade marks of Google LLC WARNING Do not connect smartphone or operate the controls while driving NOTICE Do not leave your smartphone in the vehicle In particular high tem peratures ins...

Page 54: ...ple CarPlay refer to https www apple com ios feature availability apple carplay Check if Apple CarPlay Android Auto of Pre ferred service on the general settings screen is set to on P 57 Check if the...

Page 55: ...s not compatible with pinch multi touch gestures this is not a malfunc tion During Apple CarPlay music application Apple Music Spotify etc playback if the iPhone is operated to start and play audio fr...

Page 56: ...play When using Android Auto turn by turn navigation is not displayed on the multi information dis play and system display This is not a malfunction as display of these items is not possible with this...

Page 57: ...red service Select to choose the service to launch when the smartphone is connected P 59 Beep Select to turn the beep sound on off Theme setting Select to change the screen theme set tings Units of me...

Page 58: ...SW sensitivity level Select to change the capacitive touch screen button sensitivity to 1 low 2 medium or 3 high Models with navigation function 1 Display the general settings screen P 57 2 Select Cl...

Page 59: ...t Preferred service 3 Select the desired items to be set This setting cannot be changed when a device is connected to the system via USB Disconnect the device before attempting to change the set ting...

Page 60: ...me of voice guidance Select to set the voice recogni tion prompts on off Select to set the street name guidance on off 1 Select to set the avoidable route announcement on off 1 Select to reset all set...

Page 61: ...y the vehicle settings screen P 61 2 Select Valet mode 3 Enter the 4 digit personal code and select OK 4 Enter the same 4 digit personal code again and select OK The system will request that you input...

Page 62: ...pe_MK0019_en 2 4 Other settings 1 Enter the 4 digit personal code and select OK If an incorrect security code 4 digit number is entered 6 times the sys tem will not accept another security code 4 digi...

Page 63: ...69 Map screen information 71 Traffic messages 75 3 2 Destination search Search operation 78 Starting route guidance 87 3 3 Route guidance Route guidance 90 Editing route 93 3 4 Favourite destinations...

Page 64: ...lculating a route to a new destination Select to zoom in out the map scale P 69 Select to display the destination menu screen P 67 Select to change the map layout P 70 Select to adjust the volume of v...

Page 65: ...me and remaining travel time to the destination Displays the name of the current street or the next street Displays traffic events on the route The remaining length and the remaining delay time are di...

Page 66: ...messages and warnings P 75 Select to display fuel station information The location and fuel price can also be checked P 203 Select to display parking lot information The location price and avail able...

Page 67: ...tion information The location and fuel price can also be checked P 203 Select to display parking lot information The location price and avail able spaces of parking lots can be checked P 202 Select to...

Page 68: ...search for a destination from a list of the last destinations P 82 Select to search for a destination by address or geo coordinates P 82 Select to search for a destination by POI point of interest Se...

Page 69: ...attery disconnection or on a new vehicle the current position may not be correct As soon as the navigation system receives signals from the GPS the correct current position is displayed The map can be...

Page 70: ...is from 10 m to 1000 km 10 yd to 600 miles After the scale has been changed the new scale indicator will be displayed for a while The map layout can be changed between 3D heading up 2D head ing up and...

Page 71: ...splayed in 3D on the map This feature is displayed on the map in zoom scales up to 50m 50yd Landmarks can be displayed in 3D on the map This feature is displayed on the map in zoom scales up to 50m 50...

Page 72: ...ype of POI icons dis played on the screen can be selected P 104 Public POI icons Displaying POI icons List of POI icons Icon Name Library College University School Tourist office Cemetery funeral dire...

Page 73: ...rain Petrol Stations Rent a Car Facility Parking Ferry Terminal Parking Open Parking Area P Area general Parking Garage Open P A P R Rest Area Motoring Organization Auto mobile Club Mover Moving Compa...

Page 74: ...ki resorts Icon Name Amusement Park Winery Museum Shopping Market Place Shopping Centre Factory Outlet Shop Department Store Drive through bottle shop Tourist Attractions Important Tourist Attractions...

Page 75: ...registered phone number P 173 Select to register the point in the favourites list P 98 Select to display the starting route guidance screen P 87 Traffic message icons on the map Traffic message list A...

Page 76: ...on the map screen P 64 2 Select Traffic 3 Select the desired tab to select the list Select to display the traffic mes sages relating to the set route Select to display all traffic mes sages Select to...

Page 77: ...available information such as street name city name region or country will be displayed Icon of an incident Icon of an incident on the route Icon of an incident that is detoured Distance to incident a...

Page 78: ...ity names country names Phonebook from connected phone 1 Display the destination menu screen P 67 To change the search country select the country flag icon P 79 2 Enter the desired search terms in the...

Page 79: ...e calculation screen If a destination has already been set Replace Add and Can cel will be displayed Replace Select to delete the existing destination s and set a new one Add Select to add a destinati...

Page 80: ...display and edit the entry information P 100 Automatic navigation is avail able for the 4 fixed favourites home work and 2 other favour ites When the automatic navi gation is activated is turned on 4...

Page 81: ...desired destination to start route guidance If is selected last active screen will display Registered a day time slot 1 Select Auto navigation to start route guidance If Continue is selected active ro...

Page 82: ...tes list The list can contain a maximum of 100 entries When the maximum is reached the oldest destination is deleted 1 Display the destination menu screen P 67 2 Select Address 3 Select Country to ent...

Page 83: ...vehicle will be guided to the point on a road nearest to the destination If a destination is set that cannot be reached a pop up will be displayed to indicate this Search for a destination from POI da...

Page 84: ...wing the current search crite ria 2 Select the desired search method Select to set the search around the current position Select to set the search around the destination Select to set the search aroun...

Page 85: ...elect History on the POI screen 2 Select the desired previous search word Select to delete the search word 3 Select Search 4 Check that the search results are displayed Select the desired POI 5 Check...

Page 86: ...evious next buttons are only shown if there is more than one picture available If a picture can t be shown as enlarged a message Image is not avail able will be displayed Before using this function it...

Page 87: ...on Select to display the three route calculation methods Select the desired item to adjust the route preferences P 88 Select to display the avoidance criteria Select the desired item to adjust the avo...

Page 88: ...the route that is the shortest distance to the set destination Select to display the fuel effi cient route The route will be recalculated and then the starting route guid ance screen will be displaye...

Page 89: ...Select the desired item to adjust the avoidance criteria P 88 Select to display parking lot information The location and available spaces of parking lots around the destination can be checked P 202 Se...

Page 90: ...the route The remaining length and the remaining delay time are displayed The name of the current street or the next street when approaching a turning point During freeway driving the highway informa...

Page 91: ...goes off the guided route the route will be recalculated For some areas the roads have not been completely digitized in our data base Take care when following a guided route The displaying of the abo...

Page 92: ...to allow time to maneuver the vehicle If the navigation system cannot deter mine the current vehicle position cor rectly in cases of poor GPS signal reception the voice guidance may be early or delay...

Page 93: ...he road ahead A blocked route will be marked in the map P 95 Select to display the turn list to the destination P 95 Select to display the destination information The destination can be checked and th...

Page 94: ...en P 64 2 Select Info 3 Check that the Current location information is displayed Address of destination Arrival time remaining time and distance to destination Current location information Select to r...

Page 95: ...te 1 Display the route information screen P 93 2 Select 3 Select the desired block dis tance to detour Select Deactivate to cancel the blocked setting The blocked route will be marked in the map After...

Page 96: ...el the detoured setting This feature either automatically or manually changes routes when traf fic messages of the guidance route has been received The dynamic reroute settings can be changed P 106 Wh...

Page 97: ...ssages of the guid ance route has been received select manually whether or not to change routes 1 A pop up message is displayed on the screen Select Show detour to display the detour route on the map...

Page 98: ...Enter the entry name and then select OK 5 Check that the entry is regis tered in the favourites list 4 fixed favourites home work and 2 other favourites are displayed on the top of list Automatic nav...

Page 99: ...firma tion screen appears 3 Check that a progress bar is being displayed while the data loading is in progress To cancel this function select Cancel A confirmation screen is dis played when the operat...

Page 100: ...on P 100 Select to change the entry name address Select to delete the entry Entries in the favourites list Route Select to display detailed entry information P 100 Select to edit the route P 101 Selec...

Page 101: ...destinations Navigation system 3 Check the details of the entry information The address will be marked on the map 1 Display the entry options screen P 100 2 Select Edit route 3 Select of the desired e...

Page 102: ...omatic map zoom Select to change the zoom level that is automatically zoomed into when an area requiring caution is approached POIs on map Select to set displayed POI icon cate gories P 104 Show guida...

Page 103: ...s on the map Show highway mode Select to set the display of the highway mode on off P 90 Country information This function goes to another screen where it is possible to Set country information screen...

Page 104: ...Select POIs on map 3 Select the desired POI catego ries Select to display all categories Select to hide all icons Select to display main catego ries and subcategories 1 Display the map settings scree...

Page 105: ...for dis playing traffic messages P 106 Select to set the dynamic reroute method P 106 1 Display the traffic settings screen P 105 2 Select Traffic messages 3 Select the desired item Select to receive...

Page 106: ...lect to change the receiving settings of FM radio to auto matic or manual Radio station allows the user to manually select the preferred TMC station from a list of avail able stations 1 Display the tr...

Page 107: ...Select to reroute manually When traffic messages on the guidance route are received select manually whether or not to change routes 1 Press the SETUP button 2 Select Navigation 3 Select Route preferen...

Page 108: ...3 Select the desired items to avoid 1 Press the SETUP button 2 Select Navigation 3 Select Manage stored destina tions 4 Select the desired item Select to delete all favourites Select to delete all rec...

Page 109: ...n some cases Accurate current position may not be shown in the following cases When driving on a small angled Y shaped road When driving on a winding road When driving on a slippery road such as in sa...

Page 110: ...ng it may take a long time for auto reroute to oper ate In auto reroute a detour route may be shown After auto reroute the route may not be changed If an unnecessary U turn is shown or announced If a...

Page 111: ...ss screen followed by a confirma tion that the database has updated successfully 6 Remove the USB device when prompted This restarts the navi gation system and completes the update process Updating ma...

Page 112: ...112 YARIS_NAVIGATION AND MULTIMEDIA SYSTEM OWNER S MANUAL_Europe_MK0019_en 3 6 Tips for operating the navigation system...

Page 113: ...Audio visual system 4 1 Basic operation Quick reference 114 Some basics 115 4 2 Radio operation AM FM DAB radio 119 4 3 Media operation USB memory 124 iPod iPhone Apple CarPlay 126 Android Auto 129 Bl...

Page 114: ...utton From the MENU button 1 Press the MENU button then select Audio Using the radio P 119 Playing a USB memory P 124 Playing an iPod iPhone Apple CarPlay P 126 Using the Android Auto P 129 Playing a...

Page 115: ...uto connection is established some sys tem functions such as the following will be replaced by similar Apple CarPlay Android Auto function or will become unavailable iPod Audio Playback USB audio USB...

Page 116: ...two ports is connected to the USB port devices connected to the USB hub may not charge or be operable as the supply of current may be insufficient 1 Display the audio control screen P 114 2 Select So...

Page 117: ...the desired screen but ton Select to adjust the sound bal ance between the front and rear speakers Select to adjust the sound bal ance between the left and right speakers Automatic sound leveliser ASL...

Page 118: ...on 4 Select Display 5 Select the desired item to be adjusted Colour R Select to strengthen the red colour of the screen G Select to strengthen the green colour of the screen Tone Select to strengthen...

Page 119: ...n P 121 Select to display the radio options screen P 121 Select to display the sound set ting screen P 116 Select to tune to preset stations P 120 FM only DAB Select to display the audio source select...

Page 120: ...urn to seek for frequencies DAB Favourites screen Turn to select preset services stations Service station list screen Turn to move up down the ser vice station Manual screen Turn to seek for service D...

Page 121: ...ne the desired DAB ensemble or service Select to set the desired ensem ble Select to set the desired ser vice station 1 Select Options 2 Select the desired item FM Select to set the listing order of t...

Page 122: ...ly listen ing to can be re listened to at any time 1 Select Time shift 2 Select the desired operation button Select to jump forward back ward by 10 seconds Select and hold to fast forward backward Ret...

Page 123: ...when the traffic infor mation program starts 1 A pop up message is displayed on the screen when the radio seeks out a TP station 2 Select Continue When traffic announcement is set to on P 121 the radi...

Page 124: ...mode selection screen Select to display the sound set ting screen P 116 Select to set repeat playback P 125 Select to change the file track Select and hold to fast rewind Select to play pause Select t...

Page 125: ...or folder album cur rently being listened to can be repeated 1 Select Each time is selected the mode changes as follows When random playback is off file track repeat folder album repeat off When rando...

Page 126: ...reached by the following methods P 115 Connecting an iPod iPhone P 116 When an Android Auto connec tion is established this function will be unavailable An Apple CarPlay connection is not established...

Page 127: ...ge the track Turn to move up down the list Also the knob can be used to enter selections on the list screens by pressing it Some functions may not be available depending on the type of model When an i...

Page 128: ...lier track repeat off When shuffle is on track repeat off Tracks or albums can be automati cally and randomly selected 1 Select Each time is selected the mode changes as follows shuffle 1 album shuffl...

Page 129: ...116 Select to display the audio con trol screen of Android Auto Select to change the track Select to play pause Select to change the track Displays cover art Press to change the track Turn to change t...

Page 130: ...st screen Select to display the play mode selection screen Select to display the portable device connection screen P 132 Select to display the sound set ting screen P 116 Select to set repeat playback...

Page 131: ...start playing when select ing while it is paused Conversely the music may pause when selecting while it is playing In the following conditions the system may not function The Bluetooth device is turne...

Page 132: ...nnect 3 Select the desired device to be connected 4 Check that a confirmation screen is displayed when the connection is complete If an error message is displayed WARNING Do not operate the player s c...

Page 133: ...ice that is registered with the system may reduce the effects Miracast is a registered trademark of Wi Fi Alliance The Miracast control screen can Miracast Miracast is a function that enables the audi...

Page 134: ...the sound volume of the connected device to an appropriate level When a device that uses Bluetooth audio is used with Miracast no sound may be output from Miracast If this occurs disabling the Blueto...

Page 135: ...rt immediately 4 Select the system name on the smartphone 5 Select Yes 6 Check that Miracast operation screen is displayed Depending on the device con nected it may take approxi mately 5 to 15 seconds...

Page 136: ...audio Android Auto Press Change audio modes Press and hold Pause Press and hold again to resume the play mode Miracast Press Change audio modes A B Mode Operation function AM FM Press Preset stations...

Page 137: ...play the audio settings screen P 137 2 Select Common 3 Select the desired items to be set Select to set the cover art dis play on off Select to prioritize the display of information from the Gracenote...

Page 138: ...nge you may notice fad ing and drifting which increase with the distance from the radio trans mitter They are often accompanied by distortion Multi path FM signals are reflec tive making it possible f...

Page 139: ...andards Please note that the use of this acces sory with an Apple product may affect wireless performance iPhone iPod iPod nano iPod touch and Lightning are trademarks of Apple Inc regis tered in the...

Page 140: ...ble compressed files Item USB Compatible file for mat MP3 WMA AAC WAV LPCM FLAC ALAC OGG Vor bis MP4 AVI WMV Compatible file for mat video MP4 AVI WMV Folders in the device Maximum 3000 Files in the d...

Page 141: ...em plays back files with mp3 wma m4a file extensions as MP3 WMA AAC files respec tively To prevent noise and play back errors use the appropriate file extension MP3 files are compatible with the ID3 T...

Page 142: ...are not com patible with the audio player The player is compatible with VBR Variable Bit Rate When playing back files recorded as VBR Variable Bit Rate files the play time will not be correctly displ...

Page 143: ...4 Video codec H 264 MPEG 4 AVC MPEG4 Audio codec AAC MP3 Corresponding screen size MAX 1920 1080 Corresponding frame rate MAX 60i 30p AVI Container Video codec H 264 MPEG 4 AVC MPEG4 WMV9 WMV9 Advanc...

Page 144: ...conventional discs WMA WMA Windows Media Audio is an audio compression format developed by Microsoft It com presses files into a size smaller than that of MP3 files The decoding formats for WMA files...

Page 145: ...iPod error This indicates a problem in the iPod or its connec tion No music files found This indicates that there is no music data in the iPod Check the iPod firmware version This indicates that the...

Page 146: ...146 YARIS_NAVIGATION AND MULTIMEDIA SYSTEM OWNER S MANUAL_Europe_MK0019_en 4 6 Tips for operating the audio visual system...

Page 147: ...147 YARIS_NAVIGATION AND MULTIMEDIA SYSTEM OWNER S MANUAL_Europe_MK0019_en 5 Speech command system Speech command sys tem 5 1 Speech command system operation Speech command system 148 Command list 15...

Page 148: ...tant press the talk switch Microphone It is unnecessary to speak directly into the microphone when giving a command Speech commands may not be recog nized if Spoken too quickly Spoken at a low or high...

Page 149: ...will stop the voice recognition prompt and immediately play the start listen ing tone While in voice recognition mode pressing and holding the talk switch for 1 or more seconds cancels voice recognit...

Page 150: ...roid Auto connection is established some commands will become unavailable Common Top menu Navigation Command list Command list overview Command list Command Action Correction Returns to the previous s...

Page 151: ...ng Artist artist name 1 Plays tracks from the selected artist Album album name 1 Plays tracks from the selected album Song song name 1 Plays the selected track Play playlist playlist name 1 2 Plays tr...

Page 152: ...stem operation Models with navigation function Parking Displays parking information Parking at destination Displays parking information at your current destination Weather Displays weather information...

Page 153: ...MEDIA SYSTEM OWNER S MANUAL_Europe_MK0019_en 6 Peripheral monitoring system Peripheral monitoring system 6 1 Rear view monitor system Rear view monitor system 154 Rear view monitor system pre cautions...

Page 154: ...when backing up any vehi cle Be sure to back up slowly depress ing the brake pedal to control vehi cle speed The instructions given are only guide lines When and how much to turn the steering wheel wi...

Page 155: ...displayed width is wider than the actual vehicle width Vehicle centre guide line This line indicates the estimated vehicle centre on the ground Distance guide line Shows distance behind the vehicle D...

Page 156: ...he image that appears on the screen differs from the actual dis tance Items which are located higher than the camera may not be displayed on the monitor The camera for the rear view moni tor system is...

Page 157: ...ts will appear to be farther away than they actually are In the same way there will be a margin of error between the guide lines and the actual distance course on the road NOTICE When cleaning the cam...

Page 158: ...urse on the road A margin of error The distance guide lines are dis played according to flat surfaced objects such as the road It is not possible to determine the position of three dimensional objects...

Page 159: ...stance guide lines Visually check the surroundings and the area behind the vehicle On the screen it appears that a truck is parking at point However in reality if you back up to point you will hit the...

Page 160: ...reign matter mud etc is adhering to the camera Sunlight or headlights are shining directly into the camera The vehicle is under fluo rescent lights sodium lights mercury lights etc Back up while visua...

Page 161: ...alignment Have the vehicle inspected by any Toyota retailer or Toyota authorized repairer or any reliable repairer The vehicle is tilted there is a heavy load on the vehicle tyre pressure is low due t...

Page 162: ...162 YARIS_NAVIGATION AND MULTIMEDIA SYSTEM OWNER S MANUAL_Europe_MK0019_en 6 1 Rear view monitor system...

Page 163: ...ing Phone 7 1 Phone operation Hands free system for cellular phones Quick reference 164 Some basics 165 Placing a call using the Bluetooth hands free system 169 Receiving a call using the Bluetooth ha...

Page 164: ...owing functions can be used on phone operation Registering connecting a Bluetooth device P 34 Placing a call using the Bluetooth hands free system P 169 Receiving a call using the Bluetooth hands free...

Page 165: ...cation speed may decrease or malfunctions may occur such as image distortion or audio skipping If a Bluetooth device is connected to the system the interfer ence it may cause will be reduced When carr...

Page 166: ...splayed when the connection is complete If an error message is displayed follow the guidance on the screen to try again Bluetooth phone condition display The condition of the Bluetooth phone appears o...

Page 167: ...sual system will be muted during phone calls or when hands free speech commands are used Talk alternately with the other party on the phone If both parties speak at the same time the other party may n...

Page 168: ...age data All phone settings Message settings When a phone s registration is deleted the above mentioned data is also deleted A lot of personal data is registered when the hands free system is used Whe...

Page 169: ...ayed as Unknown contact In this case select the number to make a call properly 3 Check that the dialing screen is displayed The icons of call type are displayed Missed call Incoming call Outgoing call...

Page 170: ...top screen P 164 2 Select Contacts and select the desired contact 3 Select the desired number Add favourite Remove favourite Select to register remove the contact in the favourites list P 186 187 E m...

Page 171: ...t may be necessary to perform addi tional steps on the phone when trans ferring contact data The registered image in the contact list may not transfer depending on the type of Bluetooth phone connecte...

Page 172: ...elect Favourites and select Toyota assistance 3 Select 4 Check that the dialing screen is displayed The current location of the vehi cle is displayed on the screen 1 Display the home screen P 27 2 Sel...

Page 173: ...e is an incoming call Depending on the type of Bluetooth phone both the system and Bluetooth phone may ring simultane ously when there is an incoming call P 180 Select to display the keypad to send to...

Page 174: ...registered in the contact list This operation can be performed while driving 1 Select Release tones A continuous tone signal is a charac ter string that consists of numbers and the characters p or w e...

Page 175: ...Swap calls Each time Swap calls is selected during an interrupted call the party who is on hold will be switched This function may not be available depending on the type of cellular phone 1 Display th...

Page 176: ...ceiving messages or its registra tion status with the system some information may not be displayed The pop up screen is separately avail able for incoming e mail and SMS MMS messages under the fol low...

Page 177: ...ect Mark unread or Mark read to mark mail unread or read on the message screen This function is available when Update message read status on phone is set to on P 187 1 Display the message screen P 175...

Page 178: ...cel sending the message While the message is being sent a sending message screen is displayed 8 Check that a confirmation screen is displayed when the operation is complete If an error message is disp...

Page 179: ...red number 5 Check that the dialing screen is displayed Calling from a number within a message Calls can be made to a number identified in a message s text area This operation cannot be performed whil...

Page 180: ...ttings P 181 Contact call history settings P 182 Message settings P 187 Toyota assistance settings P 188 Models with navigation function only The call and ringtone volume can be adjusted A ringtone ca...

Page 181: ...tings screen P 180 2 Select Notifications Display 3 Select the desired item to be set Select to change the incoming call display Full screen When a call is received the incoming call screen is display...

Page 182: ...c tions may not be available Contacts can be transferred from a Bluetooth phone to this system Contacts and favourites can be added edited and deleted Also the call history can be deleted 1 Display th...

Page 183: ...ct history transfer on off When set to on the phone s contact data and history are automatically transferred Select to update contacts from the connected phone P 183 Select to set the transferred cont...

Page 184: ...that a confirmation screen is displayed when the operation is complete When the contact is registered 3 Select Replace contacts or Add contact Replace contacts Select to transfer the contact from the...

Page 185: ...lay vCard file lists and download contacts Downloading may not complete cor rectly in the following cases If the engine switch power switch is turned off during downloading If the USB device or Blueto...

Page 186: ...15 contacts maximum of 4 numbers per contact can be regis tered in the favourites list Registering the contacts in the favourites list 1 Select Add favourite 2 Select the desired contact to add to the...

Page 187: ...complete 1 Display the phone settings screen P 180 2 Select Messaging 3 Select the desired item to be set Select to set automatic mes sage transfer on off Select to set automatic mes sage readout on o...

Page 188: ...ture again Models with navigation function 1 Display the phone settings screen P 180 2 Select Toyota assistance set tings 3 Select the country 4 Check that a confirmation screen is displayed when the...

Page 189: ...tion from both this system and the cellular phone then regis ter the cellular phone you wish to connect to this system P 41 Another Bluetooth device is already connected Manually connect the cellular...

Page 190: ...41 Your vehicle is out of the ser vice area Move to where no longer appears on the display Automatic contact transfer function on this system is set to off Set automatic contact transfer func tion on...

Page 191: ...set to on To turn off the display set connec tion confirmation display on this system to off P 43 The engine switch power switch is in ACC or ON The cellular phone is not close enough to this system B...

Page 192: ...onnection of the cellular phone Stop the cellular phone s security software and close all applications Before using an application installed on the cellular phone carefully check its source and how it...

Page 193: ...es may be available in all countries Toyota online 8 1 Toyota online Toyota online 194 Settings required for using the service 197 Toyota online applications operation 198 Online search 199 Importing...

Page 194: ...ne search New establishments such as restaurants bars etc that are not registered in the system can be set as a destination Importing favourites and routes Establishments that were searched using a pe...

Page 195: ...e internet The Wi Fi CERTIFIED Logo is a certification mark of the Wi Fi Alliance Your personal computer and Toyota portal site Access Toyota portal site and search POIs and routes Toyota portal site...

Page 196: ...aining an account via Toyota Portal site P 197 Obtaining an account via the system P 197 When using a cellular phone to connect to the internet observe the following precautions In order to use this s...

Page 197: ...eate an account After that perform the following procedure on the navigation sys tem 1 Press the SETUP button 2 Select Online 3 Select Toyota online 4 Select Existing account 5 Input required informat...

Page 198: ...utton 2 Select Apps 3 Select the desired application Start the selected application Displays notifications that there are some changes or updates for the application Select to close running applica ti...

Page 199: ...avourites and stored routes POIs and routes searched on Toyota portal site can be downloaded to the system and saved as favourites There are 2 methods to down load POIs and routes to the system a Afte...

Page 200: ...avour ite it will be displayed on the list with out overwrite 1 Connect a device to the USB port 2 Select Yes on the popup which tells Your USB device contains POIs and or routes Add these to the navi...

Page 201: ...t available while driving 1 Press the MAP button 2 Select on the map screen 3 Select Weather 4 Check that the weather screen is displayed Location Select to change the loca tion of weather information...

Page 202: ...er desired location by per forming search Select the desired location from the search results Up to 20 locations can be registered 1 Press the MAP button 2 Select on the map screen 3 Select Parking 4...

Page 203: ...y around destination On route Select to sort by around cur rent route Only available if destination is set 1 Press the MAP button 2 Select on the map screen 3 Select Fuel 4 POI list with fuel prices w...

Page 204: ...g route guidance screen P 87 Call Select to call the registered phone number P 173 Select to display the Street View P 201 1 Display the fuel price screen P 203 2 Select search area Nearby Select to s...

Page 205: ...gs 1 Display the online settings screen P 205 2 Select Toyota online 3 Select the items to be set Shows the account name log ging in Select to create a new account or log in with an existing account P...

Page 206: ...ta online set tings screen P 205 2 Select Change account 3 Select the items to be set Select to set the new account Select to login to an existing account If the account already has been created previ...

Page 207: ...205 2 Select Applications 3 Select the items to be set Select to list up all applications which are downloaded on the system Select to delete the application Selecting an appli cation displays the ap...

Page 208: ...Toyota online set tings screen P 205 2 Select Search provider 3 Select the desired search engine It is possible to change the pre ferred fuel grade used for price information 1 Display the Toyota onl...

Page 209: ...209 YARIS_NAVIGATION AND MULTIMEDIA SYSTEM OWNER S MANUAL_Europe_MK0019_en Index Alphabetical Index 210...

Page 210: ...h details settings 38 Bluetooth setup screen 38 Connecting a Bluetooth device 39 Deleting a Bluetooth device 41 Detailed settings screen 43 Displaying the Bluetooth setup screen 38 Editing the Bluetoo...

Page 211: ...the destination 20 H Hands free system 164 Home screen operation 27 I Importing favourites and stored routes 199 Procedure for downloading favour ites and routes from a USB mem ory 200 Registering an...

Page 212: ...oth hands free system 169 By call history 169 By contacts list 170 By favourites list 170 By home screen 172 By keypad 171 SOS 171 POWER VOLUME knob 115 R Radio 119 RDS Radio data system 122 Rear view...

Page 213: ...ion 16 Steering switch 136 148 Audio switch 136 Talk switch 148 TEL switch 166 Street View 201 Displaying the Street View 201 System time settings 58 T Talking on the Bluetooth hands free system 173 C...

Page 214: ...n 60 Voice settings screen 60 W Weather 201 Changing location 201 Displaying the weather screen 201 Wi Fi 45 Wi Fi button Setup screen 18 45 For more information about the following items see the Owne...

Page 215: ...215 YARIS_NAVIGATION AND MULTIMEDIA SYSTEM OWNER S MANUAL_Europe_MK0019_en Alphabetical Index...

Page 216: ...216 YARIS_NAVIGATION AND MULTIMEDIA SYSTEM OWNER S MANUAL_Europe_MK0019_en Map database information and updates...

Page 217: ...217 YARIS_NAVIGATION AND MULTIMEDIA SYSTEM OWNER S MANUAL_Europe_MK0019_en...

Page 218: ...218 YARIS_NAVIGATION AND MULTIMEDIA SYSTEM OWNER S MANUAL_Europe_MK0019_en...

Page 219: ...219 YARIS_NAVIGATION AND MULTIMEDIA SYSTEM OWNER S MANUAL_Europe_MK0019_en Certification...

Page 220: ...220 YARIS_NAVIGATION AND MULTIMEDIA SYSTEM OWNER S MANUAL_Europe_MK0019_en...

Page 221: ...221 YARIS_NAVIGATION AND MULTIMEDIA SYSTEM OWNER S MANUAL_Europe_MK0019_en...

Page 222: ...222 YARIS_NAVIGATION AND MULTIMEDIA SYSTEM OWNER S MANUAL_Europe_MK0019_en...

Page 223: ...223 YARIS_NAVIGATION AND MULTIMEDIA SYSTEM OWNER S MANUAL_Europe_MK0019_en...

Page 224: ...224 YARIS_NAVIGATION AND MULTIMEDIA SYSTEM OWNER S MANUAL_Europe_MK0019_en...

Page 225: ...225 YARIS_NAVIGATION AND MULTIMEDIA SYSTEM OWNER S MANUAL_Europe_MK0019_en...

Page 226: ...226 YARIS_NAVIGATION AND MULTIMEDIA SYSTEM OWNER S MANUAL_Europe_MK0019_en...

Page 227: ...227 YARIS_NAVIGATION AND MULTIMEDIA SYSTEM OWNER S MANUAL_Europe_MK0019_en...

Page 228: ...228 YARIS_NAVIGATION AND MULTIMEDIA SYSTEM OWNER S MANUAL_Europe_MK0019_en...

Page 229: ...229 YARIS_NAVIGATION AND MULTIMEDIA SYSTEM OWNER S MANUAL_Europe_MK0019_en...

Page 230: ...230 YARIS_NAVIGATION AND MULTIMEDIA SYSTEM OWNER S MANUAL_Europe_MK0019_en...

Page 231: ...231 YARIS_NAVIGATION AND MULTIMEDIA SYSTEM OWNER S MANUAL_Europe_MK0019_en...

Page 232: ...232 YARIS_NAVIGATION AND MULTIMEDIA SYSTEM OWNER S MANUAL_Europe_MK0019_en...

Reviews: