Toyota PT228-89460 Manual Download Page 6

TOYOTA 

4-RUNNER 

2006 -  

TOWING HITCH 

Procedure 


Page 6 of 7 pages 

Issue: C  07/06/05 

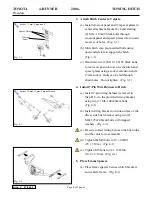
9.  Reinstall Vehicle Components. 

(a)  Reconnect exhaust to the exhaust hanger 

ensuring to fully engage the hanger. 
(Fig. 9-1) 


(b) Reinstall the air suspension cover by 

replacing the one fastener.  (Fig. 9-2) 

(1) If fastener is damaged fit a new fastener, 

(P/N 90467-09185). 

(c)  Place the hitch plug in the glove box. 


Fig. 9-1 

Exhaust Hanger Removal Tool 

Fig. 9-2 

Summary of Contents for PT228-89460

Page 1: ...rotection Notes Safety Glasses Vehicle Protection Cloth Shop Towel Special Tools Notes None Installation Tools Notes Nylon Panel Removal Tool e g Panel Pry Tool 1 Toyota SST 00002 06001 01 Ratchets and Sockets Deep Well 10 mm 12 mm 13 mm 17 mm Socket Wrench Extensions 6 min Torque Wrench x2 0 100 lbf ft 0 100 lbf in Exhaust Hanger Removal Tool e g Snap On P N YA3202 Special Chemicals Notes None Ge...

Page 2: ...rotection rechecking torque procedure etc Vehicle Disassembly Reassembly panel removal part storage etc Electrical Component Disassembly Reassembly battery disconnection connector removal etc Please see your Toyota dealer for a copy of this document 1 Inspection a Inspect parts for damage 2 Prepare Vehicle for Hitch Installation a Cover exhaust pipe with clean shop towel Fig 2 1 b Caution muffler ...

Page 3: ...ame Install harness clamp close to harness connector around black wrap Secure harness to frame and trim excess on cable tie Fig 2 5 g Remove the two 2 M8 bolts securing the factory wiring bracket to the frame Discard the two 2 bolts Fig 2 6 h Remove the two 2 M6 bolts connecting the 7 pin plug to the bracket slide the plug from the bracket Discard the bolts and factory wiring bracket Fig 2 7 Fig 2...

Page 4: ...Bolts can be fed through chain holes Do not tighten Fig 3 1 4 Install 7 Pin Wire Harness to Hitch a Install 7 pin wiring harness removed in Step B 8 to the provided wiring bracket using two 2 M6 1 00x20mm bolts Fig 4 1 b Install wiring bracket to inside surface of the driver side hitch bracket using two 2 M8x1 25x20 black bolts with trapped washers Fig 4 1 c Be sure to feed wiring between the hitc...

Page 5: ... x 25 black bolts in forward most frame locations Fig 6 1 Step 3 d Ensure all bolts engage frame spacers and the spacers do not impede on frame welds 7 Visually Center Hitch a Visually center hitch so that closeout panel is centered in fascia cut out Fig 7 1 8 Tighten Remaining Hitch Hardware a Tighten four 4 M12 bolts in the center to 60 12 lbf ft 80 15 N m Fig H 1 Steps 1 4 b Tighten four 4 M12 ...

Page 6: ...nts a Reconnect exhaust to the exhaust hanger ensuring to fully engage the hanger Fig 9 1 b Reinstall the air suspension cover by replacing the one fastener Fig 9 2 1 If fastener is damaged fit a new fastener P N 90467 09185 c Place the hitch plug in the glove box Fig 9 1 Exhaust Hanger Removal Tool Fig 9 2 ...

Page 7: ...sue C 07 06 05 Accessory Function Checks Inspection torque M12 bolts Inspection torque M8 bolts Inspection torque M6 bolts 7 pin to bracket Frame Spacers Wiring Bracket Hitch Plug 60 12 lbf ft 80 15 N m 19 4 lbf ft 25 5 N m 94 19 lbf in 10 4 2 N m Installed and off of welds Installed and fed between hitch and cross member Placed in glove box ...

Reviews: