background image

9

UN018

Touch the 

 of your desired destina-

tion.  The screen changes and displays

the map location of the selected destina-

tion and the route preference.  (See ”En-

tering Destination” on page 19.)

If the same name exists in more than one

city, you can search it more easily with the

”City”

 and 

”Category”

 switch.  (See (b)

Inputting a city name and (c) Selection from

the Points of Interest categories.)

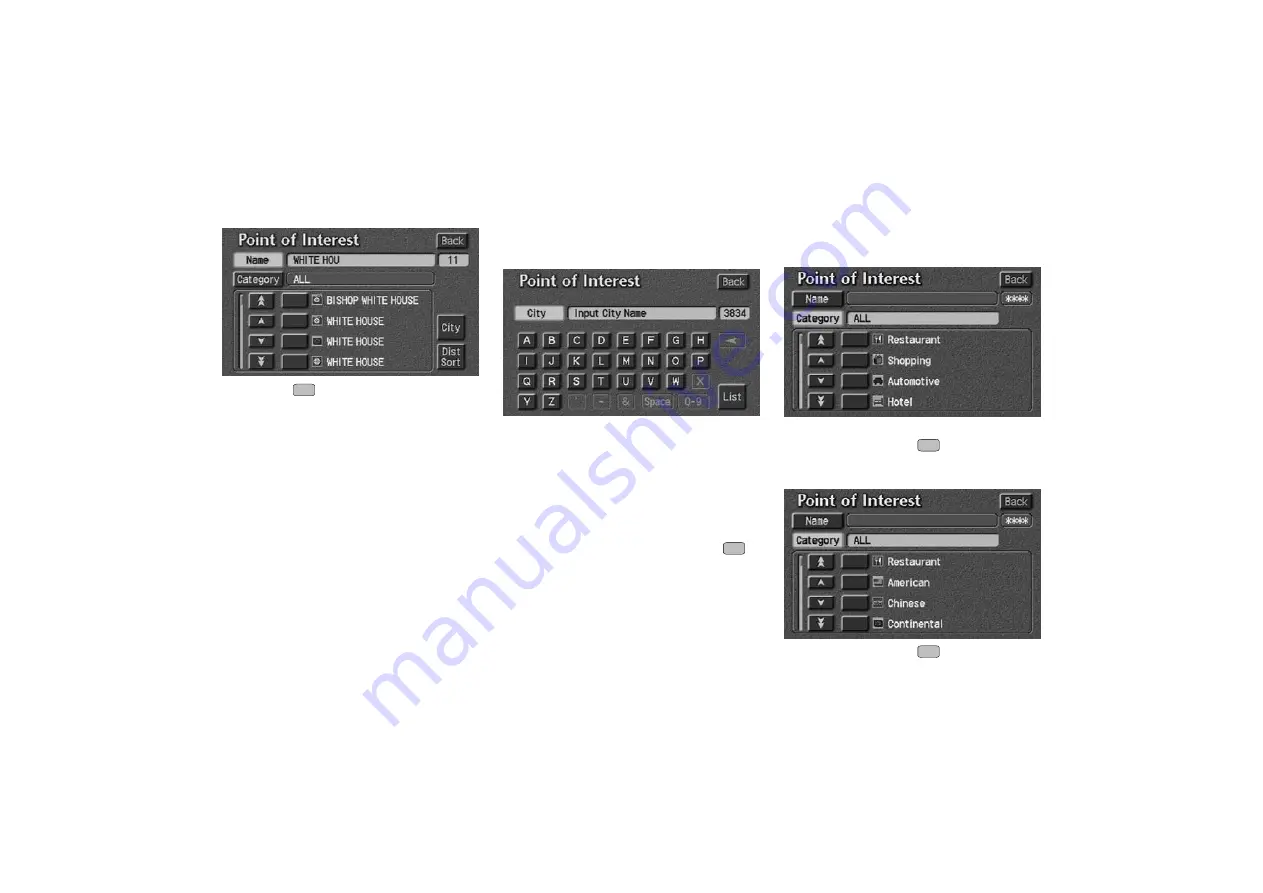
Touch the 

”City”

 switch on the point of

interest screen.

UN019

Touch alphabet keys directly on the

screen to input a city name.  When you in-
put numerals, touch the 

”0–9”

 switch to

display the screen for numeral input.

If the number of sites becomes 4 or less, or
if you touch the 

”List”

 switch at the bottom

right of the screen, the screen changes and

displays the selection list.  Touch the 

 of

the desired city name.

After entering the city name, input the

name of the point of interest.

Touch the

”Category”

 switch on the

point of interest screen.

UN020

The categories are shown on the screen.

When you touch the 

 of your desired

category, more detailed categories are

shown.

UN020

1

When you touch the 

 of your desired

category, the screen changes and dis-

plays the menu to input a name.

(b) Inputting a city name

(c) Selection from the Points of

Interest categories

Summary of Contents for LAND CRUISER 2002

Page 1: ...warning against something which may cause damage to the ve hicle or its equipment if the warning is ignored You are informed about what you must or must not do in order to avoid or reduce the risk of damage to your vehicle and its equipment INFORMATION This provides additional information Initial screen UN001 When you start the engine or turn the ignition key to ACC the initial TOYOTA screen appea...

Page 2: ... is displayed i e for the trip information screen the current screen would change to the CAUTION screen by pushing the MAP VOICE DEST or MENU button on the bezel or by touching the Maintenance switch on the informa tion menu screen When you touch the I agree switch on the screen the map screen appears ...

Page 3: ... to use it and be come thoroughly familiar with it Read the entire Navigation System Manual to make sure you understand the system Do not al low others to use this system until they have read and understood these and other in structions in this manual For your safety some functions may become inoperable when you start driving Unavail able switches are dimmed You can input your destination and sele...

Page 4: ...before you follow an instruction from the system look to see whether you can comply with the instruction safely and legally This system cannot warn you about such things as the quality of a neighborhood con dition of streets and availability of emergen cy services If you are unsure about the safe ty of an area don t drive into it Under no circumstances is this system a substitute for the driver s ...

Page 5: ...witch on the screen or push the button a beep sounds INFORMATION D If the system does not respond to a touch of a switch move your finger away from the screen and then touch it again D You cannot operate dimmed switches D Wipe off fingerprints on the surface of the display using a glass cleaning cloth D The displayed image may become darker and moving images may be slightly distorted when the disp...

Page 6: ...dicate a map view with North up Touching this sym bol changes the map view to a heading up respective The figure also indicates the map scale For details see page 34 GPS Global Positioning System mark Whenever your vehicle is re ceiving signals from the GPS this mark is displayed For de tails see page 35 Current vehicle position mark To indicate the current position For details see page 22 Map Gui...

Page 7: ... etc can be displayed on the screen For details see page 29 Deletion of point of interest s 010u Symbols such as restaurants and hotels etc displayed on the screen can be deleted For details see page 29 Heading up symbol and scale of map On the map the vehicle travel direction is up The red arrow indicates North Touching this symbol directly on the screen changes the map to North up For details se...

Page 8: ...ways to input your destination Entering destination 19 Route guidance screen 20 Current position display 22 Voice guidance 23 Typical voice guidance prompts 23 Registration of your home 26 Detour setting 27 Displaying points of interest 29 Turn list 30 Guidance screen 32 Map scale 33 Screen scrolling 34 Orientation of the map 34 Limitations of the navigation system 35 Map database information and ...

Page 9: ...ge the screen to a display of the database items that match the name or address that you have entered on the screen The number of matching items is shown to the right side of the screen If the matching item is more than 9 999 the system displays on the screen To input numerals touch the 0 9 switch and the display will change the screen to number input display UN006 Touching the A Z switch changes ...

Page 10: ... to the end or beginning of the name UN008 1 Touch the Scroll switch to move the cursor UN009 Position locating screen on the map 2 When you touch an arrow facing your desired point the map scrolls in that direction When you release your finger scrolling stops 3 If you touch the Enter switch the position of cursor is set How to move the cursor ...

Page 11: ...r destination You can find your destination using various methods See page 6 through 8 for the detailed steps 1 By Address You can input the house number and the street address by using the input keys See page 6 for the detailed steps 2 By Point of interest You can select one of the many points of interest that have been already stored in the system s database There are about 50 categories to choo...

Page 12: ... displayed map See page 19 for the de tailed steps INFORMATION D When inputting the destination the response to the switch may be slow D Point of Interest are mainly regis tered in Detailed map coverage areas The registration is made based on the NavTech Standard POI Inclusion List D If there is no point registered switches such as Marked Point Home Previous Destination or Previous Starting Point ...

Page 13: ...N302 After each letter is inputted the system searches the database for street names that match Alphabet keys are dimmed if the da tabase does not have a match for the next letter in the remaining list of matching street names When you input numerals touch the 0 9 switch to display the screen for numeral input Based on your input the number of matching sites appears at the top right of the screen ...

Page 14: ...If you input a street name first the screen changes You can then input the house num ber UN303 If the above screen appears you can select an address range on that screen The screen for inputting a city name appears if you touch the City switch on the Ad dress screen on page 6 UN015 Input a city name using alphabet keys After the number decreases to some extent touch the List switch to display the ...

Page 15: ...st directly b Inputting a city name first c Selecting from the points of interest categories It will not take a long time for you to find your destination if you use a combination of the searching ways of a b and c Touch the Point of Interest switch on the destination screen UN017 The Point of Interest screen appears and then you can input the name of the point of interest Touch letters directly o...

Page 16: ... you in put numerals touch the 0 9 switch to display the screen for numeral input If the number of sites becomes 4 or less or if you touch the List switch at the bottom right of the screen the screen changes and displays the selection list Touch the of the desired city name After entering the city name input the name of the point of interest Touch the Category switch on the point of interest scree...

Page 17: ...s and displays a list of sites UN022 If you do not know the name of the specific point of interest for example when you are trying to find the nearest restaurant touch the Dist Sort switch at the bottom of the screen A listing of all the items in the cate gory is displayed based on the distance from your current location UN023 When you touch the of your desired item the screen changes and displays...

Page 18: ...e number INFORMATION The desired point of interest can be dis played on the map screen For details see page 29 LIST OF POINTS OF INTEREST Restaurant Japanese Chinese French Italian Other American Continental Mexican Seafood Shopping Grocery Store Gas Station Parking Garage House Parking Lot Rental Car Agency ...

Page 19: ...el Golf Course Ski Resort Amusement Park all search areas Sports Complex Casino Marina Tourist Attraction all search areas Winery City Hall Police Station Library Hospital Park Recreation all search areas Civic Community Center Convention Exhibition Center Court House Train Station Airport all search areas Bus Station ...

Page 20: ... Named Place Touching the Marked Point switch on the destination screen displays your list of registered marked points See page 52 on registering and editing marked points UN024 When you touch the of your desired item the screen changes and displays the map location of the selected destina tion and the route preference See En tering Destination on page 19 Destination input by MARKED POINT ...

Page 21: ...se icons will be shown on the screen Touch the Previous Destination switch on the destination screen UN025 The screen lists up to 10 previously set des tinations During driving the screen lists 5 previously set destinations Select your desired destination The screen changes and displays the map location of the selected destination and the route preference See Entering Destination on page 19 You ca...

Page 22: ...lice stations hos pitals or dealers are shown The current position is shown with an address the latitude and the longitude at the top of the screen UN026 When you touch your desired emergency category the selected emergency category list is displayed UN027 The distance from your current position up to the destination is displayed on the right of the name You can see the names of the emergency dest...

Page 23: ...s which are located near the des tination to be set When you touch the List switch or the number of sites becomes 4 or less the list of matching street names appears UN029 Touch the of your desired item After inputting the two intersecting streets the screen changes and displays the map location of the selected destination and the route preference See Entering Destination on page 19 Destination in...

Page 24: ...tination input screen UN030 Be sure to use the complete name of the freeway or highway including the hyphen when entering the destination Freeways and interstates use an I I 405 US high ways use the state designation before the number CA 118 As the number of matching freeways de creases you can touch the List switch to display the list When the number of sites be comes 4 or less the list screen ap...

Page 25: ...the en trances or exits in order of distance from your current location UN034 Name Sort Touch this switch to list the en trances or exits in alphabetical order Touch the Previous Starting Point switch on the destination screen The screen changes and displays the map location of the previous starting point and the route preference See En tering Destination If you have not used the navigation yet th...

Page 26: ...Route Preference Touch the Change switch to change the conditions which are to determine the route to your destination You are given a number of choices on the conditions which the system uses to deter mine the route to your destination UN202 Touch the On switch of Minimize Freeway Use to search for a route other than freeways as much as possible In some cases the route cannot avoid running on a f...

Page 27: ...the shortest distance Route 3 Other route After selecting one you can start the route guidance by touching the Start switch or starting to move your vehicle If you want to set a way point between the starting point and the destination or change the search condition touch the Chg Route switch The screen changes and displays the change route menu For de tails see page 21 When you keep touching the S...

Page 28: ...or details see page 29 Mark Touch this switch for one touch regis tration of the marked point For details see page 56 INFORMATION D The distance to your destination ap pears on the left of the screen D The time to your destination can also be displayed For the setting steps see page 66 Chg Route The Change Route screen appears and the following settings are avail able Reroute To change the conditi...

Page 29: ...k continues to track your current location INFORMATION When you use the one touch scroll feature the current vehicle position mark may disappear from the screen Move the map with a one touch scroll again or push the MAP VOICE button on the bezel to return to the current vehicle position map location display The current position is automatically set as your vehicle receives signals from the GPS Glo...

Page 30: ...ghted in green You can listen to Voice route guidance by pushing the MAP VOICE button on the bezel even if the volume is OFF INFORMATION During route guidance the voice guid ance continues even if the navigation screen is changed to other screens such as the audio screen UN301 The voice guidance provides various mes sages as you approach an intersection or other point where you need to maneuver th...

Page 31: ... miles to the traf fic circle 2 In a quarter of a mile traffic circle ahead and then right turn 3rd exit ahead 3 Next exit right 4 Beep sound only EMV3114U The system indicates a U turn if the dis tance between two one way roads of oppo site directions is less than 15 m 50 ft in residential areas or 50 m 164 ft in non res idential areas 1 In half of a mile make a legal U turn 2 Make a legal U turn...

Page 32: ...e infor mation when entering or exiting a freeway or interstate 1 In 2 miles 405 freeway on the right 2 405 freeway on the right and then keep right onto 405 freeway south 3 Beep sound only INFORMATION D If the system cannot determine the current vehicle position correctly in cases of poor GPS signal reception the voice guidance may be made ear ly or delayed D If you did not hear the voice guid an...

Page 33: ...n Touch the screen to select your desired method from the menu a Registering by current position When you select this method the current vehicle position is immediately regis tered as your home This is the fastest method to use if you are at your house b Registering by street address If you are away from your home you can input your home address Input the address of the your home in the same way a...

Page 34: ...map location of the home and a message If you are sure that you want to delete the point touch the YES switch If not touch the NO switch When you are driving while the route guidance is operating you can change the route to detour around a section of the route where a delay is caused by road repairs an accident etc UN049 Touch the Chg Route switch if you encounter a reason to divert from the se le...

Page 35: ...ange route screen that allows you to select the dis tance you want to detour Touch one of the numeral keys to start the detour process Af ter detouring the system returns to the origi nal guidance route Alternate If you touch this switch the sys tem will calculate an entire new route to the destination INFORMATION D When your vehicle is on a freeway the detour distance selections are 5 15 and 25 m...

Page 36: ...not find your desired point of interest on the limited choice screen touch this switch The screen then displays the complete Point of Interest listing screen UN054 When you select a point of interest type from either the limited list or the complete list the screen will display symbols at those loca tions on the map screen Local POI Search If you want to search the nearest point of interest touch ...

Page 37: ...e distance from your current position can be displayed at the bottom left of the screen When your desired point of interest over laps with the cursor touch the Ent Dest switch The screen changes and displays the map location of the selected destination and route preference See Entering Destination on page 19 If the symbols of two or more points of inter est overlap as they are close to each other ...

Page 38: ...s indicate the direction which you should turn at an inter section INFORMATION D The current vehicle position mark appears at the bottom of the screen next to the name of the street you are driving on The mark does not move D If you leave the guidance route the name of the street you are on is not shown on the list next to the current vehicle position mark D If the road type you are on changes bet...

Page 39: ...creen UN059 1 Push the MENU button on the bezel to display the menu screen and touch the Guidance Setup switch UN065 2 The screen will change to the Guidance setup screen and you can select the Guidance Screen Type To display Arrow Screen To display Turn List Screen Arrow screen UN066 This screen shows the current road name and the distance to the next corner Guidance screen ...

Page 40: ...oom IN switch or the zoom OUT switch to change the scale one step at a time Touch and hold either switch to zoom in or out smoothly You can change the scale of the map display by touching the scale bar directly It is not available during driving The map scale is displayed under the North up symbol or Heading up symbol at the top left of the screen INFORMATION When the map scale is at the maximum r...

Page 41: ...es like Mark POI etc the screen does not scroll and the re spective functions operate After scrolling the screen the map remains centered at the selected location until you activate another function The current ve hicle position mark will continue to move along your actual route and may move off the screen When you push the MAP VOICE button on the bezel the current vehicle position mark returns to...

Page 42: ...to 4 satellites The GPS system has a certain level of inaccura cy built in for security reasons While the navigation system will compensate for this most of the time occasional positioning er rors up to 300 feet can and should be ex pected Generally position errors will be cor rected within a few seconds When your vehicle is receiving signals from the satellites the GPS mark appears at the top lef...

Page 43: ...driving D When driving without setting the current position calibration correctly D After repeating a change of directions by going forward and backward or turning on a turntable in the parking lot D When leaving a covered parking lot or parking garage D When a roof carrier is installed D When driving with the tire chains installed D When the tires are worn D After replacing a tire or tires D When...

Page 44: ...nnounce one or more D Some routes may not be searched D If the route to your destination includes gravel unpaved roads or alleys the route guidance may not be shown D Your destination point might be shown on the opposite side of the street D When a portion of the route has regula tions prohibiting the entry of the vehicle that vary by time or season or other rea son D The road and map data stored ...

Page 45: ...ision because the data no right turns one way traffic etc is not completed It is still possible to reach the destination by following the arrow direc tion and distance as shown on the bottom left of the screen The arrow points in the direction of the destination The distance shown is as measured in a straight line from the current vehicle position to the destination area UN200 In order to provide ...

Page 46: ... your ve hicle touch the System Option switch on the Menu screen The System Option screen appears and displays the map database version date Contact your dealer to find out if there is a more recent up date released INFORMATION For the updated map DVD ROM con tact your Toyota dealer ...

Page 47: ...40 Route guidance availability DCA1 2000 by NavTech Route guidance available areas Route guidance available for main roads only ...

Page 48: ...41 Route guidance availability DCA2 2000 by NavTech Route guidance available areas Route guidance available for main roads only ...

Page 49: ...42 Route guidance availability DCA3 2000 by NavTech Route guidance available areas Route guidance available for main roads only ...

Page 50: ...43 Route guidance availability DCA4 2000 by NavTech Route guidance available areas Route guidance available for main roads only ...

Page 51: ...44 Route guidance availability DCA5 2000 by NavTech Route guidance available areas Route guidance available for main roads only ...

Page 52: ...45 Route guidance availability DCA6 2000 by NavTech Route guidance available areas Route guidance available for main roads only ...

Page 53: ...46 Route guidance availability DCA7 2000 by NavTech Route guidance available areas Route guidance available for main roads only ...

Page 54: ...47 Route guidance availability DCA8 2000 by NavTech Route guidance available areas Route guidance available for main roads only ...

Page 55: ...48 Route guidance availability DCA9 2000 by NavTech Route guidance available areas Route guidance available for main roads only ...

Page 56: ...49 Route guidance availability DCA11 2000 by NavTech Route guidance available areas Route guidance available for main roads only ...

Page 57: ...50 ...

Page 58: ...SECTION II 51 ADVANCED FUNCTIONS Descriptions of functions for more effective use Marked points 52 Way points 57 Avoid point area 59 Current position calibration 62 ...

Page 59: ...078 1 Push the MENU button on the bez el to display the menu screen and touch the Marked Point switch UN079 2 Touch the Register switch of the Marked Point UN080 A screen similar to that for destination input appears Input the address of the marked point in the same way as any destination in put See page 6 through 19 Marked points39 a Registering marked points ...

Page 60: ...hone number 1 Push the MENU button on the bez el to display the menu screen and touch the Marked Point switch UN082 2 Touch the Edit switch UN083 The screen lists the marked points Sort by Mark Touch this switch to list the marked points in order of the type of symbol Sort by Date Touch this switch to list the marked points in order of the registered date Sort by Name Touch this switch to list the...

Page 61: ... as your vehicle ap proaches them When you touch the desired symbol or Back the previous screen is displayed D Editing a Name UN086 Touch alphabet or numeral keys directly to input the name After you finish your entry touch the En ter switch at the bottom right of the screen The previous screen will be displayed D Editing a Phone telephone number UN087 Touch numeral keys directly After you finish ...

Page 62: ...the Marked Point switch UN089 2 Touch the Delete switch of the marked point delete mark 3 Touch of the marked point to de lete If you want to delete all of the marked points touch the Delete All switch To delete only specified marked points use the Mark Date Name or Dist switch to display the screen so that you can easily find the marked points UN090 UN091 Either of the above messages appears de p...

Page 63: ... The registered point is shown by on the map To change the icon or name etc see b Editing marked points You can register up to 100 marked points If you attempt to register more than 100 a message appears for confirmation UN095 If you want to register a new point touch the YES switch and delete several old points See c Deleting marked points If you do not want to delete the points already registere...

Page 64: ...eady regis tered on the route Add instead of Set is displayed After entering a way point the screen changes and displays the map location of the way point and route preference See Entering Destination on page 19 1 Touch the Add switch to display the Add Way Point screen UN099 2 Select the section of your route where you want to add a way point and touch the ADD switch MAP If you touch this switch ...

Page 65: ...ge 19 1 Touch the Delete switch to display the Delete Way Point screen UN101 2 Select the way point you want to delete and touch the Delete switch UN102 3 A selected point and above message appear To delete the point touch the YES switch If you want to try again or cancel the deletion touch the NO switch The previous screen will return INFORMATION When the vehicle is in motion Delete Next instead ...

Page 66: ...the MENU button on the bezel to display the menu screen and then touch the Avoid Point Area switch to display the following screen un137 INFORMATION D Some areas and freeways may not be able to be set as an avoid point D If a destination is input in the avoid area or the route calculation cannot be made without running through the avoid area a route passing through the avoid area may be shown d De...

Page 67: ...Depending on the contents to be edited touch either the Reduce or Enlarge switch or one of the arrows When you touch the Enter switch the following message appears UN106 After a few seconds the avoid point area screen returns 1 Touch the Edit Avoid Point Area switch to display the Edit Avoid Point Area screen UN107 2 Touch the point you want to edit from the list a Registering avoid point area b E...

Page 68: ...e see page 33 1 Touch the Delete Avoid Point Area switch to display the Delete Avoid Point Area screen UN109 2 Select the point you want to delete from the list Delete All All avoid points registered in the system are deleted UN110 UN111 3 Either of the above messages appears To delete the point s touch the YES switch If you touch the YES switch the data cannot be recovered If you want to try agai...

Page 69: ...12 1 Push the MENU button on the bez el to display the Menu screen and then touch the System Option switch UN113 2 Touch the Position switch INFORMATION For additional information on current position accuracy see Limitations of the Navigation System on page 35 D Position Direction UN114 1 Touch the scroll arrows to move the cursor to your desired location Touch the Enter switch Current position ca...

Page 70: ...replaced This will adjust for any possible change in tire circumference from the old tires to the new ones If this procedure is not per formed when tires are replaced the cur rent vehicle position mark may become incorrect To execute the fast distance tire calibration procedure touch the Distance switch on the System Option screen UN116 The above message appears and the fast distance calibration i...

Page 71: ...64 ...

Page 72: ...SECTION III 65 MORE ADVANCED FUNCTIONS Convenient features Automatic rerouting 66 Time to destination 66 Maintenance information 68 Dealer setting 70 ...

Page 73: ...ch the On switch on the right of Automatic Reroute Selected switch is highlighted in green INFORMATION If your vehicle leaves the guidance route the system searches for a new route to the destination The new route may or may not take you back to the previous route depending on how far you are off the original guidance route When the Time to Destination feature is turned on the time required to rea...

Page 74: ...touch the Enter switch 6 The guidance setup screen returns Touch the On switch on the right of Time to Destination Selected switch is highlighted in green INFORMATION D The displayed time to the destination is the approximate driving time cal culated based on the speeds you se lected and your actual position along the guidance route D The time shown may vary greatly de pending on your progress alo...

Page 75: ... touch the Maintenance switch maintenance 2 Touch your desired icon and input the conditions UN126 Date Input the next maintenance date Distance Input the driving distance until the next maintenance check You can input a five digit number for the driving distance After you input the information touch the OK switch The screen then returns to the Maintenance screen The icon s color will change to gr...

Page 76: ...ving or the road conditions the system may have a time lag between the data which have been inputted and the actual date and driving distance Information items Scheduled Maintenance Oil Change Replace Oil Filter Rotate Tires Replace Tires Replace Battery Replace Brake Pad Replace Wiper Blades Replace Engine Coolant Replace Brake Fluid Replace Automatic Transmission Fluid Replace Air Conditioning F...

Page 77: ... input any destina tion See page 6 through 19 3 After you enter your dealer the screen changes and displays the map location of the dealer If it is OK touch the Enter switch The current screen changes to the screen where you can edit the data of your dealer See b Editing dealer By touching the Go to Dealer switch the system sets your dealer as a destination See d Going to dealer Dealer setting a R...

Page 78: ...e name After you finish your entry touch the En ter switch at the bottom right of the screen The previous screen will be displayed D Editing a Position UN133 UN133t Touch the arrows to scroll to your desired point on the map screen Touch the Enter switch when the cursor moves to your desired point The previous screen will be displayed b Editing dealer ...

Page 79: ...h the Delete Dealer switch UN136 UN136t 2 A selected point will appear Also a message will appear at the bottom of the screen To delete touch the YES switch To cancel the deletion touch the NO switch The registered dealer can be set as a des tination Touch the Go to Dealer switch The screen changes and displays the map location of the registered dealer and the route preference See Entering Des tin...

Page 80: ...SECTION V 73 AIR CONDITIONING Automatic air conditioning controls 74 ...

Page 81: ...on screen display button 76 2 Driver side temperature control button 77 3 Front windshield button 79 4 Automatic control button 76 5 OFF button 76 6 Air intake control button 78 7 Air conditioning on off switch 79 8 Air flow control switch 77 9 Fan speed control switch 78 ...

Page 82: ...75 Air flow selection See Lower vent on page 81 ...

Page 83: ...han necessary when the engine is not running SETTING OPERATION automatic con trol UNC501 1 Push the AUTO button Air flow quantity switching of the diffusers on off of the air conditioning and switching of the air intake between RECIRCULATED AIR and OUTSIDE AIR are automatically ad justed The operation status is shown by each indicator When one of the manual control buttons is depressed while opera...

Page 84: ...4 The outlets from which air is delivered can be selected manually by touching the switch The function of each mode is as follows 1 Panel Air flows mainly from the instru ment panel vents 2 Bi level Air flows from both the floor vents and the instrument panel vents 3 Floor Air flows mainly from the floor vents It is recommended that you close the lower vent For details about this see page 81 4 Flo...

Page 85: ...E AIR mode and RECIRCULATED AIR mode With the button in the OUTSIDE AIR mode the OUTSIDE AIR mode indicator light will come on and the system will take fresh out side air into the vehicle If quick circulation of cooled air is desired push the air intake control button for RECIR CULATED AIR The RECIRCULATED AIR mode indicator light will come on For normal use it is best to keep the air in take cont...

Page 86: ... removing frost or exterior fog on the windshield turn the air condition ing off once it is no longer required This will improve fuel economy The air conditioning can be used for year round automatic tem perature control including cooling and dehu midifying operation If the air conditioning compressor does not operate the indicator of the A C button will blink If the indicator of the A C button bl...

Page 87: ...LD but ton once again while in the FRONT WIND SHIELD mode the mode then returns to the last mode used CAUTION Do not use the FRONT WINDSHIELD button during cooled air operation in extremely humid weather The differ ence between the temperature of the outside air and that of the windshield could cause the outer surface of the windshield to fog up blocking your vi sion c Rear air conditioning switch...

Page 88: ...side vents may be opened or closed as shown I17029 The lower vent may be opened or closed as shown For removing frost or fog it is recommend that you close the lower vent when you use the Floor the Floor Windshield or the Windshield mode Center vents Side vents Lower vent ...

Page 89: ...82 ...

Page 90: ...SECTION VI 83 AUDIO SYSTEM Audio system 84 ...

Page 91: ...lot 94 4 Frequency turning knob 89 5 Radio mode Preset tuning 90 Tape mode Side change of cassette tape 95 DISC mode Disc selection 99 6 Traffic function button 91 7 Mode selectors 85 8 Stopping and ejecting a cassette tape 94 9 Radio mode Seek tuning 90 Tape DISC mode Direct access to a desired program 96 100 10 Turning the system on and adjusting the volume 85 ...

Page 92: ...e last mode used AUDIO Push this button to display switches for audio system UNC608 Push the AM FM TAPE or DISC button to turn on that mode The selected mode turns on directly Push these buttons if you want to switch from one mode to another If the tape or disc is not set the cassette play er or compact disc player does not turn on You can turn off the cassette player by eject ing the cassette tap...

Page 93: ...ge and bass levels In fact different kinds of music and vocal programs usually sound better with different mixes of treble mid range and bass A good balance of the left and right stereo channels and of the front and rear sound lev els is also important Keep in mind that if you are listening to a ste reo recording or broadcast changing the right left balance will increase the volume of one group of...

Page 94: ...akers L or R Adjusts sound balance between the left and right speakers OK The previous screen returns The antenna automatically extends when the radio is on or the radio RDS system is on and retracts when the radio mode is off I17003 To adjust the height of the antenna manu ally push the switch Clean the antenna mast periodically with a clean dry cloth CAUTION Before extending the antenna confirm ...

Page 95: ...f the cassette player and do not insert anything except a cassette tape into the slot unc601 If your vehicle is equipped with an automatic changer it can play selected discs or contin uously play all the discs set in the magazine When you set discs into the magazine make sure they face the correct way If not the player will display DISC CHECK and the disc number NOTICE Never try to disassemble or ...

Page 96: ...ep up the station band or to step down Your radio automatically changes to stereo reception when a stereo broadcast is re ceived ST appears on the display If the signal becomes weak the radio reduces the amount of channel separation to prevent the weak signal from creating noise If the signal becomes extremely weak the radio switches from stereo to mono reception In this case ST disappears from th...

Page 97: ...the CH button for the station you want The switch 1 6 is highlighted in green and station frequency appears on the display Manual tuning Turn the TUNE knob brief ly Each time you turn the knob the radio will step up or down to another frequency Seek tuning Push the Ɯ or Ɲ button of the SEEK button and hold it until you hear a beep The radio will begin seeking up or down for a station of the neares...

Page 98: ...y selected if current reception worsens This functions switches over to the broad casting station providing good reception within the same RDS network and is conve nient for following the appropriate stations UNG614 TRAF Traffic function A station that reg ularly broadcasts traffic information is automatically sought and broadcasts when the program starts When you push the TRAF button TRAF SEEK ap...

Page 99: ...ion cannot be found NO RDS Stations Found appears and the pre vious mode returns If RDS stations are found the stations are read and preset by program type The FM TYPE mode screen displays the RDS Stations Found indicates the number of stations which are found and then RDS sta tions appear in the order of frequency If in one program type more than 6 stations are found the 6 stations are preset in ...

Page 100: ...station UNG618 If a new message is received with the first text message on the display MSG appears on the corner of the screen again When you touch the LATEST MESSAGE switch the new message appears The RDS audio system can store three mes sages consisting of 64 characters in memory To store a message in memory touch the STORE switch until you hear a beep If 3 messages are already stored in memory ...

Page 101: ...te tape is put in the cassette player the player will automatically recognize it and MTL ap pears on the display To stop or eject the cassette tape push the button UNG605 If a cassette is already in the slot push the TAPE button Dolby Noise Reduction feature If you are listening to a tape that was recorded with Dolby B Noise Reduction touch the switch marked with the double D symbol The switch wil...

Page 102: ...side Fast forward and Rewind switches You can fast forward or fast rewind by touching the or switch To stop the tape while it is fast forwarding touch to stop the tape while it is re winding touch If a tape rewinds completely the cassette player will stop and then play the same side If a tape fast forwards completely the cas sette player will play the other side of the tape using the auto reverse ...

Page 103: ... on the upper side to skip for ward FF and the number will appear on the display Push the button until the number you want to skip appears on the display Af ter that the player will automatically skip for ward When the end of the tape is reached the player automatically reverses sides and re sumes normal play Push this button on the lower side to skip backward Push the button until REW and the num...

Page 104: ...and the parking brake applied While you are driving you can hear audio alone even in the DVD video or video CD mode The DVD player can play the discs labeled as shown below Audio CDs DVD video discs Video CDs CD R CD Recordable CD RW CD Re writable and personal computer use CD ROMs may not be playable on this DVD play er a Inserting discs unc602 1 Pull the lock release lever and open the console b...

Page 105: ...agazine into the player as indicated by the arrow ahead on the mag azine close the door and console box When the magazine is set completely the system will be in a Load cycle for approxi mately 30 seconds while the system searches for discs in the magazine Upon completion of this cycle the DVD player unit will be ready to play If the DISC button is pushed during the Load cycle LOAD ap pears on the...

Page 106: ...arting with disc number 1 The disc number of the disc currently being played the track number and the time from the beginning of the program are shown on the display c Selecting a desired disc unx609 On the screen Touch the desired disc number The selected disc number is highlighted in green The player will start playing the selected disc from the first track On the audio panel Push the Ɯ or Ɲ sid...

Page 107: ...lected track from the beginning Fast forward Touch the switch and hold it to fast forward the disc When you re lease the switch the player will resume play ing from that position Reverse Touch the switch and hold it to reverse the disc When you release the switch the player will resume playing iii Searching for a desired track or a disc unx012 Touch the SCAN switch SCAN will be highlighted in gree...

Page 108: ...h once again DISC RPT switch Use it for automatic re peat of the disc you are currently listening to Touch the switch while the disc is playing When the disc is finished the player will auto matically go back to the beginning of the disc and play the disc again To cancel it touch the switch once again RAND switch Use it for automatic and random selection of the disc which you are currently listeni...

Page 109: ... region code indicating a country where you can use the DVD video disc on this DVD player If the DVD video disc is not labeled as ALL or 1 you cannot use it on this DVD player If you attempt to play an in appropriate DVD video disc on this player REGION CODE ERROR appears on the screen Even if the DVD video disc does not have a region code there is a case that you cannot use it Marks shown on DVD ...

Page 110: ...and audio Region codes The region codes are pro vided on DVD players and DVD discs If the DVD video disc does not have the same re gion code as on the DVD player you cannot play the disc on the DVD player Audio This DVD player can play liner PCM and Dolby digital and MPEG audio format DVD Other decoded type cannot be play able Title and chapter Video and audio pro grams stored in DVD video disc ar...

Page 111: ... number and playback time display may not appear while playing back certain DVD video discs Conversational speech on some DVDs is re corded at a low volume to emphasize the im pact of sound effects If you adjust the vol ume assuming that the conversations represent the maximum volume level that the DVD will play you may be startled by louder sound effects or when you change to a differ ent audio s...

Page 112: ...D video disc provided separately Angle switch The angle selection screen appears See page 107 Sub Title switch The subtitle changing screen appears See page 106 Audio switch The audio changing screen appears See page 106 Switches on second page Search switch The title search screen appears See page 106 switch Use this switch to pause the video screen When you touch this switch again the video scre...

Page 113: ...turn the previous screen returns viii Changing the subtitle language unx620 Each time you touch Sub Title the lan guage is selected from the ones stored in the discs and changed To turn off the subtitle touch Hide Touch Return the previous screen returns ix Changing the audio language Each time you touch Audio the lan guage is selected from the ones stored in the discs and changed Touch Return the...

Page 114: ...his screen touch Others and enter a language code For the entry of language code see page 108 Subtitle language You can change the subtitle language 1 Touch Subtitle Lang 2 Touch a language you want to read on the Select Subtitle Lang screen and Enter If you cannot find a language you want to read on this screen touch Others and enter a language code For the entry of language code see page 108 DVD...

Page 115: ...onal code 3 Touch a parental level 1 8 on the Se lect Restriction Level and Enter xii Entry of language code unx618 If you touch Others on the Select Au dio Lang screen Select Subtitle Lang screen or Select DVD language screen you can select a language you want to hear or read by entering a language code 1 Touch the numbers of language code If you enter the wrong numbers touch Clear to delete the ...

Page 116: ...an 0701 Irish 0704 Scots Gaelic 0712 Galician 0714 Guarani 0721 Gujarati 0801 Hausa 0809 Hindi 0818 Croatian 0821 Hungarian 0825 Armenian 0901 Interlingua 0905 Interlingue 0911 Inupiak 0914 Indonesian 0919 Icelandic 0923 Hebrew 1009 Yiddish 1023 Javanese 1101 Georgian 1111 Kazakh 1112 Greenlandic 1113 Cambodian 1114 Kannada 1119 Kashmiri 1121 Kurdish 1125 Kirghiz 1201 Latin 1214 Lingala 1215 Laoth...

Page 117: ...3 Kinyarwanda 1901 Sanskrit 1904 Sindhi 1907 Sangho 1908 Serbo Croatian 1909 Sinhalese 1911 Slovak 1912 Slovenian 1913 Samoan 1914 Shona 1915 Somali 1917 Albanian 1918 Serbian 1919 Siswati 1920 Sesotho 1921 Sundanese 1923 Swahili 2001 Tamil 2005 Telugu 2007 Tajik 2008 Thai 2009 Tigrinya 2011 Turkmen 2012 Tagalog 2014 Setswana 2015 Tonga 2018 Turkish 2019 Tsonga 2020 Tatar 2023 Twi 2111 Ukrainian 2...

Page 118: ...ba 2621 Zulu f Operating a video CD i Playing a video CD unx623 Push the number of the disc you want to play When you touch the PICTURE switch the video screen appears ii Displaying operation switches unx624 unx625 ...

Page 119: ...his switch while the disc menu is displayed the previous page appears on the screen If you touch this switch while the player is play ing video the previous track is searched and played Sel Number switch The track or num ber search screen appears See Searching by track on the next page Main Sub switch A multiplex transmis sion changing switch The mode changes from Main Sub to Main to Sub and back ...

Page 120: ...e door of the DVD player is open If DVD ERROR appears on the display It indicates that the inside of the player unit may be too hot due to the very high ambient temperature Remove the magazine from the player and allow the player to cool down If NO DVD MAGAZINE appears on the display It indicates that the magazine is not inserted into the DVD player If the malfunction is not rectified Take your ve...

Page 121: ... the upper atmosphere especially at night These reflected signals can interfere with those received directly from the radio station causing the radio station to sound alternately strong and weak Station interference When a reflected sig nal and a signal received directly from a radio station are very nearly the same frequency they can interfere with each other making it difficult to hear the broad...

Page 122: ...tended for use with 12 cm 4 7 in discs only Extremely high temperature can keep your DVD player from working On hot days use air conditioning to cool the ve hicle interior before you listen to a disc Bumpy roads or other vibrations may make your multi disc player skip If moisture gets into your DVD player you may not hear any sound even though your DVD player appears to be working Re move the maga...

Page 123: ...repeat a section of a track To see a pin hole hold the disc up to the light Remove discs from the DVD player when you are not listening to them Store them in their plastic cases away from moisture heat and direct sunlight To clean a disc Wipe it with a soft lint free cloth that has been dampened with water Wipe in a straight line from the center to the edge of the disc not in a circle Do not use a...

Reviews: