background image

AVALON_Navi_U (L/O 0205)

102

2003 AVALON NAVI (OM41403U)

Select the 

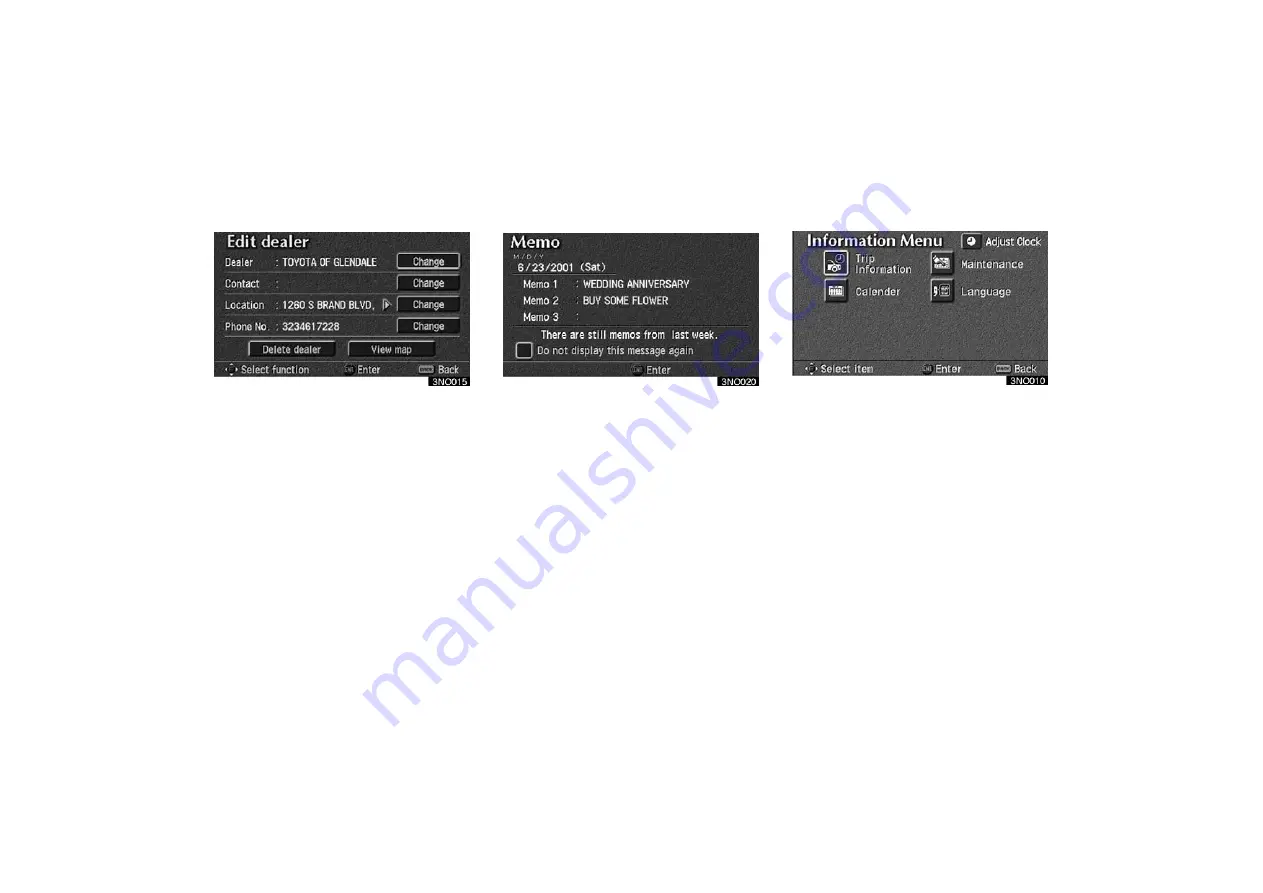
“View map”

 switch on

“Edit dealer” screen. The screen
changes and displays the map location
of the registered dealer and the route
preference. (See “Entering Destination”
on page 28.
)

This system has a function which in-
forms you the memo you entered. When
the system begins operating after
reaching the memo’s date, the “Informa-
tion” screen will be displayed.

The “Information” screen will not be dis-

played again by selecting the 

“Do not

display this message again”

switch.

Push the 

“INFO”

 button on the navi-

gation controller to display the informa-
tion menu screen. Select the 

“Calen-

dar”

 switch to display the “Calendar”

screen.

(d) View map

Calendar with memo

Summary of Contents for Avalon 2003

Page 1: ...knowledge or short cut may at times be faster than the calculated routes The navigation system s database includes about 50 point of interest categories to allow you to easily select destinations suc...

Page 2: ...f the warning is ignored You are informed about what you must or must not do in order to avoid or reduce the risk of damage to your Toyota and its equip ment INFORMATION This provides additional infor...

Page 3: ...sh the ENT button on the navigation controller to indicate I agree on the display the next screen appears On this screen you can select the lan guage shown on the screen Select your desired switch on...

Page 4: ...ers to use this system until they have read and under stood these and other instructions in this manual For your safety some functions may be come inoperable when you start driving Unavailable switche...

Page 5: ...rn you about such things as the safety of an area condition of streets and availability of emergency services If you are unsure about the safety of an area do not drive into it Under no circumstances...

Page 6: ...ion Displays the distance and the estimated travel time to the destination The direction will be indicated when your vehicle is off the route For details see page 31 Operation guide To display the swi...

Page 7: ...arked point For details see page 71 Changing the map direction and Point of Interest display on the right screen NZ02626 When the map display is shown on the dual screens select this to call out the e...

Page 8: ...ENT button select and scroll lever In case of selecting the function and letters or moving cursor press down the lever to one direction out of 8 directions In case of deciding the function after selec...

Page 9: ..._U L O 0205 ix 2003 AVALON NAVI OM41403U INFORMATION Under extremely cold conditions the map may not be displayed and the data input by a user may be deleted Also the buttons may be harder than usual...

Page 10: ...on 9 Explains 11 ways to input your destination Entering destination 28 Route guidance screen 31 Guidance screen 33 Map appearance 33 Current position display 35 Voice guidance 36 Typical voice guidan...

Page 11: ...type front seat The controller is located beside the automatic transmis sion selector lever With bench type front seat The controller is located on the front armrest To turn on the system Push the MAP...

Page 12: ...nal position while driving NOTICE Observe the following otherwise the navigation controller may be dam aged z Do not leave the controller exposed to high temperatures such as on the instrument panel f...

Page 13: ...this position the controller can be used without batteries NOTICE z When replacing the batteries use new batteries of the same manufac turer z Dispose of used batteries according to the local laws Re...

Page 14: ...rs with numeric keypad of the controller For details see Inputting with numeric key pad on page 6 in this section If you type a wrong letter delete it with the switch Selecting the switch erases one l...

Page 15: ...ct the or switch and the name will scroll to the end or beginning of its name 1NO099 You can input letters and numbers or select the displayed numbers with the numeric keypad of the controller To use...

Page 16: ...l input screen and the inputting letters will also change to the number Selecting the A Z switch changes the screen back to the alphabet input screen and inputting letters back to the alphabet Inputti...

Page 17: ...display you can select a number with the 1 through 5 buttons Inputting letters are assigned to each button of the keypad as follows W X Y Z Buttons Inputting letters Alphabet Diacritics Number 1 2 3...

Page 18: ...the navigation controller and select your desired switch on the switch menu on the right of the screen Push the DEST button on the naviga tion controller and the Destination screen appears The destin...

Page 19: ...to search you can use one of 11 different methods to enter your destina tion United States of America US1 Idaho Oregon Washington US2 California Neveda US3 Arizona Colorado Montana New Mexico Utah Wyo...

Page 20: ...one of the many points of inter est that have been already stored in the system s database There are 54 categories to choose from including restaurants hotels and so on See page 16 for the detailed s...

Page 21: ...r the detailed steps INFORMATION D When inputting the destination the response to the switch may be slow D Points of interest are mainly reg istered in Detailed map coverage areas The registration is...

Page 22: ...r is inputted the system searches the database for street names that match Alphabet keys are dimmed if the database does not have a match for the next letter in the remaining list of matching street n...

Page 23: ...d destination and the route preference See Entering destination on page 28 If the same street exists in more than one city the current screen changes to the Select city screen Select or enter your des...

Page 24: ...yed All cities All cities are selected 5 near cities 5 near cities are dis played Selecting a city in the list changes to the display to input a street name Input city name The screen for input ting t...

Page 25: ...name See Inputting a street name on page 13 The screen changes and displays the map location of the selected destination and the route preference See Enter ing destination on page 28 There are 3 ways...

Page 26: ...e of your desired destina tion You can search it more easily with the City and Category switches See b Inputting a city name and c Selection from the point of interest catego ries Select the City swit...

Page 27: ...of the desired city name After entering the city name input the name of the point of interest Select the Category switch on the POI Point of interest screen The categories are shown on the screen When...

Page 28: ...anges and displays a list of sites When you select the of your de sired item the screen changes and dis plays the map location of the selected destination and the route preference See Entering destina...

Page 29: ...Info switch to display the selected destination name address and telephone number List of points of interest RESTAURANT JAPANESE CHINESE FRENCH ITALIAN OTHER AMERICAN CONTINENTAL MEXICAN SEAFOOD SHOPP...

Page 30: ...DEALERSHIPS AUTOMOBILE CLUB AUTO SERVICE MAINTENANCE HOTEL GOLF COURSE SKI RESORT AMUSEMENT PARK SPORTS COMPLEX CASINO MARINA TOURIST ATTRACTION WINERY CITY HALL POLICE STATION LIBRARY HOSPITAL PARK R...

Page 31: ...egistered marked points Refer to pages 66 through 70 on Registering Editing or Delet ing marked points When you select the of your de sired item the screen changes and dis plays the map location of th...

Page 32: ...and displays the map location of the selected destination and the route preference See Entering destination on page 28 You can delete the list of previous des tinations while you stop your vehicle if...

Page 33: ...ation and the route preference See Enter ing destination on page 28 Select the INFO switch to display the selected emergency destination name ad dress and telephone number INFORMATION In an area which...

Page 34: ...nd the map location of the se lected destination and the route prefer ence See Entering destination on page 28 To input a freeway entrance or exit se lect the Freeway Ent Exit switch on the Destinatio...

Page 35: ...it name The screen changes and displays the map location of the se lected destination and the route prefer ence See Entering destination on page 28 There are 2 ways to list the freeway entrance or exi...

Page 36: ...location of the last map and the route preference See Entering des tination on page 28 Select the home switch on the destination input screen The screen changes and displays the map location of your h...

Page 37: ...you input the destination by one of the 11 methods the screen changes and displays the map location of the selected destination and the route pref erence Select the Map scroll switch on the screen to...

Page 38: ...ou keep pushing the ENT but ton on the navigation controller until you hear a beep demo mode will start Route preference To change the conditions of the route preference Select the Edit route switch a...

Page 39: ...route out of 3 types of route Choose one from the three routes Quick A route on which you can reach the destination in the shortest time Short A route on which you can reach the destination in the sho...

Page 40: ...be familiar Map screen with switch When the ENT on the navigation controller is pushed while the map is displayed the switch screen is displayed on the right side of the screen GPS Upon reception of...

Page 41: ...e destination can be displayed for each destination When you are not travel ing on the route however only the dis tance is displayed INFORMATION D The distance to your destination ap pears on the left...

Page 42: ...page 31 Split screen near the intersection The distance to the intersection is shown at the bottom of the screen Split screen near the exit of the free way You can set the map mode and guid ance mode...

Page 43: ...lect the Guid ance mode Guidance mode To display arrow screen To display turn list screen To display map screen Arrow screen This screen shows the current road name and the distance to the next corner...

Page 44: ...you use the map scroll feature the current vehicle position mark may disappear from the screen Move the map again with map scroll or push the MAP VOICE button to return to the current vehicle position...

Page 45: ...ou can adjust the volume of the voice or turn off voice guidance Push the MENU button on the navi gation controller to display the Menu screen and select the Volume switch Select the volume using the...

Page 46: ...mes sages as you approach an intersection or other point where you need to maneuver the vehicle 1 Proceed about 5 miles 2 In a half of a mile right turn 3 Right turn 4 Beep sound only INFORMATION On...

Page 47: ...114U The system indicates a U turn if the distance between two one way roads of opposite directions is less than 15 m 50 ft in residential areas or 50 m 164 ft in non residential areas 1 In half of a...

Page 48: ...ou did not hear voice guidance command push the MAP VOICE button to hear it again If you register your home address be forehand you can easily set the route back to your home 1 Push the MENU button on...

Page 49: ...m the menu on the screen Input your home in the same way as the destination input See page 27 DELETING YOUR HOME 1 Push the MENU button on the navigation controller to display the Menu screen and sele...

Page 50: ...te EMV3065U This picture shows an example of how the system would route you around a delay caused by a traffic jam 1 This part indicates the location where traffic jam is occurring due to road repairs...

Page 51: ...hortest distance Alternative Other route Points of interest such as gas stations and restaurants can be displayed on the map screen You can also set their location as a destination and use them for ro...

Page 52: ...t this switch while selecting some categories of POI The Local POI list screen will appear with a list of the points within 20 miles 32 km Sort by Icon Select this switch to list the points of interes...

Page 53: ...centered in the screen and it overlaps with the cursor 2 Push the ENT button on the nav igation controller and then the switch menu appears 3 Select the Guide switch The name of the point of interest...

Page 54: ...ot displayed You can change from the map screen to a Turn list screen that displays the list of the roads up to your destination This list can be used for a route guid ance 1 Push the MENU button on t...

Page 55: ...nce route the name of the street you are on is not shown on the list next to the cur rent vehicle position mark D If the road type you are on changes between a highway a main street or a residential s...

Page 56: ...your finger After scrolling the screen the map re mains centered at the selected location until you push the MAP VOICE but ton The current vehicle position mark will continue to move along your actual...

Page 57: ...avel is al ways up A red arrow indicates the north 1 Push the ENT button while the map screen is displayed 2 When the Map orient at the right side of the screen is selected the orientation of the map...

Page 58: ...ignals various vehicle signals map data etc However an accurate position may not be shown depending on the satellite condition road configuration vehicle condition or other circum stances The Global P...

Page 59: ...gation system is re ceiving good GPS signals the vehicle position may not be shown accurately or inappropriate route guidance may occur in some cases D When driving on a small angled Y shaped road D W...

Page 60: ...c rerouting the route may not be changed D The route in a U turn may be shown or announced D A location may have multiple names and the system will announce one or more D Some routes may not be search...

Page 61: ...e map but route guidance is limited The naviga tion route might lack precision because the data no right turns one way traf fic etc is not completed It is still possible to reach the destination by fo...

Page 62: ...he DVD switch on the Menu screen The DVD information screen ap pears and displays the map database ver sion date ROUTE GUIDANCE AVAILABILITY Route guidance available area for de tailed roads and for m...

Page 63: ...AVALON_Navi_U L O 0205 54 2003 AVALON NAVI OM41403U DCA01 Route guidance availability 2000 by NavTech Route guidance available areas Route guidance available for main roads only...

Page 64: ...AVALON_Navi_U L O 0205 55 2003 AVALON NAVI OM41403U 2000 by NavTech Route guidance available areas Route guidance available for main roads only Route guidance availability DCA02...

Page 65: ...AVALON_Navi_U L O 0205 56 2003 AVALON NAVI OM41403U 2000 by NavTech Route guidance available areas Route guidance available for main roads only Route guidance availability DCA03...

Page 66: ...AVALON_Navi_U L O 0205 57 2003 AVALON NAVI OM41403U 2000 by NavTech Route guidance available areas Route guidance available for main roads only Route guidance availability DCA04...

Page 67: ...AVALON_Navi_U L O 0205 58 2003 AVALON NAVI OM41403U 2000 by NavTech Route guidance available areas Route guidance available for main roads only Route guidance availability DCA05...

Page 68: ...AVALON_Navi_U L O 0205 59 2003 AVALON NAVI OM41403U 2000 by NavTech Route guidance available areas Route guidance available for main roads only Route guidance availability DCA06...

Page 69: ...AVALON_Navi_U L O 0205 60 2003 AVALON NAVI OM41403U 2000 by NavTech Route guidance available areas Route guidance available for main roads only Route guidance availability DCA07...

Page 70: ...AVALON_Navi_U L O 0205 61 2003 AVALON NAVI OM41403U 2000 by NavTech Route guidance available areas Route guidance available for main roads only Route guidance availability DCA08...

Page 71: ...AVALON_Navi_U L O 0205 62 2003 AVALON NAVI OM41403U 2000 by NavTech Route guidance available areas Route guidance available for main roads only Route guidance availability DCA09...

Page 72: ...AVALON_Navi_U L O 0205 63 2003 AVALON NAVI OM41403U 2000 by NavTech Route guidance available areas Route guidance available for main roads only Route guidance availability DCA11...

Page 73: ...ED FUNCTIONS Descriptions of functions for more effective use Marked points 66 Preset destinations 72 Area to avoid 74 Current position calibration 78 Edit route 80 Setting a preferred road 82 Search...

Page 74: ...tton on the navigation controller to display the Menu screen and select the Marked points switch 2 Select the Register switch of the Marked points A screen similar to that for destination input appear...

Page 75: ...e page by selecting Page 1 or Page 2 switch INFORMATION Up to 100 marked points can be reg istered Selecting the With sound switch select your desired sound When your vehicle approaches the marked poi...

Page 76: ...NU button on the navigation controller to display the Menu screen and select the Marked points switch 2 Select the Edit switch of the Marked points The screen lists the marked points Sort by Icon Sele...

Page 77: ...ect the Change switch which you want to edit CHANGING THE ICON Select your desired icon CHANGING THE NAME Select alphabet or numeral keys to in put the name After you finish your entry select the OK s...

Page 78: ...the desired point on the map Push the ENT button on the naviga tion controller when the cursor is your desired point The previous screen will be displayed SHOW NAME You can set the name of marked poin...

Page 79: ...letion If you want to delete select the Yes switch To cancel the deletion select the No switch You can register your current position or any points See Screen Scrolling on page 47 from the map screen...

Page 80: ...ton on the navigation controller to display the menu screen and select the Marked points switch Delete several old points by following the c Deleting marked points You can set up to 5 destinations bef...

Page 81: ...ation 4 Input the preset destination in the same way as the destination inputs See page 9 1 Push the MENU button on the navigation controller to display the Menu screen and select the Marked points sw...

Page 82: ...want to delete select the Yes switch To cancel the deletion select the No switch Any areas you want to avoid due to traffic jams construction work or other reasons can be registered as avoid areas Pu...

Page 83: ...ation again after deleting unnecessary points appears on the screen 3 When any of the detour gauge at the left side of the screen is se lected a box appears around the cursor This is to determine the...

Page 84: ...to avoid screen 2 Select the area to avoid switch you want to edit 3 Select the Name Location or Change area size on this screen CHANGING THE NAME Select alphabet or numeral keys to in put the name Af...

Page 85: ...t side of this screen if you want to change the area size 1 Select the Delete switch of the Area to avoid to display the De lete area to avoid screen 2 Select the area you want to delete from the list...

Page 86: ...t the current position mark manually 1 Push the MENU button on the navigation controller to display the Menu screen and then select the Setup switch 2 Select the Calib switch on the right side of the...

Page 87: ...controller and then the map screen will be displayed TIRE CHANGE CALIBRATION The tire change calibration function should be used when the tires are re placed This will adjust for any possible change...

Page 88: ...Select the Edit route switch on the screen 3 Select the Add switch of Des tination 4 Input an additional destination in the same way as the destination input See page 28 5 The Add destination screen...

Page 89: ...ose the destinations in the order of arrival by selecting the switch on the left side of the screen After you finished selecting the destina tions select the OK switch The previous screen will be disp...

Page 90: ...elect the No switch To delete a previous destination 1 Push the MENU button to dis play the Menu screen and select the Marked points switch on the screen 2 Select the Del prev dest switch 3 Do the sam...

Page 91: ...h to register the road Select the Next switch when you change the road 4 The Add preferred road screen ap pears Select the Add switch if you want to add as preferred road 1 Push the MENU button on the...

Page 92: ...y the Menu screen and select the Edit route switch on the screen 2 Select the Delete switch of the Set preferred road The Delete preferred road screen appears 3 Select the preferred road which you wan...

Page 93: ...route on which you can reach the destination in the shortest time Short A route on which you can reach the destination in the shortest distance 3 Select the Quick or Short switch and select the OK swi...

Page 94: ...roller to display the Menu screen and select the Route preview switch on the screen The route preview screen ap pears To display the next destination To preview the route to the next destination To pr...

Page 95: ...review the next POI To next To preview the next des tination If the points of interest you selected are on the route they are displayed on the screen Select POI To select the POI icon Delete To delete...

Page 96: ...AVALON_Navi_U L O 0205 88 2003 AVALON NAVI OM41403U...

Page 97: ...onvenient features Setup 90 Map color 91 Automatic rerouting 91 Time to destination 92 Adjust time zone 93 Distance 94 Notify seasonal restrict 95 Voice guide in all modes 95 Current street name 96 Ma...

Page 98: ...r desired map color Auto reroute You can set the system will or will not automatically search for a new route to the destination Estimated travel time You can set to display the time required to reach...

Page 99: ...ically When you select the Auto switch the map color is changed in every three month The map color list Switch NO The map color Schedule 1 Green Mar May 2 Blue Jun Aug 3 Gray Sep Nov 4 Beige Dec Feb W...

Page 100: ...oute may or may not take you back to the previous route depending on how far you are off the original guid ance route When the Estimated travel time fea ture is turned on the time preferred to reach t...

Page 101: ...dis played Select the On switch of Estimated travel time Selected switch is highlighted in green INFORMATION D The displayed time to the destina tion is the approximate driving time calculated based...

Page 102: ...screen and then select or to set the day light saving time 5 Select the OK switch on the screen and the Setup screen will be displayed 1 Push the MENU button on the navigation controller 2 Select the...

Page 103: ...he Setup switch on the screen 3 Select the On switch of Notify seasonal restrict and select the OK switch The restricted road icon and the message may appear on the screen 1 Push the MENU button on th...

Page 104: ...ice guide in all modes and select the OK switch 1 Push the MENU button on the navigation controller 2 Select the Setup switch on the screen 3 Select the On switch of Current street name and select the...

Page 105: ...played or start up by selecting the Do not display this message again switch 1 Push the INFO button on the navigation controller to display the information menu screen Select the Maintenance switch t...

Page 106: ...y either condition Select the Off switch at the top of the Maintenance screen and the information screen will no longer be displayed INFORMATION D For scheduled maintenance informa tion please refer t...

Page 107: ...location address in the same way as you input any destination See pages 13 through 28 After you enter your dealer the screen changes and displays the map location of the dealer If it is OK select the...

Page 108: ...ealer switch on the Maintenance screen The Edit dealer screen appears on the dis play 2 Select the Change switch to edit the item EDITING THE NAME OF THE DEALER OR CONTACT Select alphabet numeral or u...

Page 109: ...t the Enter switch EDITING THE PHONE NUMBER Select numeral keys After you finish your entry select the OK switch at the bottom right of the screen The previous screen will be dis played 1 Select the D...

Page 110: ...as a function which in forms you the memo you entered When the system begins operating after reaching the memo s date the Informa tion screen will be displayed The Information screen will not be dis p...

Page 111: ...this month 1 Select the day you want to input a memo 2 Select the Memo switch to dis play the Memo screen 3 Select alphabet umlaut keys directly to input a memo You can input up to 24 letters After yo...

Page 112: ...ou want to default the date color you chose select the Cancel switch on the screen Change mark After you select the date and or mark color select the OK switch to dis play the previous screen When you...

Page 113: ...switch If not select the No switch If you want to edit the memo select the date Selecting the Edit switch will display the memo edit screen See page 102 for the details If you want to have a look of...

Page 114: ...The Memo list screen will be displayed You can input a search period from Janu ary 1 2000 through December 31 2020 If you want to delete and or edit the memo select the switch of the memo If you want...

Page 115: ...AVALON_Navi_U L O 0205 107 2003 AVALON NAVI OM41403U To edit Select the Edit switch See page 105 for details To delete Select the Delete switch See page 105 for details...

Page 116: ...AVALON_Navi_U L O 0205 108 2003 AVALON NAVI OM41403U...

Page 117: ...AVALON_Navi_U L O 0205 109 2003 AVALON NAVI OM41403U OTHER FUNCTIONS Clock adjustment 110 Outside temperature display 111 Trip information 111 Screen adjustment 113 SECTION IV...

Page 118: ...usted by the GPS clock When you select the OFF switch you can adjust the clock manually with H M and 00 switches H To set the hour with Auto Adjust OFF select this switch M To set the minute with Auto...

Page 119: ...display contact your Toyota dealer There may be a case that appears momentarily when the ignition is quickly turned to ON It is normal if it goes out soon Outside temperature is also displayed on the...

Page 120: ...e displayed value is updated every 10 seconds Every time you refuel the vehicle the cal culation is reset When refueling be sure to stop your vehicle and turn the ignition switch off Cruising range Th...

Page 121: ...lation push the ENT button You can adjust the brightness or con trast of the screen depending on the brightness of your surroundings You also can turn the display off Push the DISP button on the navi...

Page 122: ...mode or night mode To display the screen in the day mode even with the head light switch on select DAY MODE switch on the adjust ment screen for brightness and contrast control If the screen is set in...

Reviews: