


CONNECT THE AILERON PUSHRODS
❍
25. Trim the servo horn as shown in the photo. Using the same
technique that was used for the elevator and rudder, (hold ailerons in
neutral, mark at horn, cut 3/8" (10mm) past the mark, make “L” bend)
attach the aileron pushrods to the servo horn. Note: The reason for the
odd servo horn is to provide aileron differential. Aileron differential
will assist in allowing the aircraft to maintain a level attitude during
the turns. This is common practice among aircraft that have a flat-
bottom airfoil.
(See the glossary of terms starting on page 27 for a
clearer explanation.)
STRAIGHTEN THE ANTENNA
❍
26. Unwind the antenna and straighten (do not stretch) the wire
to its full length. Do not cut the antenna wire as this will greatly
decrease the range and sensitivity of your receiver and void your
radio warranty.
DRILL AN ANTENNA EXIT
❍
27. Using a 3/16" (4mm) drill bit, drill a hole centered
approximately 3/4" (19mm) behind the wing saddle on top of the
fuselage. Cut a 1/2" (13mm) long piece of fuel tubing and center it
inside this hole.
SECURING THE ANTENNA
❍
28. Route the antenna away from the servos, make a strain relief
from a spare servo arm and route the antenna through the fuel
tubing/antenna exit. Use a trimmed servo arm and small rubber band
at the end of the antenna and attach to a T-pin. Push the pin into the
top of the fin. Adjust the trimmed servo arm until there is a slight
amount of tension on the antenna wire. The rubber band should be
partially stretched.
Note: Never push a pin through the antenna or
trim off the excess wire.
FINAL RADIO INSTALLATION INSPECTION
❍
29. Using mixing sticks, secure the radio system and fuel tank as
shown in the photo. It is best to save this step until after you have
completed balancing your aircraft, but it is shown here to remind
you that it is necessary to secure these components. If they are not
secured, there is a possibility of them shifting around in the aircraft,
and possibly upsetting the balance, or worse yet, becoming
unplugged or entangled in the pushrods. Either situation could pose
a threat to returning your aircraft to the ground safely and in one
piece. Make sure that the receiver, battery and fuel tank will have no
chance of moving in your aircraft during flight.
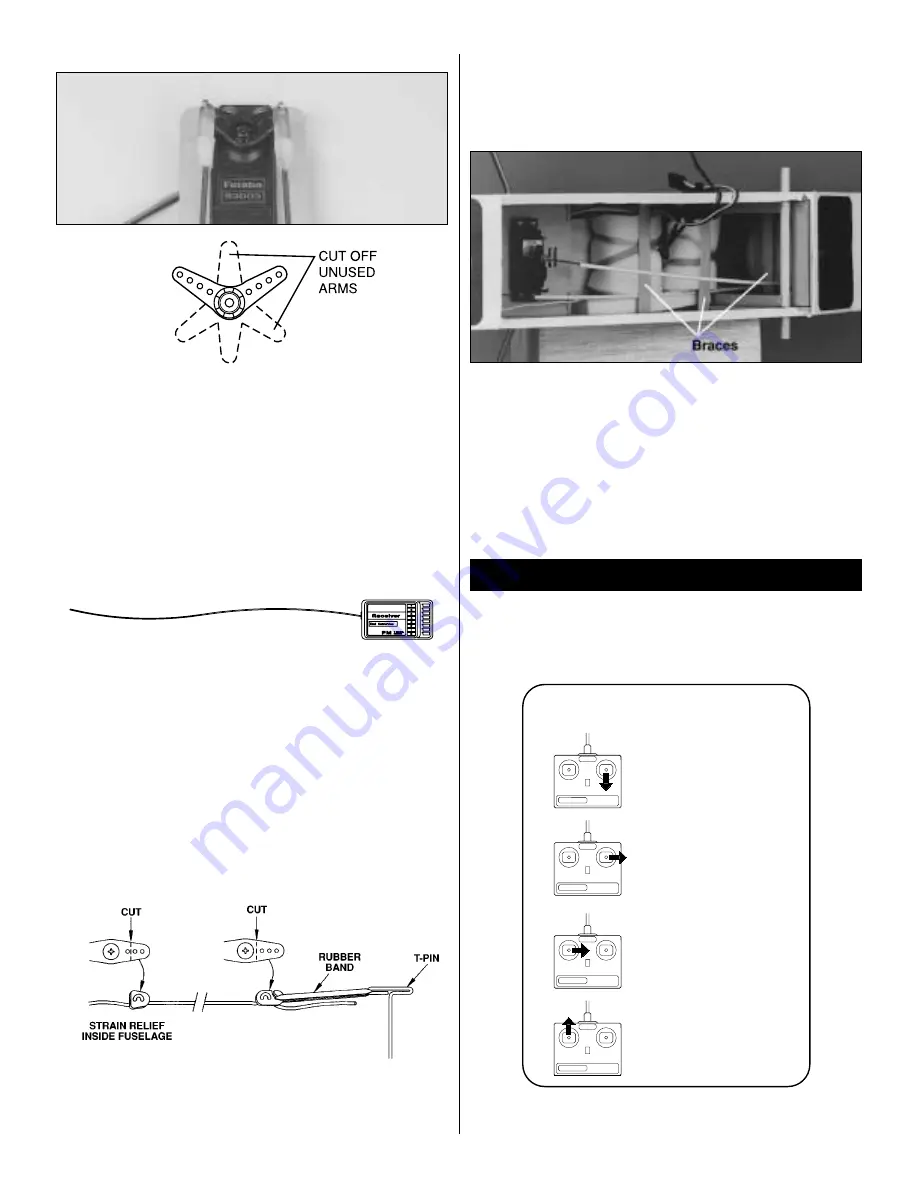
CHECK THE CONTROL DIRECTIONS
❍
1. Turn on the transmitter and then the receiver. Standing behind
the plane, make the following movements with the transmitter and
observe the control surfaces:
If any of the servo movements are wrong, reverse the servo direction
with the servo reversing switches on the transmitter.
CARBURETOR WIDE OPEN
NOSE WHEEL TURNS RIGHT
RUDDER MOVES RIGHT
LEFT AILERON MOVES DOWN
RIGHT AILERON MOVES UP
ELEVATOR MOVES UP
4-CHANNEL
TRANSMITTER
(STANDARD MODE 2)
4-CHANNEL RADIO SETUP
TRANSMITTER
4-CHANNEL
TRANSMITTER
4-CHANNEL
TRANSMITTER
4-CHANNEL
RADIO SYSTEM SET-UP
17