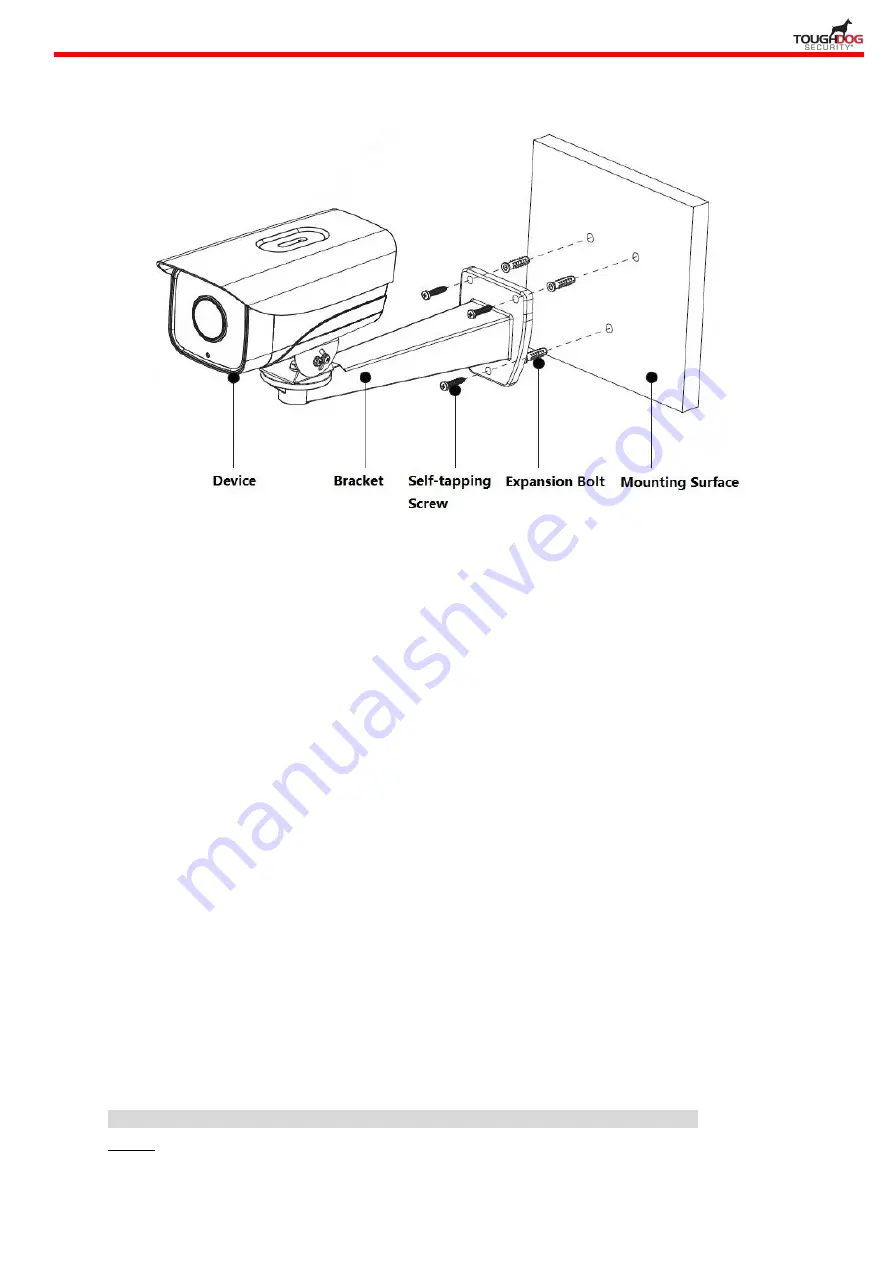
TOUGHDOG SECURITY TDOBIS2403-4G IR Quick Start Manual Download Page 10

Figure 2-2 

Step 1 

Mark the bracket mounting hole sites on the mounting surface and dig expansion bolt bottom 

holes on the marked hole sites on the mounting surface, then knock the expansion bolts into the 

mounting holes and lock them firmly. 

Step 2 

Align the screw holes on the bottom of wall-mounted bracket with the mounting hole sites on the 

mounting surface, and then insert the self-tapping screws into the screw holes on the bracket 

bottom and lock them firmly. 

Step 3 

Align the mounting holes on the bottom of device enclosure with the mounting holes on the front 

of wall-mounted bracket, and then insert the locking screws into the screw holes and lock them 

firmly. 

2.3 Connect Device Cable 

Connect device corresponding power, audio cable and other cable well according to

requirement, and then use insulated tape to twine the connection respectively to make it

waterproof.

Connect alarm input and output terminal to external cable according to 

“Connect Alarm

Input/output Port

”, and use insulated tape to twine connection to make it waterproof.

Connect network cable to corresponding network port of the device cable according to
“Install Waterproof Connector (Optional)”.

Note 

Some models do not support alarm function, which cannot be applied to this chapter. 

Step 1 

Connect alarm input device to the alarm input of I/O port. 

IR Bullet Network Camera Quick Start Guide 

Summary of Contents for TDOBIS2403-4G IR

Page 1: ...Q u i c k S t a r t G u i d e I R B u l l e t N e t w o r k C a m e r a Q u i c k S t a r t G u i d e TDOBIS2403 4G IR Bullet Network Camera...

Page 2: ...ht and so on to focus otherwise it may cause overexposure It is not the device malfunction which will affect the longevity of CCD or CMOS Please transport use and store the device within the range of...

Page 3: ...ome cover is an optical device please don t touch or wipe cover surface directly during installation and use please refer to the following methods to deal with once dirt is found Stained with dirt Use...

Page 4: ...ncy energy and if not installed and used in accordance with the instruction manual may cause harmful interference to radio communication However there is no guarantee that interference will not occur...

Page 5: ...vice Installation 4 2 1 Install SD Card Optional 4 2 2 Fix Device 4 2 3 Connect Device Cable 5 2 4 Remove Oil Stain on Front Cover Optional 8 3 Network Configuration 9 3 1 Device Initialization 9 3 2...

Page 6: ...on about port function No Cable port Port name Connector Function description 1 AUDIO IN Audio input port RCA It inputs audio signal and receives analog audio signal from the devices such as pickup 2...

Page 7: ...ALARM_OUT1 can only be used cooperatively with ALM_OUT_GND1 when connecting to alarm device 2 ALM_OUT_GND1 3 ALARM_IN1 Alarm input port 1 it receives on off signal of external alarm source 4 ALARM_IN...

Page 8: ...3 Figure 1 2 IR Bullet Network Camera Quick Start Guide...

Page 9: ...slot and reset button Step 2 Insert the SD card into the card slot which is shown in Figure 2 1 the card slot is elastic so you only need to press the SD card slightly to make it inserted Figure 2 1...

Page 10: ...nted bracket and then insert the locking screws into the screw holes and lock them firmly 2 3Connect Device Cable Connect device corresponding power audio cable and other cable well according to requi...

Page 11: ...lication Alarm output high and low level alarm output is OC it needs to increase pull up resistance externally to work normally Max external pull up level is 5V max port current is 5mA peak After exte...

Page 12: ...al The installation process of waterproof connector for network port is shown in Figure 2 6 Note It needs to implement the operation when the device is equipped with waterproof connector and it is use...

Page 13: ...fter the device has been used for a period of time Figure 2 7 Step 1 Press down the spring arm on the device front cover and meanwhile pull out the front cover outward then the front cover is demounte...

Page 14: ...onfigTool exe and open quick config tool Step 2 Click to enter the interface where you can modify IP address click Search Setting the system will display the Setting dialog box Step 3 Set the device n...

Page 15: ...sword strong and weak prompt Step 6 Click Initialization the system begins to initialize the device means initialization succeeded means initialization failed Click the icon to check more details Step...

Page 16: ...rk the device will automatically acquire IP address from the DHCP server Step 6 Click OK to complete modification of device IP address 3 3Login WEB Interface Step 1 Open IE browser enter the modified...

Page 17: ...12 Figure 3 3 IR Bullet Network Camera Quick Start Guide...

Reviews: