background image

- 18 -

Accumulation of paper dust and dirt may cause the printer to not print portions of characters.
To prevent such problems, perform periodic maintenance, such as removing paper dust from the paper transport section and 
removing the blackened paper dust from the thermal head surface.

Note: Turn the printer’s power switch off before performing maintenance.

As a guideline, clean the printer every six months.

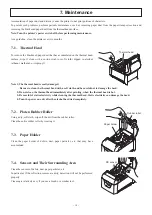
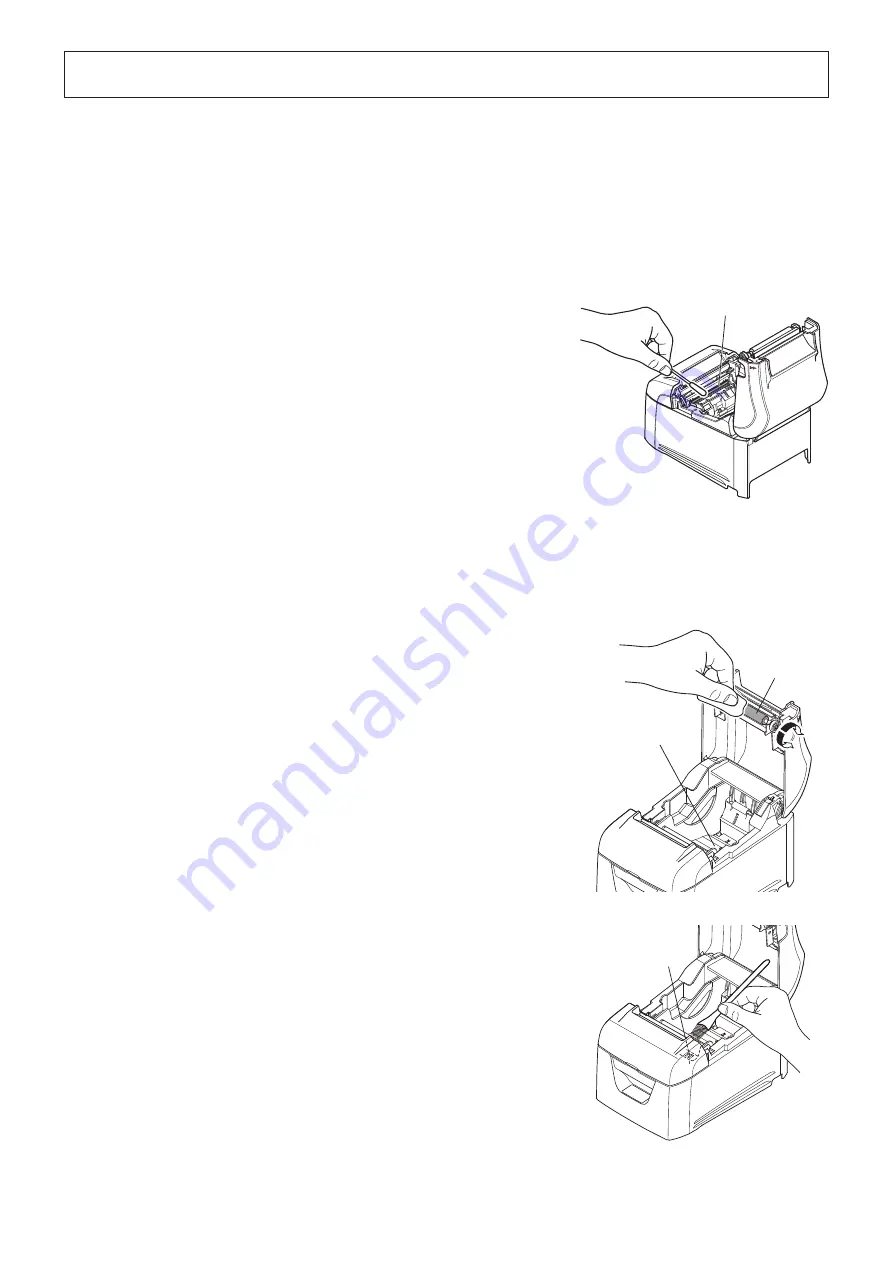
7-1.  Thermal Head

7. Maintenance

To remove the blackened paper dust that has accumulated on the thermal head 
surface, wipe it clean with a cotton swab (or soft cloth) dipped in alcohol 
(ethanol, methanol, or isopropyl).

7-2.  Platen Rubber Roller

Using a dry, soft cloth, wipe off the dirt from the rubber roller.  
Clean the entire rubber roller by rotating it.

7-3.  Paper Holder

Clean the paper holder of debris, dust, paper particles, etc. that may have 
accumulated.

Note 1: The thermal head is easily damaged.  

Be sure to clean the thermal head with a soft cloth, and be careful not to damage the head.

2: Do not clean the thermal head immediately after printing, when the thermal head is hot.
3: Be careful of static electricity while cleaning the thermal head. Static electricity can damage the head.
4: Turn the power on only after the alcohol has dried completely.

7-4.  Sensors and Their Surrounding Area

Clean the sensors of debris, dust, paper particles, etc.

In particular, if the reflection sensors are dirty, detection will not be performed 

properly.
Cleaning is relatively easy if you use a brush or a similar tool.

Thermal head

Rubber roller

Paper holder

PE sensor

Summary of Contents for PR-TB4

Page 1: ...Hardware Manual THERMAL PRINTER PR TB4 ...

Page 2: ...ial environment This equipment generates uses and can radiate radio frequency energy and if not installed and used in accordance with the instruction manual may cause harmful interference to radio communications Operation of this equipment in a residential area is likely to cause harmful interference in which case the user will be required to correct the interference at his own expense This statem...

Page 3: ...wer On 7 3 5 Connecting to a Peripheral Device 7 3 6 Loading a Paper Roll 8 3 7 Changing the Paper Width 10 3 8 Setup Precautions 11 4 Attaching the Accessories 13 4 1 Attaching the Holder Plate 13 5 Troubleshooting 15 5 1 Error Indicators 15 6 Preventing and Removing Paper Jams 16 6 1 Preventing Paper Jams 16 6 2 Removing Paper Jams 16 6 3 Releasing the Cutter Lock 17 7 Maintenance 18 7 1 Thermal...

Page 4: ... extreme heat 6 Make sure that the surrounding area is clean dry and free of dust 7 Make sure that the printer is connected to a reliable power outlet It should not be on the same electric circuit as copiers refrigerators or other appliances that cause power spikes 8 Make sure that the room where you are using the printer is not too humid 9 Use the printer within the boundaries indicated in the en...

Page 5: ...connect this to a telephone line Peripheral drive connector Connects to an AC adapter Power inlet Connects to a host PC through a USB cable USB port Connects to a host PC through a cable Interface connector Lights when the printer is online This lamp also indicates errors in combination with other lamps Lights when the cover is open This lamp also indicates errors in combination with other lamps W...

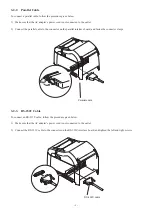
Page 6: ...face Cable to the PC 3 1 1 USB Cable Connect the USB cable to a USB port on your PC 3 1 2 Parallel Cable Connect the parallel cable to a parallel port on your PC 3 1 3 RS 232C Cable Connect the RS 232C cable to a RS 232C port on your PC ...

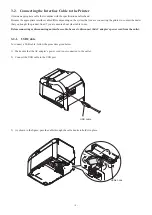
Page 7: ...ght the product from if you are unsure about what cable to use Before connecting or disconnecting an interface cable be sure to disconnect theAC adapter s power cord from the outlet 3 2 1 USB Cable To connect a USB cable follow the procedure given below 1 Make sure that the AC adapter s power cord is not connected to the outlet 2 Connect the USB cable to the USB port 3 As shown in the figure pass ...

Page 8: ...ble to the connector on the RS 232C interface board and tighten the left and right screws 3 2 2 Parallel Cable To connect a parallel cable follow the procedure given below 1 Make sure that the AC adapter s power cord is not connected to the outlet 2 Connect the parallel cable to the connector on the parallel interface board and fasten the connector clasps RS 232C cable Parallel cable ...

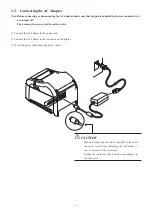
Page 9: ...ower cord from the outlet 1 Connect the AC adapter to the power cord 2 Connect the AC adapter to the connector on the printer 3 Insert the power cable plug into an AC outlet CAUTION When disconnecting the cable take hold of the cable connector to pull it out Releasing the lock makes it easy to disconnect the connector Pulling the cable excessively could cause damage to the connector ...

Page 10: ...plug Follow the procedure given below 1 Make sure that the AC adapter s power cord is not connected to the outlet 2 Connect the modular jack plug to the peripheral drive connector on the rear panel of the printer Connect the other end of the cable to the modular jack of the peripheral device CAUTION Do not connect a telephone line to the peripheral drive connector Doing so may cause the printer to...

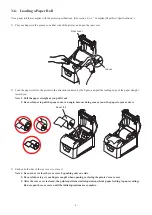
Page 11: ... get your fingers caught when opening or closing the printer s rear cover 3 After the rear cover is closed the printer performs initial operations from paper feeding to paper cutting Do not open the rear cover until the initial operations are complete 2 Load the paper roll into the printer in the direction indicated by the figure and pull the leading edge of the paper straight toward you Note 1 Pu...

Page 12: ...and outer diameters Inner diameter 12 1 mm external diameter 18 1 mm Printed surface Outer edge of roll You cannot use inner wrapped paper rolls Note 1 Do not glue or tape the paper roll and shaft core together 2 Do not fold the tail end of the paper 3 6 2 Recommended Paper Roll Manufacturer Product name Mitsubishi Paper Mills Limited P220AG HP220A HP220AGB 1 Mitsubishi HiTec Paper Flensburg GmbH ...

Page 13: ...g the paper width from 79 5 mm to 57 5 mm 1 Remove the paper roll guide 2 As shown in the figure insert the paper roll guide in the groove 3 Secure the paper roll guide in place by pushing the section marked as A in the figure Note Do not change the paper width while the printer is in use The amount of wear on the thermal head rubber roller and cutter varies depending on the paper width This varyi...

Page 14: ... the tear bar There is a cutter or tear bar inside the paper outlet slot Never put your hand in the slot regardless of whether or not the printer is in operation You must open the printer cover to replace paper However because the cutter blade or tear bar is located inside of the cover be careful not to bring your face and hands too close to the blade or tear bar when the cover is open During and ...

Page 15: ...s sandpaper etc Do not touch the thermal print head heating element Doing so may make it dirty which will decrease the printing quality Static electricity can damage the driver IC and other components of the thermal print head Avoid touching it directly Do not operate the printer if there is moisture which has been caused by condensation or another factor on the front sur face of the head The prin...

Page 16: ...mage Be sure to have qualified personnel install the specified screws and printer to the wall Star is not responsible for any accidents or injuries that occur as a result of improper in stallation misuse or modifications Especially when installing the printer at a high location make sure that the printer is se curely installed to the wall If the printer is not installed securely and falls personal...

Page 17: ...cover 5 Insert the roll paper as shown Note 1 The printer s weight is approximately 2 4 kg when the largest diameter roll paper is loaded Use screws on the wall that have both shear strength and pulling out strength to withstand a force of at least 12 kgf 118 N 2 When installing the printer on a wall be sure the installation surface of the printer has an angle between 0 to 10 degrees with respect ...

Page 18: ...cond intervals Paper cutting in progress error After you restart the printer the printer recovers when the mobile cutter returns to its home position Note 3 4 Flash memory error Off Flashes at 1 second intervals Flash memory access error RAM error Off Flashes at 2 second intervals RAM access error Head thermistor error Off Flashes at 3 second intervals Detection of head thermistor error Power volt...

Page 19: ... Do not pull on the paper with the rear cover closed Doing so may cause damage to or deformation of parts such as the thermal head and the rubber roller 4 Load the paper roll straight and gently close the rear cover Note 1 Load the paper roll straight If you close the rear cover with the paper roll skewed paper jams may occur 2 Push on both sides of the rear cover to close it securely Pushing the ...

Page 20: ...med paper Note When removing jammed paper be careful not to damage the printer In particular the thermal head is easily damaged so do not touch it 4 Turn the knob in front of the cutter in the direction of the red arrow shown on the right until the rear cover can be opened Note If you can not turn the knob in the direction of the red arrow turn it in the opposite direction until the rear cover can...

Page 21: ...f the dirt from the rubber roller Clean the entire rubber roller by rotating it 7 3 Paper Holder Clean the paper holder of debris dust paper particles etc that may have accumulated Note 1 The thermal head is easily damaged Be sure to clean the thermal head with a soft cloth and be careful not to damage the head 2 Do not clean the thermal head immediately after printing when the thermal head is hot...

Reviews: