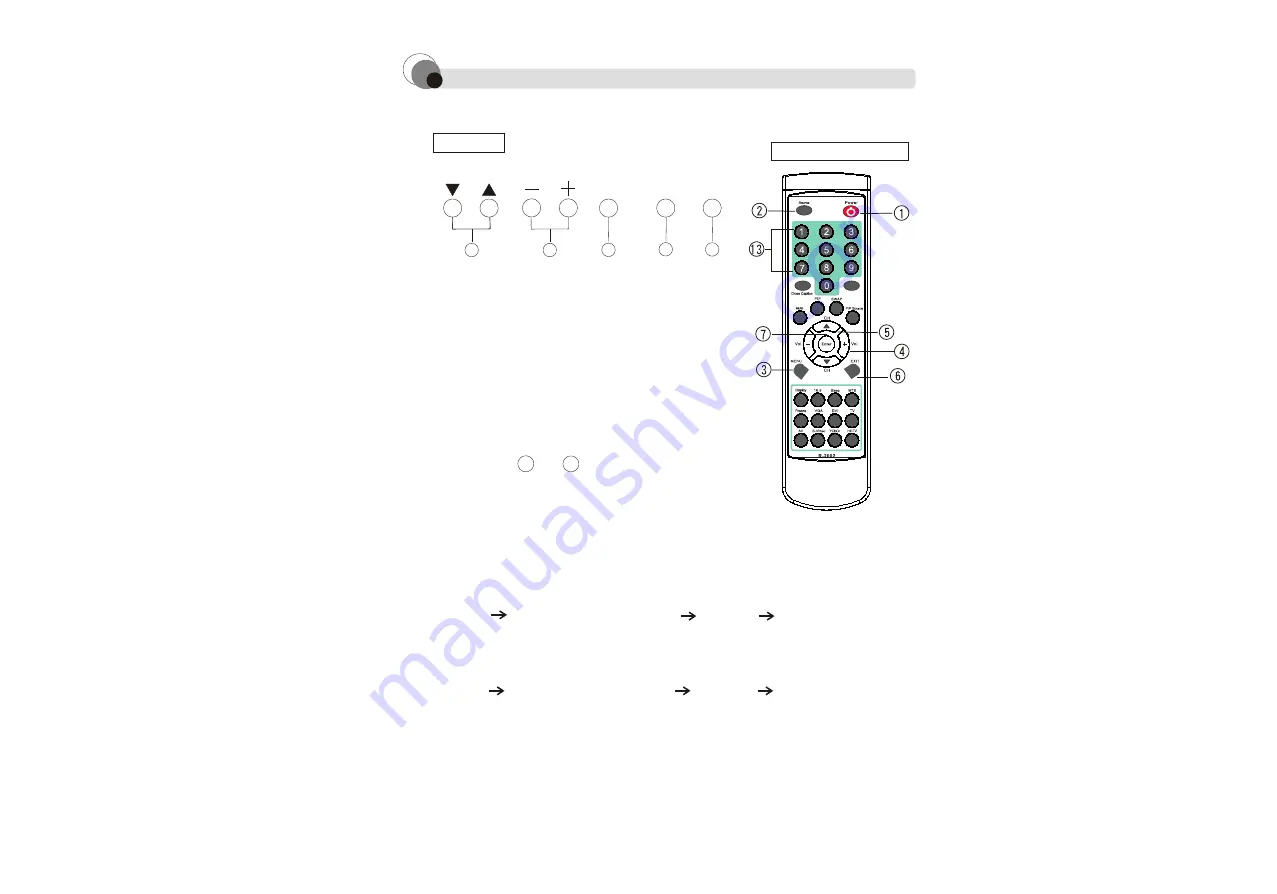
Tote Vision LCD-2300VT Operation Manual Download Page 21


A

:By using Key Pad


B

:Or Remote Control

1.Channel Selection

2.Direct Channel Selection

    Select favorite channels directly by pressing
    channel numbers. For example, Ch45. Press 4 
    and followed by 5

Press Ch       or       button to search channels

5

5.Press POWER button to stop auto-scan process 

4.Auto Scan

BASIC OPERATION

E

3.Antenna/Cable TV Setup

    Menu       CHANNEL SETTINGS      System      ANTENNA/
    CABLE

 Menu      CHANNEL SETTINGS     CH EDIT     AUTO

Remote Control

Key Pad

B

Ch

Vol

C

Source

Menu POWER

D

E

A

25

Summary of Contents for LCD-2300VT

Page 1: ...TOTEVISION SERVICE CENTER 1319 Dexter Avenue N 020 Seattle Wa98109 TELL 206 623 6000 FAX 206 623 6609 LCD 2300VT LCD 2700VT LCD 3018VT LCD 3200VT LCD 4000VT LCD 4200VT LCD COLOR TV P N 7042301301 V1 0...

Page 2: ...Cable TV Setup 4 Auto Scan TV AUDIO PC SELECTION AUDIO SETTINGS PC RGB MODE BASIC OPERATION FEATURES SOURCE INPUT CONNECTORS PICTURE PARAMETERS PRODUCT SPECIFICATIONS MULTI MEDIA BOX 3 DVI Source Con...

Page 3: ...opened there is a danger of injury from electric shock There is no component that can be replaced by users Please contact the service personnels and replace with manufacturer appointed components Disp...

Page 4: ...product Instructions Please follow and be aware of cautions and warnings Follow Steps Please follow the operation procedures Socket Outlet Please use standard socket outlet to avoid damages to the LC...

Page 5: ...serted through the slots and openings of the display 3 Product is under humid condition or liquid leakages on to the display 4 Product cannot function normally or cannot operate 5 Product was dropped...

Page 6: ...surface Do not use diluted acid Humidity Keep this product away from moisture or high humidity area Placement Place this product on a stable and vibration free surface in order to avoid the LCD displ...

Page 7: ...re to sunlight heater and stove etc This would avoid structure distortion or machine break down When switched off the LCD display can be stored comfortably between 4 to 140 20 to 60 Unplug from the so...

Page 8: ...88 8 888 88 88 8 8 ACCESSORIES User Menu 1 Remote Control 1 AAA Batteries 2 VGA Cable 1 Power Cable 1 6...

Page 9: ...tion to check current horizontal frequency vertical frequency phase and resolution Position Adjustment Users can adjust display s vertical and horizontal positions PIP setup 1 PIP source Select PIP in...

Page 10: ...23 LCD 2300VT 27 LCD 2700VT 30 LCD 3018VT Dimensions 8 58 7 1 6 4 9 9 2 69 48 90 987 2 269 48 87 9 58 7 1 412 8 766 2 2 4 0 80 5 720 4 7 4 9 5 412 8...

Page 11: ...Control Buttons 23 27 30 LCD 2300VT LCD 2700VT LCD 3018VT RGB Audio in 89 9 mm Dimensions Power Vol Ch Source Menu RGB Jack Audio In PC Audio Souce In 13...

Page 12: ...ms 60 000 hours NTSC PAL Secam 23 27 30 8W 8W 2 32 600 1 50 000 hours 600 1 Model Picture panel Resolution Dimensions mm W H D HDTV compatible Speaker AC Power Supply View angle Contrast ration type R...

Page 13: ...ation No radiation wave from screen No Flaring Picture No flaring picture which may hurt users eyes Excellent Sound Effects High performance speakers Thinner and lighter space saving better for decora...

Page 14: ...NSTALLATION WITH MULTI MEDIA BOX 1 Antenna Installation Caution Please use legal cable TV otherwise it may damage the product It may also void warranty Audio VGA Audio Input Audio Output YES YES 2 SET...

Page 15: ...ase purchase standard signal cables Please switch off the TV before setting up additional equipments Please use correct socket outlet Please unplug the power cord if theTV will not be used for a long...

Page 16: ...ut is using White RCA Jack Left and Red RCA Jack Right The level of audio output cannot be changed using the volume treble and bass controls on your display This connector should be used with an exter...

Page 17: ...l currents may still remain in TV after power is switched off please unplug the power cord if it is not intended to be used for a long period of time TV AUDIO PC SELECTION 2 Sources display orders are...

Page 18: ...and to select function that need to be adjusted VOL for volume up and for volume down CH Use CH to change channels Exit Back to previous channel or program 7 Enter Under menu mode press this key to c...

Page 19: ...the imformations at top right corner 13 Digit Buttons Switch to favorite channel directly by entering the channel numbers 14 16 9 Switch to 4 3 or 16 9 display format 15 Freeze Freeze the display imag...

Page 20: ...s 2 heads and 3 heads Users are adviced to use the same number of plugging heads for both PC and display Key Pad B Ch Vol C Source Menu POWER D E A PC Mode Adjustment 1 Press or button to get Menu lis...

Page 21: ...nel numbers For example Ch45 Press 4 and followed by 5 Press Ch or button to search channels 5 5 Press POWER button to stop auto scan process 4 Auto Scan BASIC OPERATION E 3 Antenna Cable TV Setup Men...

Page 22: ...Balance Sound Balance adjustment Bass Bass sound frequency adjustment Treble Treble sound frequency adjustment 5 MUTE Press Mute button from remote control to switch On Off the sound Refer to pg 14 f...

Page 23: ...S option 3 Select BRIGHTNESS and press to perform adjustment FLESHTONE SHARPNESS CONTRAST BIRGHTNESS CONTRAST SATURATION HUE COLOR TEMP 50 FLESHTONE SHARPNESS 3 B 7 C 1 Press MENU button to display th...

Page 24: ...MENU button to display the main menu 2 Press Enter button to select PICTURE PARAMETERS option 3 Press button to select HUE and use to adjust 3 B 7 C 5 E 4 D 1 Press MENU button to display the main men...

Page 25: ...Press MENU button to display the main menu 2 Press Enter button to select PICTURE PARAMETERS option 3 Press button to select SHARPNESS and use to adjust 3 B 7 C 5 E 4 D 1 Press MENU button to display...

Page 26: ...display the main menu 2 Press button to select PC PARAMETERS option 3 Press Enter button to select AUTO 4 Press Enter again and use to select YES NO 3 B 7 C 4 E 4 D 1 Press MENU button to display the...

Page 27: ...e main menu 2 Press button to select PC PARAMETERS option 3 Press Enter button to select PHASE 4 Press to adjust 3 B 7 C 4 E 4 D 1 Press MENU button to display the main menu 2 Press button to select P...

Page 28: ...AUDIO SETTINGS option 3 Press Enter button then to select required option 4 Press Enter again and use or to adjust 3 B 7 C 4 E 5 E 5 E 50 4 D AUTO CLOCK PHASE POSITION AUTO COLOR YES NO AUTO COLOR AU...

Page 29: ...SOURCE 4 Press Enter button and use and to select OFF SMALL LARGE PBP 3 B 7 C 5 E 4 D 7 C 4 E 5 E PICTURE IN PICTURE PIP SIZE OFF SMALL PBP PIP POSITION PIP SOURCE LARGE 1 Press MENU button to displa...

Page 30: ...TV is selectable for sub screen display 2 VGA and HDTV source are not viewable at the same time 3 When the main screen is display under the DVI mode either VGA S video1 S video2 AV1 AV2 YCbCr TV HDTV...

Page 31: ...k Represent a playable source Represent a non playable source Picture source setup PICTURE SOURCE SETUP VGA DVI Av1 YCbCr TV HDTV Sv1 VGA DVI Sv1 Av1 YCbCr TV HDTV Main source PIP source Sv2 Sv2 Av2 A...

Page 32: ...H EDIT AUTO ADD DELETE CHANNELS AUTO SCAN ANTENNA AND CABLE TV SELECTION CHANNEL SETTINGS 1 Press MENU button to display the main menu 2 Press button to select CHANNEL SETTINGS 3 Press Enter button to...

Page 33: ...NG CODE CHANGE Please Enter the Password GENERAL SETTINGS OSD TIMEOUT LANGUAGE SLEEP TIMER I P INFO RESET TRANSPARENCY DEINTERLACE 10 SEC 30 SEC 1 MIN OSD TIMEOUT 1 Press MENU button to display the ma...

Page 34: ...ER 60 MIN OFF OSD TIMEOUT LANGUAGE SLEEP TIMER I P INFO RESET TRANSPARENCY DEINTERLACE 30 MIN 120 MIN 1 Press MENU button to display the main menu 2 Press button to select GENERAL SETTINGS 3 Press Ent...

Page 35: ...O H SYNC V SYNC AV 720x240 15KHZ 59KHZ 1 Press MENU button to display the main menu 2 Press button to select GENERAL SETTINGS 3 Press Enter then and the information will display on screen 7 C GENERAL...

Page 36: ...SETTINGS OSD TIMEOUT LANGUAGE SLEEP TIMER I P INFO RESET TRANSPARENCY DEINTERLACE OSD TIMEOUT LANGUAGE SLEEP TIMER I P INFO RESET TRANSPARENCY DEINTERLACE 50 MADI MOTION LOW MEDUUM HIGH TRANSPARENCY D...

Page 37: ...e interlacing Video processing with this de interlacing recommend in TV AV and S video mode 2 Motion Video processing in motion picture Low Exhibits very little fickering Medium Between low and high H...

Page 38: ...duct is used for the purpose for which it was designed It does not cover i products which have been damaged by negligence misuse accidents abuse acts of God or units which have been modified or repair...

Reviews: