background image

I

NTELLI

M

IST

    H

UMIDIFIER

IntelliMist Humidifier

Troubleshooting Guide

1. Humidity Reading Will Not Increase

When humidity levels are in the teens it may take several
weeks to notice an increase in humidity in your home.
This is due to the fact that virtually all of the moisture has
evaporated from the wood, drywall, carpets, draperies, and
furniture.  Until this moisture is replaced, materials will
absorb moisture from the air, causing very little humidity
rise in the rooms.

2. In-line Fitler Installation

When installing the in-line water filter, it is important that 
enough water be flushed through the filter.  Up to three
gallons of water (or until the water flow is clear) should be 
run through the filter to prevent micro fine particles form 
clogging the sprayer nozzle.  

3. Humidifier Water Connections

The plastic fittings supplied with the humidifier should be 
finger tightened, plus 1/4 turn with pliers.  Over tightening
with pliers or a wrench will cause the fittings to crack and 
split, thus leaking water.  The plastic fittings are OK to use
on copper pipe.  The brass compression fittings should be 
tightened with a wrench, and then re-checked for leaks.
The brass nut should slide on the tube first, followed by the
compression sleeve, and the brass tube end inserted last.
Then the tube should be inserted into the humdifier
valve base and tightened with pliers or a wrench. 

Page 11

Summary of Contents for IntelliMist

Page 1: ...umidity For Use With 1 7 Ton HVAC Systems Designed For Use Only With P110 0009 Humidistat P474 3000 Humidistat P374 1600 INTELLISTAT TOTALINE USE ONLY WITH CENTRAL AIR CONDITIONING SYSTEMS THE HUMIDIFIER MUST BE MOUNTED OVER THE EVAPORATOR COIL OR EVAPORATOR COIL DRAIN PAN IF THERE IS NOT A DRAIN PAN ONE MUST BE INSTALLED PATENTS PENDING TM TOTALINE Humidifier IntelliMist 4Z95 MODEL P110 300 R C H...

Page 2: ...ELLIMIST HUMIDIFIER TABLE OF CONTENTS CONTENTS ACCESSORIES 2 MOUNTING LOCATIONS 3 ASSEMBLY INSTALLATION 4 WATER HARDNESS 6 WATER FILTER 7 WIRING DIAGRAMS 8 TROUBLE SHOOTING GUIDE 11 OUTPUT CHECK 16 Page 1 ...

Page 3: ... Water Filter 0800 Water Filter Mounting Bracket 0152 Mounting Kit AVAILABLE INTELLIMIST ACCESSORIES P110 0009 Humidistat P474 3000 Humidistat P374 1600 INTELLISTAT Combination Thermostat Humidistat P110 0008 Replacement Filter Nozzle INTELLIMIST HUMIDIFIER This Humidifier MUST be used with Totaline P110 0009 P474 3000 Humidistats or P374 1600 INTELLISTAT USE ONLY WITH CENTRAL AIR CONDITIONING SYS...

Page 4: ... the nozzle is spraying away from the coil there should be a minimum of three feet from the nozzle to the top of the plenum If this is not available then point the nozzle of the humidifier directly into the evaporative coil 4 Always install downstream of an electronic air cleaner Drill or knock out a 1 hole 4 mounting holes for the 6 screws on the mounting template INTELLIMIST HUMIDIFIER AIR FLOW ...

Page 5: ...2 3 3 INSTALL THE HUMIDIFIER Be sure to use a cold water connection Mount the humidifier to the sheet metal using the four 6 mounting screws supplied Page 3 The in line water filter should be mounted below or to one side of the humidifier assembly in a vertical position as shown Fig 3 Be sure the flow arrow on the filter is pointing to the humidifier Fig 3 R R C C H1 H1 H2 H2 INTELLIMIST ON INTELL...

Page 6: ...in the pipe Turn the handle clockwise to expose the piercing pin beyond the seal approximately 3 16 Place the body of the valve over the hole in the pipe so the pin fits in the hole Tighten the bottom clamp evenly Turn handle clockwise and close the valve feature of the saddle valve only All other materials INTELLIMIST HUMIDIFIER CAUTION SAFETY NOTE USE COPPER TUBING WHERE INSTALLATIONS MAY CAUSE ...

Page 7: ...r If the water hardness is higher than 15 the filter nozzle should be replaced every 3 months during the heating season If the humidifier is run with the fan in the non heating season then the filter nozzle should be replaced every 6 months Water hardness test kits are available at local home improvement centers Rotary Pin Orifice Nozzle Water Filter ...

Page 8: ...er and check for leaks until the water appears clear not gray or cloudy Fig 4 SUPPLIED BRACKET The water filter supplied with the humdifier is specifically formulated for optimal operation The filter design inhibits bacteria odor and calcium buildup The filter should only be replaced with Totaline part P110 0008 In the rare instance white powder is noticed on the interior of the house this is an i...

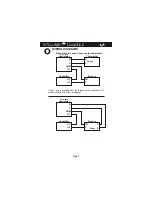
Page 9: ...nly 1 wire is available from the furnace to the humidistat W1 may be obtained from the thermostat R R R 24vac 24vac C W1 W1 C R C C C C Humidistat P110 0009 P110 0009 Humidistat Thermostat Furnace Furnace Humidifier Humidifier HUM HUM H1 H1 H1 H1 H2 H2 INTELLIMIST HUMIDIFIER ...

Page 10: ...IntelliMist Humidifier are not connected internally They are provided for an easy tie off point when using 1 multi conductor cable from the Humidifier to the humidistat In this case H2 would need a jumper to C Y2 HUM Y1 W2 W1 O B G C R Furnace Humidifier R W1 O B Y1 Y2 W2 C G Intellistat W3 H1 H2 C R P110 0009 P374 1600 INTELLIMIST HUMIDIFIER 24vac 24vac ...

Page 11: ...to the INTELLIMIST control the Red LED will be observed to go on and off with the MICROPULSE technology control Reset the humidistat to the recommended setting 35 INTELLIMIST HUMIDIFIER 5 5 WIRING DIAGRAMS R Y1 G R G Y1 W1 C C W1 Humidistat P110 0009 Thermostat Furnace Humidifier R C HUM H1 H1 H2 ADD A Wire ADD A Wire Part A Part B When only 5 wires are available to the thermostat and a P474 0410 ...

Page 12: ...through the filter Up to three gallons of water or until the water flow is clear should be run through the filter to prevent micro fine particles form clogging the sprayer nozzle 3 Humidifier Water Connections The plastic fittings supplied with the humidifier should be finger tightened plus 1 4 turn with pliers Over tightening with pliers or a wrench will cause the fittings to crack and split thus...

Page 13: ... during fan only or cooling which will result in excess water in the duct To run the humidifier in fan only use the Intellistat For more information see Factors that Affect Humidity Control 5 Can t raise humidity enough Make sure the controller is set to the correct tonnage to match the air handler setup step 3 humidistat or step 10 Intellistat With the Intellistat it is possible to bring on the f...

Page 14: ...ifier to spray on the intellistat a small vertical bar will appear in the lower left corner of the screen If the symbol appears check the wiring or if using the humidistat see below 7 Raindrops appear on the humidistat but the humidifier won t spray There may a compatibility problem with the furnace Add a pilot relay with the coil connected to W and C on the furnace and the contacts to HUM and R o...

Page 15: ...e in the house when the fan is running Therefore in climates where little heating is required and the heating fan system is therefore run very few hours per day the fan must be run in the non heating modes to increase the humidity in the rooms This can be accomplished in one of three ways 1 The Intellistat in setup step 11 can be set to ON then the Intellistat will run the fan and humidifier any t...

Page 16: ...ir is heated up to 72 degrees the resulting humidity in the house is 8 The amount of humidity that can be added to the air is limited by the airflow in the ductwork and the temperature of the air Hot air which you have when the furnace is running can hold 6 time as much moisture as the air can hold when only the fan is running It is much easier to increase the humidity in the house with the furnac...

Page 17: ...low button to energize the Intellimist Humidifier Water droplets on the bottom left hand corner of the screen will appear and the red LED will energize Push the flow button once more to deenergize the Intellimist Humidifier 4 The screen you are now seeing is our test mode to ensure proper wiring between the Humidistat and the Furnace board if your furnace is currently energized the Humidistat will...

Page 18: ...TRIBUTOR DEALER OR OTHER PERSON WHATSOEVER ALL WORK UNDER THE TERMS OF THIS WARRANTY SHALL BE PERFORMED DURING NORMAL WORKING HOURS ALL REPLACEMENT PARTS WHETHER NEW OR REMANUFACTURED ASSUME AS THEIR WARRANTY PERIOD ONLY THE REMAINING TIME PERIOD OF THIS WARRANTY THE COMPANY WILL NOT BE RESPONSIBLE FOR 1 Normal maintenance as outlined in the installation and servicing instructions or owners manual...

Reviews: