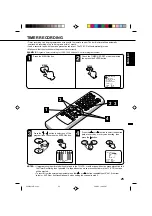
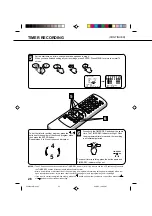
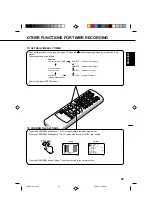
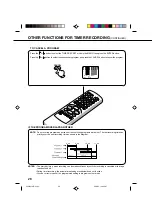
background image

18

ME

NU

PA

US

E/S

TIL

L

TIM

ER

RE

C

RE

C/O

TR

EJE

CT

PR

OG

RA

M

SP

/L

P

CA

LL

O / A

V

MU

TE

SL

EE

P

CH

/TR

K

ON

/

STA

ND

BY

TV

 M

ON

I.

VO

LU

ME

EN

TE

R

CA

NC

EL

IN

DE

X

AU

TO

TR

AC

KIN

G

CO

UN

TE

R

RE

SE

T

ZE

RO

RE

TU

RN

FF

REW

ST

OP

PLA

Y

0

8

7

9

6

5

4

3

2

1

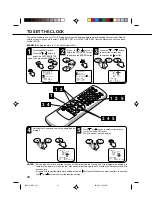
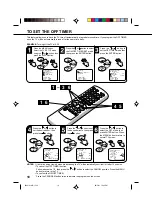
EXAMPLE: Turning off the TV at 8:30.

Press the 

or

button to set

the desired minute, then press

the 


button.

TO SET THE OFF TIMER

This feature allows you to have the TV turn off automatically at a predetermined time. If you program the OFF TIMER
once, the TV will be automatically turned off at the same time daily.

Press the MENU button.
Select the TV SETUP mode

using the 

or

 button, then

press the ENTER button.

ON/OFF  TIMER  SET
PICTURE

TV  SETUP

EXIT

ENTER

SELECT

: MENU

: ENTER

Press the 

or

 button to

set the OFF TIMER mode, then
press the ENTER button.

7 : 45

CH  3

ON  TIMER

0 : 00

OFF  TIMER

MON-FRI

CANCEL

SET

ON/OFF  TIMER  SET

ENTER

SELECT

EXIT


: ENTER
: MENU

Press the 

or


button to

set the desired hour, then

press the


button.

7 : 45

CH  3

ON  TIMER

8 : 00

OFF  TIMER

MON-FRI

CANCEL

SET

ON/OFF  TIMER  SET

SET

SELECT

EXIT: MENU

:

OK 

: ENTER

/ 0-9

7 : 45

CH  3

ON  TIMER

8 : 30

OFF  TIMER

MON-FRI

SET

SET

ON/OFF  TIMER  SET

SET

SELECT

EXIT: MENU

:

OK 

: ENTER

Press the 

or

 button to

select the SET mode, then
press ENTER button. Press
the MENU button to return to
normal TV screen.

7 : 45

CH  3

ON  TIMER

8 : 30

OFF  TIMER

MON-FRI

SET

SET

ON/OFF  TIMER  SET

SET

SELECT

EXIT: MENU

:

OK 

: ENTER

NOTES:

 If a station being viewed stops broadcasting, the TV will automatically shut itself off after 15 minutes.

 To cancel the OFF TIMER function:

   Follow above step 1-5, then press the 

or

 button to select the CANCEL position. Press the MENU

button to return to the TV.

 To confirm the ON/OFF TIMER:

   Press the PROGRAM button twice to indicate the programs on the screen.

Press the 

or

 button to select

the ON/OFF TIMER SET mode,
then press the ENTER button.

TIMER  REC  SET
VCR SETUP
CHANNEL SETUP
TV  SETUP
SYSTEM  SETUP

EXIT

ENTER

SELECT

: MENU

: ENTER

MENU

STOP

PLAY

ENTER

STOP

PLAY

STOP

PLAY

MENU

ENTER

ENTER

STOP

PLAY

ENTER

STOP

PLAY

STOP

PLAY

FF

FF

6

1

4 5

3

1

6

 5960101A/E/17-22

28/5/01, 12:44 PM

18

Summary of Contents for VTV21FL3

Page 1: ... manual thoroughly è  ËÒÔÓÎ ÁÓ ÌËÂÏ ÛÒÚ ÓÈÒÚ ÔÓÊ ÎÛÈÒÚ ÌËÏ ÚÂÎ ÌÓ Ô Ó ËÚ ÈÚ ÚÛ ËÌÒÚ ÛÍˆË ATTENTION ÇçàåÄçàÖ If you purchase a universal remote control from your local retailer please contact the remote manufacturer for the required programming code ÖÒÎË Ô ËÓ eÎË ÛÌË e Ò Î Ì È ÔÛÎ Ú ËÒÚ ÌˆËÓÌÌÓ Ó ÛÔ ÎeÌËfl Îfl ÔÓÎÛe ÌËfl ÒÓÓÚ eÚÒÚ Û Ëı ÛÔ Îfl Ëı ÍÓ Ó Ó ÈÚeÒ Í Ô ÓËÁ Ó ËÚeÎ ÔÛÎ Ú ENGLISH VTV21FL3 êìëë...

Page 2: ...azard do not expose this equipment to rain or moisture MAINS SUPPLY This unit is designed to operate from AC 110 240V 50 60Hz household mains supply HQ This TV VCR is equipped with HQ High Quality recording capability A built in detail enhancer is used to boost the recorded signal for cleaner sharper images and maximum picture playback 5960101A E cover in 4 6 01 10 19 AM 2 ...

Page 3: ...S PREPARATION PRECAUTIONS 2 LOCATION OF CONTROLS 4 REMOTE CONTROL 5 ANTENNA CONNECTIONS 7 POWER SOURCE 7 TV OPERATION ON SCREEN LANGUAGE SELECTION 8 TUNING THE TV CHANNEL 9 TO SET THE CLOCK 12 TV OPERATION 13 PICTURE CONTROL ADJUSTMENTS 15 TO SET THE ON TIMER 17 TO SET THE OFF TIMER 18 PLAYBACK RECORDING LOADING AND UNLOADING THE VIDEO CASSETTE TAPE 19 PLAYBACK 20 SPECIAL PLAYBACK 21 RECORDING A T...

Page 4: ... unit is suddenly moved from a cold place to a warm place moisture may form inside the unit In this case do not operate it for two to three hours PRECAUTIONS WHAT IS MOISTURE CONDENSATION When cold water is poured into a glass for example water vapor in the air will condense on the surface of the glass This is called moisture condensation MOISTURE WILL CONDENSE ON THE UNIT IN THE FOLLOWING CASES W...

Page 5: ...o use the unit again When you leave your home for a long period of time unplug the AC power cord The ventilation holes prevent overheating Do not block or cover these holes Especially avoid covering the holes with soft materials such as cloth or paper Place the unit on a flat stable level surface and never subject it to violent shaking or any other shock or impact When you finish operating the uni...

Page 6: ...ly 10 REC OTR Indicator Lights up when the TV VCR is recording 11 REW Rewind Button In the Stop mode this button rapidly winds the tape backwards In the Play mode this button activates reverse search 12 PLAY Button Press to play a prerecorded tape 5 4 6 1 13 REC OTR Button Press once to start normal recording Additional presses activate One TouchTimer Recording 14 CHANNEL Buttons Press to select a...

Page 7: ...ct Channel Selection Buttons 0 9 Allows direct access to any channel 3 CALL Button Displays the present time day of the week channel counter speed selection and VCR mode if VCR is operating on the TV screen 4 ZERO RETURN Button Used to stop the tape when the counter reaches 00 00 00 5 SP LP Button Sets the tape speed for recording 6 REW Rewind Button In the Stop mode this button rapidly winds the ...

Page 8: ...direct sunlight an incandescent lamp fluorescent lamp or any other strong light shines on the remote sensor the remote control operation may be unstable REMOTE CONTROL OPERATION 5m The following cases the remote control may not operate When there is an obstacle between your TV VCR and the remote control If you try to operate your TV VCR from a distance greater than 5 metres If you try to operate y...

Page 9: ...n of what to buy you should seek the advice of a local antenna contractor EXTERNAL ANTENNA POWER SOURCE Use the AC line cord provided for operation on AC Insert the AC cord plug into 110 240V 50 60Hz AC outlet After you have connected the Antenna and Power source you must check that your TV VCR is properly installed Press MAIN POWER switch on the front panel the red standby indicator will light Tu...

Page 10: ...GUAGE SELECTION Press the MENU button Press the or button to select the SYSTEM SETUP mode Then press the ENTER button Press the or button to select the LANGUAGE mode Then press the ENTER button Press the or button to select the desired language Then press the ENTER button Press the MENU button to return to normal TV screen 1 4 1 2 3 TIMER REC SET VCR SETUP CHANNEL SETUP TV SETUP SYSTEM SETUP EXIT ...

Page 11: ...resetting channels into memory Press the MENU button Press button to select the CHANNEL SETUP mode then press the ENTER button SELECT TV SETUP ENTER EXIT ENTER MENU CHANNEL SETUP VCR SETUP SYSTEM SETUP TIMER REC SET Press button to select the AUTO TUNING mode then press the ENTER button CHANNEL SETUP SELECT AUTO TUNING ENTER EXIT ENTER MENU CH TUNING CH ALLOCATION The Auto Tuning will start and be...

Page 12: ...H TUNING Press button to select the CH ALLOCATION mode then press the ENTER button Press or number button to select the TV station to be moved ThenpresstheENTER button CH 4 CH ALLOCATION CH 1 0 9 SET OK ENTER EXIT MENU EXAMPLE Exchange the TV stations between position 4 and 6 TO EXCHANGE THE TV STATIONS TO ANOTHER CHANNEL POSITION Press or number button to select the position number which the sele...

Page 13: ... button to select the CH TUNING mode then press the ENTER button CHANNEL SETUP SELECT AUTO TUNING ENTER EXIT ENTER MENU CH TUNING CH ALLOCATION 3 1 1 1 CH 1 B G SEARCH F TUNE EXIT MENU If you cannot get a clear picture press the or button until the picture becomes clear When you have a clear crisp picture store this setting by pressing ENTER button CH 1 D K OK CH ENTER 0 9 EXIT MENU Press the or b...

Page 14: ... the ENTER button CLOCK SET COLOUR SYSTEM AUTO SYSTEM SETUP EXIT ENTER SELECT MENU ENTER CLOCK SET DAY MONTH YEAR TIME 26 WED 1 2000 0 00 EXIT SET SELECT MENU 0 9 OK ENTER TIMER REC SET VCR SETUP CHANNEL SETUP TV SETUP SYSTEM SETUP EXIT ENTER SELECT MENU ENTER CLOCK SET DAY MONTH YEAR TIME 26 FRI 10 2001 11 30 EXIT SET SELECT MENU 0 9 OK ENTER Press or button to select current minute then press th...

Page 15: ...e TV VCR The VOLUME can be adjusted to a desired level by pressing the VOLUME or button The VOLUME level is represented by a green bar on the screen Select channels either with the Direct Channel Selection buttons or with the CH buttons VOLUME 32 To select with the Direct channel selection buttons Press the one of keys 1 9 as required Press the two or three digits in order from left to right 1 9 1...

Page 16: ...rammed the display will disappear and will reappear every 10 minutes To confirm the sleep time setting press the SLEEP button once and the remaining time will be a momentarily displayed To cancel the sleep time press the SLEEP button repeatedly until the display turns to 0 CALL Press the CALL button The current time channel number real time tape counter and tape operation will be indicated Press C...

Page 17: ...l TV screen PICTURE CONTROL ADJUSTMENTS Press the ENTER button until your desired PICTUREmodeappearse g brightness contrast color or sharpness Then press the or button to adjust the PICTURE See the next page for detail NOTE To resume the normal picture adjustment press the CANCEL button while in the picture mode menu Press the or button to select the PICTURE mode then press the ENTER button TIMER ...

Page 18: ...appears on the screen then press the or button to adjust the brightness When the button is pressed the darker portions of the picture become lighter NEXT RESET SET ENTER EXIT MENU CANCEL BRIGHTNESS 0 Press the ENTER button until CONTRAST appears on the screen then press the or button to adjust the contrast Pressing the button improves the contrast and enhance the color Picture looks sharper in the...

Page 19: ...the CANCEL position Press the MENU button to return to the TV After setting the ON TIMER of the OFF TIMER will flash on and off If you wish to set the OFF TIMER press the ENTER button then follow the steps 3 5 on page 18 6 1 TIMER REC SET VCR SETUP CHANNEL SETUP TV SETUP SYSTEM SETUP EXIT ENTER SELECT MENU ENTER Press the MENU button Select the TV SETUP mode using the or button then press the ENTE...

Page 20: ...esired hour then press the button 7 45 CH 3 ON TIMER 8 00 OFF TIMER MON FRI CANCEL SET ON OFF TIMER SET SET SELECT EXIT MENU OK ENTER 0 9 7 45 CH 3 ON TIMER 8 30 OFF TIMER MON FRI SET SET ON OFF TIMER SET SET SELECT EXIT MENU OK ENTER Press the or button to select the SET mode then press ENTER button Press the MENU button to return to normal TV screen 7 45 CH 3 ON TIMER 8 30 OFF TIMER MON FRI SET ...

Page 21: ...ce The first press will stop the tape in any mode The second press will eject the tape Pull the cassette out AUTOMATIC EJECT When the VCR is automatically rewinding the tape and reaches its end AUTO REWIND the tape will be ejected automatically See NOTE on page 24 TO PREVENT ACCIDENTAL ERASURE TO RECORD AGAIN After recording break off the erase prevention tab if you do not wish to record over the ...

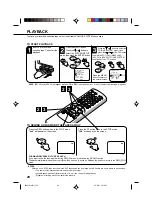
Page 22: ...ETUP EXIT ENTER SELECT MENU ENTER TO START PLAYBACK Press the MENU button Press the or button to select the SYSTEM SETUP mode then press the ENTER button Press the or button to select the COLOUR SYSTEM mode then press the or ENTER button to select AUTO PAL MESECAM NT3 58 or NT4 43 COLOUR SYSTEM usually used in AUTO position Press the MENU button to return to the normal screen CLOCK SET COLOUR SYST...

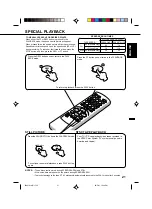
Page 23: ...de STILL PICTURE Press the FF button once or twice in the PLAYBACK mode To continue the normal playback press PLAY button again NTSC TAPE PLAYBACK Your TV VCR can playback video tapes recorded in the NTSC Color System TV system usually used in America and Japan SPECIAL PLAYBACK TO VISUALLY SEARCH FOR DESIRED POINTS When either the FF or REW button is pressed in the PLAYBACK mode the speed search p...

Page 24: ...de is canceled TIMER REC SET VCR SETUP CH TUNING TV SETUP CLOCK SET EXIT ENTER SELECT MENU ENTER VCR SETUP AUTO REPEAT NTSC PLAYBACK OUT EXIT ENTER SELECT MENU ENTER ON 3 58 2 Press the TV MONI button while in the playback mode The video tape will continue to play while the picture switches to the TV channel selected on the TV VCR Press the button again to return to playback picture TO MONITOR A T...

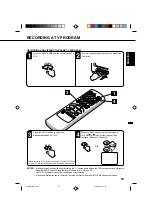
Page 25: ...tion continues to record Press the STOP button to stop the recording and to turn off the VCR The TV VCR channel cannot be changed during recording If the erase prevention tab is removed the tape will eject when the REC OTR buttons are pressed Press the Direct channel selection buttons or CH TRK or to select the channel to be recorded Example Channel 2 CH 2 Press the ON STANDBY button to turn on th...

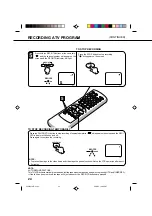
Page 26: ...icator will light AUTO REWIND FEATURE This TV VCR will automatically rewind and eject the tape when the tape has ended except during OTR and TIMER REC If the tab has been removed the tape will eject whenever the REC OTR buttons are pressed REC OTR REC OTR CH 2 INDEX NOTE To prevent damage to the video head and video tape the pause function will stop the VCR operation after about 5 minutes Press th...

Page 27: ...MER REC SET DATE START END CH SPEED 23 SAT 1 SP 11 30 EXIT SET SELECT MENU 0 9 Check the TIMER REC SET mode is selected then press the ENTER button TIMER REC SET VCR SETUP CHANNEL SETUP TV SETUP SYSTEM SETUP EXIT ENTER SELECT MENU ENTER Press the or button to select one of the program lines then press the ENTER button EXIT SELECT MENU ENTER Press the or button to select the desired date or every d...

Page 28: ...et the second program 4 5 Press both the TIMER REC buttons at the same time The TIMER REC indicator will light When the programmed time is reached the recording is automatically started To cancel timer recording press the button again and TIMER REC indicator will go out TIMER REC NOTES The VCR section cannot be used while the TIMER REC indicator is lit If you want to use the VCR operation press bo...

Page 29: ...g changes as follows The current day Friday SUN SAT Sunday to Saturday MON SAT Monday to Saturday One month later minus one day MON FRI Monday to Friday WKL WED WKL THU Weekly Thursday Weekly Wednesday Example Press the PROGRAM button once The TV screen displays the timer program list Press the PROGRAM button again The TV screen displays the ON OFF timer setting TO CONFIRM THE SETTINGS Press the P...

Page 30: ...function You can correct or cancel the programmed setting in program confirm mode TO CANCEL A PROGRAM Press the or button to select the TIMER REC SET mode in the MENU then press the ENTER button Press the or button to select the unnecessary program and press the CANCEL button to cancel the program EXIT SELECT MENU ENTER IF THE PROGRAM OVERLAPS ANOTHER 8 00 11 00 9 00 10 00 NOTE Do not overlap prog...

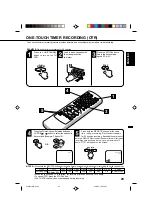
Page 31: ... to select the channel to be recorded Example Channel 2 Press both the REC OTR buttons at the same time to begin recording Press the button again for 30 minutes recording Each additional press of NOTES Press both the REC OTR buttons at the same time to increase the time needed for recording See the chart below once NORMAL REC twice 0 30 4 times 1 30 5 times 2 00 6 times 3 00 7 times 4 00 Press Rec...

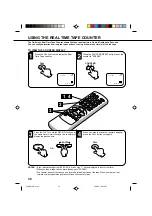
Page 32: ... the counter to 00 00 00 USING THE REAL TIME TAPE COUNTER The On Screen Real Time Tape Counter shows the tape running time in Hours Minutes and Seconds You can easily determine how long the tape has been running or how much time is left on the tape TO VIEW THE COUNTER DISPLAY CH 2 00 00 00 SP 11 30 SAT CH 2 01 30 21 SP 11 30 SAT NOTES If you rewind the tape from 00 00 00 a minus sign will be displ...

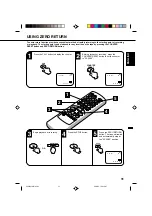
Page 33: ...des a convenient method of rapidly returning to the starting point of recording or playback The starting point can be indexed for any location on the tape by pressing the COUNTER RESET button and ZERO RETURN button Press the CALL button to display the counter CALL Before playback or recording press the COUNTER RESET button to set the counter to 00 00 00 Begin playback or recording Press the STOP b...

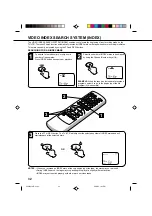
Page 34: ...ing of the 4th program 4th index mark INDEX 4 EXIT SEARCH NO INDEX 1 9 M E N U P A U S E S T I L L T IM E R R E C R E C O T R E J E C T P R O G R A M S P L P C A L L O A V M U T E S L E E P C H T R K O N S T A N D B Y T V M O N I V O L U M E E N T E R CANCEL IN DEX A U T O T R A C K IN G C O U N T E R R E S E T Z E R O R E T U R N F F R E W S T O P P L A Y 0 8 7 9 6 5 4 3 2 1 NOTES When you record...

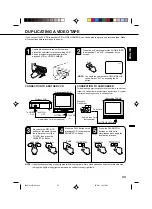
Page 35: ...to begin the duplicating process NOTE Unauthorized recording of copyrighted television programs films video cassettes and other materials may infringe the rights of copyright owners and be contrary to copyright laws Load a blank cassette tape with the erase prevention tab intact into the recording VCR Load a previously recorded tape into the playback VCR or VIDEO CAMERA Press the AV button to sele...

Page 36: ...r your recording VCR is NTSC system Select 4 43 for your recording VCR is PAL system VCR SETUP AUTO REPEAT NTSC PLAYBACK OUT EXIT ENTER SELECT MENU ENTER OFF 4 43 FF REW ENTER Press the MENU button to return to the normal screen Then start the recording MENU Press the MENU button Press the or button to select the VCR SETUP mode then press the ENTER button STOP PLAY ENTER VCR SETUP AUTO REPEAT NTSC...

Page 37: ...n removed Main power switch is OFF Clock is not set START END time is not correctly TIMER REC buttons are OFF Present time is not set correctly One Touch Timer Recording OTR is ON INDEX mark was recorded at the beginning of the tape Antenna conector is not connected or wires are broken Recording does not work Timer recording does not work Connect the Mains lead to the AC outlet Check Antenna conne...

Page 38: ...OGGING The video heads record and playback picture and sound on the video tape In the event that they become dirty you won t be able to do a perfect recording and the playback picture will be extremely snowy with good sound If this happens have the TV VCR checked by qualified service personnel VIDEO HEAD CLEANING AUTO HEAD CLEANING cleans the video heads automatically when a cassette is inserted o...

Page 39: ...ture may be marred by the appearance of small dots When the signal is extremely weak it may be necessary to install a special antenna to improve the picture RADIO FREQUENCY INTERFERENCE The interference produces moving ripples or diagonal streaks and in some cases causes loss of contrast in the picture PICTURE SIZE VARIATION A slight picture size variation is normal when you adjust the CONTRAST or...

Page 40: ...carrier phase shift recording 1 Track 12 65mm high density tape Approx 1 minutes 48 seconds With E 180 Cassette Tape SP 23 39mm s LP 11 69mm s NTSC SP 33 35mm s 300 min with E 300 video cassette PAL 210 min with T 210 video cassette NTSC Video 1 0 Vp p 75 ohm unbalanced Audio 8dB 50k ohm unbalanced Video 1 0 Vp p 75 ohm unbalanced Audio 8dB 1k ohm unbalanced 110 240V 50 60Hz 70 W AC 240V 26 5 kg 5...

Reviews: