background image

APPENDIX 1 SPECIFICATIONS 

ENGLISH VERSION EO1-33035 

A1.3 Media 


EA1- 3 

A1.3.1  Media Type (Cont.) 


Unit: mm (inch) 

Issue mode 

Item 

Batch mode 

Strip mode 

Cut mode 

c


Width including backing paper 

25.4 to 112 (1.0 to 4.4) 

d


Media


width  

Min. 17 (0.7) 

e


Media pitch


10 to 609 (0.39 to 24.0) 

15 to 609 (0.59 to 24.0) 

f Media length 

Min. 10 (0.39) 

Min. 15 (0.59) 

g


Gap length (or black mark length) 

Min. 2 

Min. 6 

h


Black mark width


Min. 8  

Thickness 

0.06 to 0.19  

Max. outer roll diameter 

Ø

127 (5)  

Ø

214 (8.4): When the optional External Media Roll Hanger is used. 

Roll direction 

Either is acceptable. 

Outside roll media; Linerless paper (option) 

Inner core diameter 

25.4, 38.1, or 76.2 (1, 1.5, or 3) 

(See NOTE 2.)


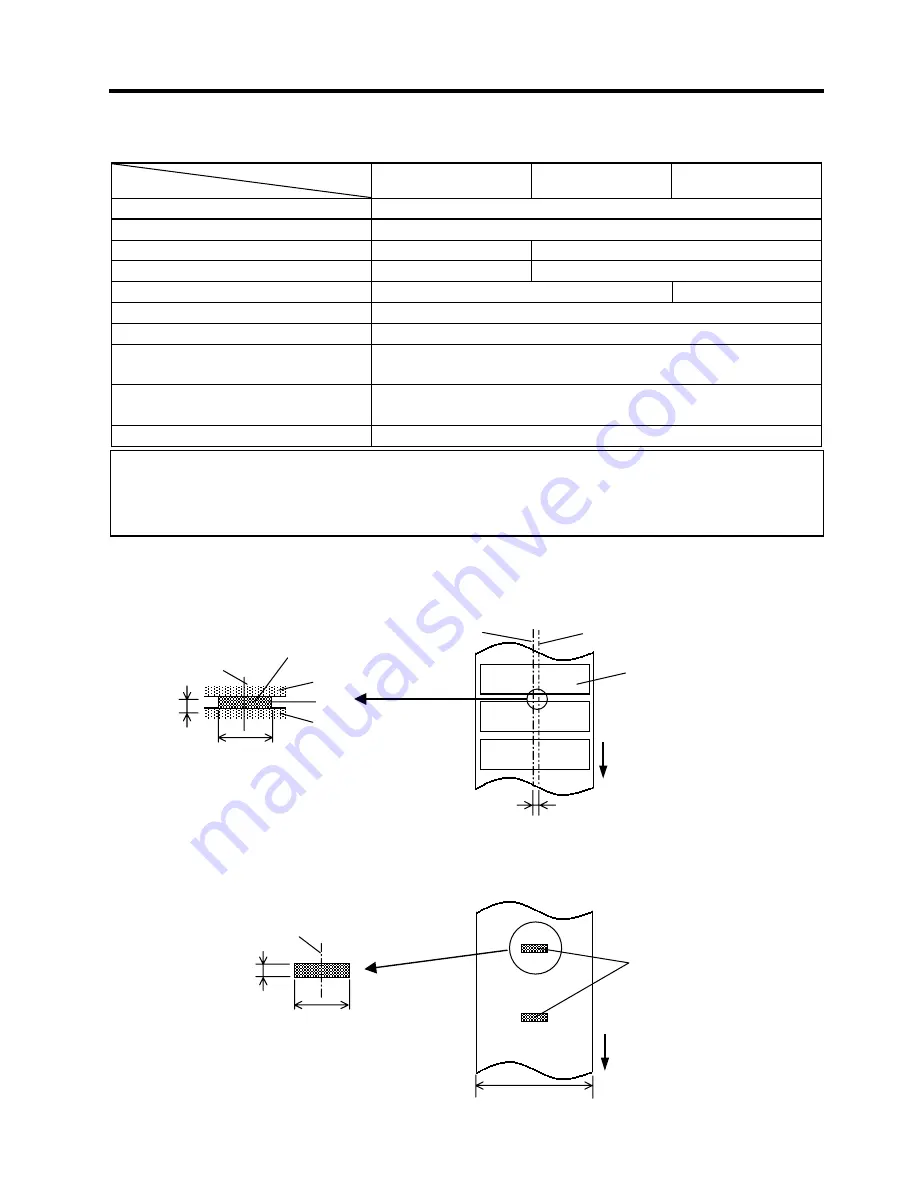
A1.3.2  Detection Area of the Transmissive Sensor 

The Transmissive Sensor is positioned 6 mm from the centre.   
The Transmissive Sensor detects a gap between labels, as illustrated below. 


A1.3.3  Detection Area of the Reflective Sensor 

The Reflective Sensor is movable within the full range of the media width. 
The reflection factor of the Black Mark must be 10% or lower with a waveform length of 950 nm. 
The Reflective Sensor should be aligned with the centre of the Black Mark.   


NOTES: 

1.  To ensure print quality and print head life use only TOSHIBA TEC approved media. 

2.  When using a media roll of 76.2-mm (3”) inner core diameter, the 3”-Diameter Media Shaft included in the 

optional External Media Roll Hanger is required. 

Min. 2 mm 
(Min. 6 mm:
cut mode) 

Min. 8 mm 

Sensor position 

Area to be detected. 

Label 

Gap 

Label 

Centre of media 

Sensor position 

Media feed direction 

6 mm 

Print side 

Min. 2 mm 
(Min. 6 mm: 
Cut mode) 

Min. 8 mm 

Sensor should be positioned at the 
centre of the black mark. 

Media feed direction 

Detecting the black marks on
the back.


Sensor is movable within the full range. 

Summary of Contents for TEC B-SV4D-QM

Page 1: ...TEC Label Printer B SV4D QM Owner s Manual ...

Page 2: ...terference to radio communications However there is no guarantee that interference will not occur in a particular installation If this equipment does cause harmful interference to radio or television reception which can be determined by turning the equipment off and on the user is encouraged to try to correct the interference by one or more of the following measures Reorient or relocate the receiv...

Page 3: ...r cord plug with wet hands as this may cause electric shock If the machines share the same outlet with any other electrical appliances that consume large amounts of power the voltage will fluctuate widely each time these appliances operate Be sure to provide an exclusive outlet for the machine as this may cause fire or electric shock Do not place metal objects or water filled containers such as fl...

Page 4: ...ures high humidity dust or gas Ensure the printer is operated on a level surface Any data stored in the memory of the printer could be lost during a printer fault Try to avoid using this equipment on the same power supply as high voltage equipment or equipment likely to cause mains interference Unplug the machine whenever you are working inside it or cleaning it Keep your work environment static f...

Page 5: ...7 1 Media Sensor Calibration E2 9 2 7 2 Self Print Test and Dump Mode E2 9 3 MAINTENANCE E3 1 3 1 Cleaning E3 1 3 1 1 Print Head E3 1 3 1 2 Platen Sensors E3 2 3 1 3 Cover E3 2 3 2 Care Handling of the Media E3 3 4 TROUBLESHOOTING E4 1 4 1 Troubleshooting Guide E4 1 4 2 Removing Jammed Media E4 1 APPENDIX 1 SPECIFICATIONS EA1 1 A1 1 Printer EA1 1 A1 2 Options EA1 2 A1 3 Media EA1 2 A1 3 1 Media Ty...

Page 6: ...e media sensor enable easy media loading and use of a wide range of media All frequently used bar code formats are available in this printer Fonts and bar codes can be printed in any rotation This printer provides a choice of six different type faces of alphanumeric font and outline font printing capability The GS type is designed for batch issue and the GC type is for cut issue Fitting the option...

Page 7: ...K ASTA Canada CSA Japan MITI UK BSI Denmark DEMKO Netherlands KEMA U S A UL Finland FEI Norway NEMKO France UTE Spain AEE Power Cord Instruction 1 For use with 100 125 Vac mains power supply please select a power cord rated 125V 7A or 10A 2 For use with 200 240 Vac mains power supply Please select a power cord rated Min 250V 2 5A or 5A 3 Please select a power cord with the length of 1 8m to 3m Cou...

Page 8: ...mm inches Power Jack Power Switch Rear Media Guide Parallel Interface Connector Centronics USB Interface Connector Serial Interface Connector RS 232C 200 7 9 260 8 10 3 168 5 6 6 231 8 9 1 Top Cover Cover Open Lever FEED PAUSE Button Media Outlet Indicator Lamp Backing Paper Outlet Media Outlet GS Type Cutter Block Strip Block Option NOTE The picture on the left is the GC model s The depth of the ...

Page 9: ...leting the current label The printer resumes printing when this button is pressed again Color Illuminates when Flashes when RED A print error such as a memory error syntax error etc The top cover is opened There is no label GREEN The printer is on line and ready to print The button is pressed as a PAUSE function The printer is downloading files Media Guide Media Holder Platen Media Guide Adjustmen...

Page 10: ...ter with the cover open Be careful not to allow fingers or articles of clothing to get caught into any of the moving parts of the printer Make sure to turn off the printer power and to remove the power adapter connector from the printer whenever working on the inside of the printer or when cleaning the printer For best results and longer printer life use only TOSHIBA TEC recommended media Store th...

Page 11: ...to the Printer Driver in the CD ROM When the printer is connected to a host computer it is good practice to turn the printer ON before turning on the host computer and to turn OFF the host computer before turning off the printer 1 To turn ON the printer power press the power switch as shown in the diagram below Note that is the power ON side of the switch 2 Check that the Indicator Lamp is illumin...

Page 12: ...ese are A serial cable connection between the printer s RS 232C serial connector and one of your host computer s COM ports A parallel cable connection between the printer s standard parallel connector and your host computer s parallel port LPT A USB cable connection between the printer s USB interface connector and one of your host computer s USB port The diagram below shows all the possible cable...

Page 13: ...ower Adapter connector into the Power Jack on the rear of the printer 4 Plug the other end of the Power Cord into a grounded outlet as shown in the figure below Power Adapter Power Cord Power Adapter Connector Power Jack NOTES 1 Since the power cord is not enclosed in this printer please purchase a proper one after referring to page 1 2 2 The EA10953 AC adapter should be exclusively used for the B...

Page 14: ...edia Holder by sliding it onto the Media Shaft Make sure that the media roll is positioned at the centre of the Media Shaft 7 Insert the Media Holder Ass y into the slots of the printer WARNING 1 Do not touch any moving parts To reduce the risk of fingers jewellery clothing etc being drawn into the moving parts be sure to load the media once the printer has stopped moving completely 2 To avoid inj...

Page 15: ...ter Batch mode In the batch mode the media is continuously printed and fed until the number of media specified in the issue command has been printed NOTE When the Media Guide Adjustment Knob is turned backward the Media Guides move away from each other When it is turned forward the Media Guides move toward each other Media Guide Media Guide Adjustment Knob CAUTION To separate the printed media fro...

Page 16: ...ically cut After loading the media as described on the previous pages insert the leading edge of the media into the Media Outlet of the Cutter NOTE When the media is correctly set the backing paper is supposed to be pinched by the Platen and the Strip Feed Roller as shown below Strip Block Tab Strip Feed Roller Strip Plate Platen Strip Block Backing Paper Backing Paper Outlet CAUTION 1 Be sure to ...

Page 17: ... printer s Media Holder Ass y and place it into the cuts of the External Media Roll Hanger 3 Pull the media forward and insert the leading edge into the printer so that it passes between the Rear Media Guides When the media roll has the inner core diameter of 76 2 mm 3 use the 3 Diameter Media Shaft included in the optional External Media Roll Hanger 4 Manually move the Rear Media Guides so that t...

Page 18: ...ibration 6 To start the Online operation turn the printer off then on again 1 Turn off the printer power and install a media roll on the printer 2 Press the FEED PAUSE Button while turning on the printer The Indicator Lamp will be illuminated in the following order Orange Orange Flashing Red Flashing Green 3 Release the FEED PAUSE Button when the Indicator Lamp is illuminated in green 4 The printe...

Page 19: ...VE 17 Sensor selection and sensitivity MEMORY 192KB XXXKB Memory capacity of the Main PC Board and optional memory card 0 1 2 3 4 6 8 TTF AREA XXXKB XXXKB True type font storage area Main PC board and optional memory card EXT CHAR AREA XXXKB XXXKB Writable character storage area Main PC board and optional memory card BASIC AREA XXXKB XXXKB BASIC file storage area Main PC board and optional memory ...

Page 20: ... power before performing maintenance Failure to do this may cause an electric shock 2 To avoid injury be careful not to pinch your fingers while opening or closing the cover and print head block 3 Be careful when handling the print head as it becomes very hot immediately after printing Allow it to cool before performing any maintenance 4 Do not pour water directly onto the printer CAUTION 1 Do not...

Page 21: ...ve dust or paper particles from the Media Sensor and Cover Open Sensor using an air blower Wipe the Cover with a dry soft cloth Wipe off dirt with a soft cloth slightly moistened with water CAUTION Do not use any volatile solvents including thinner and benzene as this may cause discoloration or distortion of the cover Platen Media Sensor Cover Open Sensor ...

Page 22: ...e high humidity dust or gas The thermal paper used for direct thermal printing must not have specifications which exceed Ca2 K Na 800 ppm and Cl 600 ppm Some ink used on pre printed media may contain ingredients which shorten the print head s product life Do not use labels pre printed with ink which contain hard substances such as carbonic calcium CaCO3 and kaolin Al2O3 2SiO2 2H2O For further info...

Page 23: ...etect the print start position Retry the Media Sensor calibration 3 A paper jam occurred 4 A cutter jam occurred After removing causes of the problems press the FEED PAUSE Button to return to Online state Poor print quality 1 The Top Cover is not closed completely Close the Top Cover completely 2 Clean the Print Head 3 The media being used is not with in specification Use TOSHIBA TEC recommended m...

Page 24: ...25 to 85 RH no condensation 10 to 90 RH no condensation Free air environment 203 dpi Thermal direct Batch GS GC model Strip GS model option Cut GC model GS model option 50 8 mm sec 2 sec 76 2 mm sec 3 sec 101 6 mm sec 4 sec 127 mm sec 5 sec 50 8 mm sec 2 sec 76 2 mm sec 3 sec 25 4 mm 1 0 to 112 mm 4 4 108 0 mm 4 3 GS model 200 0 mm 231 8 mm 168 5 mm 7 9 9 1 6 6 GC model 200 0 mm 260 8 mm 168 5 mm ...

Page 25: ...ng kit B SV904 LP QM This kit consists of a platen and a sheet which prevent the linerless paper from sticking to the printer inside LAN adapter B SV704 LAN QQ For AC100 to 120V B SV704 LAN QP For AC200 to 240V This option enables the printer to be used in a LAN network A1 3 Media Please make sure that the media to be used is approved by TOSHIBA TEC The warranties do not apply to problems caused b...

Page 26: ...centre The Transmissive Sensor detects a gap between labels as illustrated below A1 3 3 Detection Area of the Reflective Sensor The Reflective Sensor is movable within the full range of the media width The reflection factor of the Black Mark must be 10 or lower with a waveform length of 950 nm The Reflective Sensor should be aligned with the centre of the Black Mark NOTES 1 To ensure print quality...

Page 27: ...t on the 1 5 mm wide area from the media edges shaded area in the above figure 2 The centre of media should be positioned at the centre of the print head 3 Print quality is not guaranteed within 3 mm from the print head stop position including 1 mm slow up 4 Average print black rate should be 15 or less For bar code print area the print rate should be 30 or less 5 Line weight should be 3 to 12 dot...

Page 28: ...Should not be bundled tightly with power cords Should not be tied to power line conduits RS 232C Cable description The serial data cable used to connect the printer to a host computer should be one of the following two types 9 pin or 25 pin connector NOTE Use an RS 232C cable with a connector with inch type securing screws Connector to the Host Computer Function 9 pin 25 pin RXD 2 3 TXD 3 2 DTR 4 ...

Page 29: ...ind the print start position of the label Font A complete set of alphanumeric characters in one style of type E g Helvetica Courier Times Gap Distance from the bottom of one label to the top of the next label IPS Inch per second A unit used to express print speed Label A type of media with adhesive backing supplied on a backing paper Media Material on which images are printed by the printer Label ...

Page 30: ...2 6 EA1 1 J Jammed media E4 1 K Keyboard display unit EA1 2 L Label EA1 2 Label length EA1 3 Label pitch EA1 3 Label width EA1 3 LAN EA1 1 LAN adapter EA1 2 M Media E3 3 EA1 2 Media guide E1 4 2E 6 Media guide adjustment knob E1 4 E2 6 Media holder E1 4 E2 5 Media sensor E1 4 E2 6 E2 9 E3 2 Media shaft E1 4 E2 5 P Parallel interface E1 3 E2 3 EA1 1 Parallel port E2 3 Platen E1 4 E3 2 Power adapter...

Page 31: ... 33035 INDEX S Serial interface E1 3 E2 3 EA1 1 EA2 1 Strip mode E2 7 Supply voltage EA1 1 T Tag paper EA1 2 Thermal direct EA1 1 3 diameter media shaft E2 8 Two dimensional code EA1 1 U USB interface E2 3 EA1 1 W Weight EA1 1 ...

Page 32: ...E EO1 33035 ...

Reviews: