background image

S8 T8 T9

5-1

Chapter 5

Firmware Upgrade Procedure

Item

Photo

Item

Photo

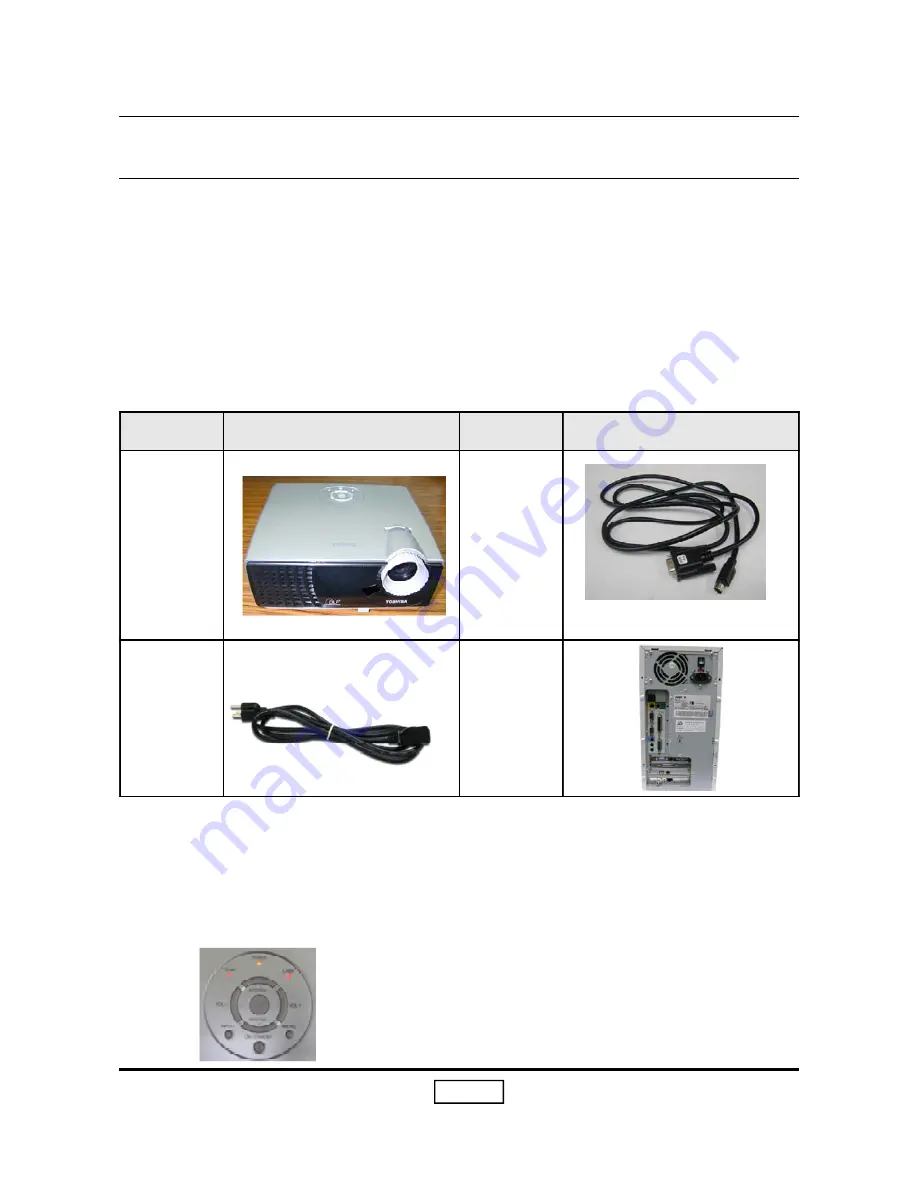
Projector
(S8/T8/T9)

8-pin RS232
Cable

Note: This cable is the same as T90 &

T90A/MT200/MT400 series.

Power Cord

PC or Laptop

5-1 Equipment Needed

Software :

-  DLP Composer Lite
-  Firmware 

(S8/T8/T9) (*.img file)

Note: The FW upgrade procedure for T9/T8/S8 is the same. Here, we take S8 as an example.

Hardware :

Connection:
Connect the serial port of your PC on laptop with the “Control” port of S8 by the 8-pin RS232
cable.

FW Upgrade Mode:
Press and hold “INPUT” and “MENU” buttons of S8 and plug in the power cord to S8. Release
“INPUT” and “MENU” buttons after TEMP, POWER & LAMP LEDs are all lit.

Summary of Contents for TDP TDP-S8

Page 1: ...1 as indicated by the underlined serial number s This Service Manual describes replacement parts for green product s When repairing any green product s use the parts described in this manual and lead free solder 2 For 1 and 2 see the next page Published in Japan January 2006 GREEN TOSHIBA CORPORATION TDP S8 TDP T8 ...

Page 2: ...ement of parts is not only confined to manufacture The same green parts used in manufacture must also be used as replacement parts 2 LEAD FREE SOLDER This product is manufactured using lead free solder as a part of a movement within the consumer products industry at large to be environmentally responsible Lead free solder must be used in the servicing and repair of this product WARNING This produc...

Page 3: ... when you immediately identify prob lems that occur with our products We expect your customers will appreciate the service that you offer them This manual is for technicians and people who have an electronic background Send the product back to the distributor for repairing and do not attempt to do anything that is complex or is not mentioned in the troubleshooting NOTICE The information found in t...

Page 4: ...le Photo Sensor and Color Wheel 2 9 Disassemble DMD Board DMD Chip Thermal Switch Focus Ring Zoom Ring Engine Module Blower Fan and Elevator 2 13 Chapter 3 Troubleshooting 3 1 Equipment Needed 3 1 AdjustmentNeeded 3 1 LED Lighting Message 3 1 Main Procedure 3 2 Chapter 4 Function Test and Alignment Procedure 4 1 Test Equipment 4 1 Test Condition 4 1 Test Display Modes Pattern 4 2 Inspection Proced...

Page 5: ...duction 1 1 Highlight T9 T8 S8 main different parts Parts Model T9 T8 S8 MAIN BOARD T9 F W Same as T9 S8 F W DMD Chip 0 55 XGA 0 55 XGA Same as T9 0 55SVGA Top Cover T9 T8 S8 Bottom Cover T9 Same as T9 S8 Front Cover T9 T8 Same as T9 Rear Cover T9 Same as T9 S8 Lamp Cover T9 Same as T9 S8 KEYPAD CAP T9 Same as T9 S8 ELEVATOR BASE T9 Same as T9 S8 ELEVATOR PUSH BUTTON T9 Same as T9 S8 Remove Contro...

Page 6: ...e colors S8 True 1024 X 768 resolution 16 7M True colors T8 T9 7 Video capabil ity With up down left and right screen reverse Build in full screen NTSC PAL SECAM video capability with S video Composite component through D sub terminals SXGA XGA SVGA VGA MAC compatibility Auto image re sizing to 800x600 full screen S8 Auto image re sizing to 1024 x 768 full screen T8 T9 Auto detection of computer s...

Page 7: ... One Mini DIN 4 pin for S Video Input One RCA Jack for Composite Video Input RS232 connector 4 Input signal spec PC Signal Hsync Frequency 31 35 80 kHz Vsync Frequency 56 85 Hz Video Signal RGB PC Analog RGB 0 7Vp p 75 ohm Analog RGB 1Vp p 75 ohm Sync signal Separate TTL H V Sync Composite TTL Sync Video Composite video 1Vp p 75 ohm S video Luminance 75 ohm Chrominance 75 ohm 5 System Con troller ...

Page 8: ...Lumens Typical S8 1440 ANSI Lumens Minimum S8 1800 ANSI Lumens Typical T8 T9 1600 ANSI Lumens Minimum T8 T9 6 Contrast 1800 1 Typical Full on full off 1200 1 Minimum Full on full off 7 Uniformity 60 Typical ANSI 50 Minimum ANSI 8 TV Distor tion Horizontal Up 1 Horizontal Down 1 Vertical 1 9 Lens Offset 115 10 10 Lamp Osram E17 5e 200W P VIP Lamp 1 4 Optical Specifications No Item Description 7 On S...

Page 9: ...nd pres sure level measurement 7200 rpm color wheel rotational speed 4 Lamp life 3000 hours marketing at full power mode Up to 2000 hours with 50 survival rate 50 maintenance to initial lumens at full power mode According to current lamp specification 5000 hours marketing at eco mode Up to 3000 hours with 50 survival rate 50 maintenance to initial lumens at eco mode According to current lamp specifi...

Page 10: ...00x600 60 37 9 800x600 72 48 1 800x600 75 46 9 800x600 85 53 7 XGA 1024x768 60 48 4 1024x768 70 56 5 1024x768 75 60 0 1024x768 85 68 7 SXGA 1152x864 70 63 8 1152x864 75 67 5 1152x864 85 77 1 1280x960 60 60 1280x960 75 75 1280x1024 60 63 98 1280x1024 75 79 98 MAC 16 832x624 74 55 49 725 MAC 19 1024x768 75 60 24 MAC 1152x870 75 06 68 68 MAC G4 640x480 60 31 35 i Mac DV 1024x768 75 60 i Mac DV 1152x8...

Page 11: ...2 1 S8 T8 T9 Item Photo Item Photo Screw Bit 107 Hex Sleeves 5mm Screw Bit 102 Screw Bit 101 Screw Bit 101 2 1 Equipment Needed Chapter 2 Disassembly Process ...

Page 12: ...crews to remove Lamp Module 3 Unscrew 1 screw and press the left tenon A on the lower cover first and then press the right one B on the lower cover to pull the bilateral sides to remove Top Cover 2 2 Disassemble Lamp Keypad Board Top Cover and Front Cover Lamp Cover Lamp A B Pull Top Cover ...

Page 13: ...he mylar first Un plug the FFC cable and un screw 4 screws to remove Keypad Button Enter Key and Keypad Board 5 Unscrew 2 screws to re move Top Cover Shielding Keypad Button Keypad Board Keypad Cap Top Cover Top Cover Shielding FFC Cable Enter Key ...

Page 14: ...ocedure Photo 6 Unscrew 2 screws to re move Lamp Plate 7 Unplug the red connector from Main Board unscrew 1 screw and pull Buttom Cov er outwards and pull forward Front Cover to remove it Lamp Iron Plate Pull Front Cover ...

Page 15: ... first unscrew 1 screw to remove IR Sensor Board 2 Push the three tenons to remove IR Lens and Front Cover IR Sensor Board Front Cover Push 2 3 Disassemble IR Sensor Board Main Board I O Module Speaker Back Cover and Lamp Driver IR Lens IR Lens Hood Mylar ...

Page 16: ...2 6 S8 T8 T9 No Procedure Photo 3 Unplug 8 connectors and unscrew 2 screws to sepa rate Main Board and I O Module from the unit Main Board I O Module ...

Page 17: ...s to separate Main Board and I O Module Notice Please re attach EMI gasket to the position shown in the red circle again after replacing Main Board 5 Unscrew 2 screws to re move Speaker Sponge and Speaker from EMI Shielding Back Cover EMI Shielding Back Cover Speaker ...

Page 18: ...ure Photo 6 Push the tenons in yel low circle to remove Back Cover from EMI Shielding Back Cover 7 Unscrew 2 screws and un plug 2 connectors to remove Lamp Driver Module Back Cover Lamp Driver Module EMI Shielding Back Cover ...

Page 19: ...ctor to separate Lamp Driver from Lamp Driver Holder and the connector 2 Unscrew 5 screws and un plug 3 connectors to remove LVPS and AC Socket Lamp Driver Module LVPS 2 4 Disassemble Lamp Driver Module LVPS Thermal Sensor Fan Module Photo Sensor and Color Wheel AC Socket ...

Page 20: ... Procedure Photo 3 Unplug 2 connectors to remove 2 pin connector and 14 pin connector from LVPS 4 Unscrew 1 screw to remove Thermal Sensor Board 5 Unscrew 2 screws to re move Fan Module Thermal Sensor Board Fan Module ...

Page 21: ...8 T9 No Procedure Photo 6 Unscrew 4 screws to break down Fan module 7 Unscrew 4 screws to re move Lamp Cable and Limit Switch 8 Unscrew 1 screw to remove Photo Sensor Lamp Driver Cable Limit Switch Photo Sensor ...

Page 22: ...2 12 S8 T8 T9 No Procedure Photo 9 Unscrew 1 screw to remove Color Wheel Note be careful not to scratch Color Wheel while removing Color Wheel ...

Page 23: ...nd DMD Heatsink Spring 2 Unscrew 4 hex screws to remove DMD Module and DMD Board DMD Heatsink Spring 2 5 Disassemble DMD Board DMD Chip Thermal Switch Focus Ring Zoom Ring Engine Module Blower Fan and Elevator DMD Board DMD Chip Thermal Pad Gasket DMD Heatsink DMD Chip connector ...

Page 24: ...rem nant or dirt 2 Please stick Thermal Pad in the middle of DMD socket shown in red circle and the edge of tape cannot touch DMD socket 3 Protruding facet faces down towards the insulation Maylar 4 Insulation Mylar gap face right 3 Remove DMD Seal Rubber and DMD Mask Plate 1 2 3 4 DMD Seal Rubber DMD Mask Plate ...

Page 25: ...1 screw to remove Thermal Switch 5 Unscrew 3 screws to re move Focus Ring Lightcut Mylar and Focus Ring 6 Unscrew 2 screws to re move Zoom Ring and Zoom Ring Holder Zoom Ring Holder Zoom Ring Thermal Switch Focus Ring Focus Ring Lightcut Maylar ...

Page 26: ...8 T8 T9 No Procedure Photo 7 Unscrew 3 screws to re move Projection Lens 8 Unscrew 1 screw to remove Lamp Lightcut Top 9 Unscrew 4 screws to re move Engine Frame Projection Lens Lamp Lightcut Top Engine Frame ...

Page 27: ...2 17 S8 T8 T9 Blower Fan No Procedure Photo 10 Unscrew 4 screws to re move Rod Fix Plate and then Rod can be removed 11 Unscrew 3 screws to re move Blower Fan Module Rod Fix Plate Rod ...

Page 28: ...e Elevator Foot 13 Remove 2 screws to re move Elevator Module 14 Loosen 4 tenons in yellow circle to remove Bottom Cover Shielding 15 Tear off EMI Bottom Gasket from Bottom Cover Elevator Foot Elevator Module Bottom Cover Shielding EMI Bottom Gasket Bottom Cover ...

Page 29: ...placing Main Board you need to do ADC and Video Calibration and adjust Color Wheel Index For details please see Chapter 4 Charge Parts Update Color Wheel Index ADC Calibration Video Calibration Reset Lamp Use Time M B v v v FW v Color Wheel v Lamp Module v LED Lighting Message Status Light TEMP POWER LAMP Standby OFF ON O OFF Normal Power ON OFF ON O OFF Powering up OFF Blink G OFF Cooling OFF Bli...

Page 30: ...Lighting Message a Check Color Wheel Check color wheel Photo sensor b No Power Refer to No Power troubleshooting Error Status Status Light TEMP POWER LAMP Remark Troubleshooting Standby OFF ON O OFF After 5 sec goto Standby Check 1 Lamp 2 Lamp Driver 3 M B Normal Power ON OFF ON O OFF Check 1 Lamp Door 2 Limit Switch Powering up OFF Blink G OFF Check 1 Thermal Switch 2 Thermal Sensor 3 Fans 4 M B ...

Page 31: ...hermal Sensor refer to LED Lighting Message Check Fans refer to LED Lighting Message Check Color Wheel refer to LED Lighting Message Check Lamp refer to LED Lighting Message Check Lamp Driver refer to LED Lighting Message Check Main Board Check DMD Board Mechanical Noise Check Color Wheel Check Fan Module Line Bar Line Defect Sometimes it s because of DMD chip and DMD board did not assemble proper...

Page 32: ...ghtness is within spec Replace the Lamp if the Brightness is less than spec Check Engine Module Dead Pixel Dust Out of spec Ensure the projection screen without dirt Ensure the projection lens is clean Clean DMD Chip and Engine Module Check DMD Chip Check Engine Module Garbage Image Ensure that the signal cable and source work well Check Main Board Check DMD Board Remote Controllor or Control Pane...

Page 33: ...S8 T8 T9 3 5 Function Abnormal Do Reset of the OSD menu Check Main Board Check DMD board ...

Page 34: ...Minolta CL 100 Luminator Patern Generator Quantum Data 802B or CHROMA2327 Suggested 4 2 Test Condition Circumstance Brightness Dark room less than 2 5 lux Inspection Distance 1 5m 3m for functional inspection Screen Size 60 inches diagonal After repairing each projector the unit should be burn in Refer to the table below Symptom Burn in Time Normal Repair 2 Hours NFF 4 Hours Auto Shutdown 6 Hours ...

Page 35: ...ll Black Cannot accept any bright pixel Figure 7 Dead Pixel Dark pixel Full White The numbers of dead pixel should be smaller or amount to 6 pixel Figure 8 6 Blemish Bright Full Black Gray 30 The bright blemish cannot be accepted if the problem appear with Gary 30 pattern Figure 7 8 7 Blemish Dark Full white Blue 60 The dark blemish cannot be accepted if the problem appear with Blue 60 pattern Fig...

Page 36: ...S8 T8 T9 4 3 Figure 6 Full White Figure 7 Full Black Figure 1 Fine Line Moire Figure 2 64 RGBW Scale Figure 3 Red Pattern Figure 4 Green Pattern Figure 5 Blue Pattern Figure 8 Gary 30 Pattern ...

Page 37: ...S8 T8 T9 4 4 Figure 9 Blue 60 Pattern Figure 10 Text Pattern Figure 11 Boundary Frame Figure 12 94 white Figure 13 Calibration Pattern ...

Page 38: ...Frequency H Position V Position to the inner of the screen Focus Test Signal 1024x768 60Hz T8 T9 800x600 60Hz S8 Test Pattern Text Pattern Adjust the center clearly meanwhile one slightly vague corner in the image is allowed Calibration in Factory Mode See Page 4 7 or Appendix for hotkeys After Main Board is changed or firmware is upgrade the calibration is needed to ensure good color performance ...

Page 39: ...ee Page 4 7 or Appendix for hot keys Blemish Bright Test signal 1024x768 60Hz T8 T9 800x600 60Hz S8 Test Pattern Gray 30 pattern Please check and ensure the unit is within the spec The bright blemish should not be seen under Gray 30 pattern If out of spec please return the unit to repair area Blemish Dark Test signal 1024x768 60Hz T8 T9 800x600 60Hz S8 Test Pattern Blue 60 pattern Please check and...

Page 40: ...9 800x600 60Hz S8 Test Pattern Full Black Pattern and Full White Pattern 1 Bright Pixel Test Pattern Full Black Pattern Please check and ensure that the unit cannot accept any bright pixel Suggested If not please return the unit to repair area 2 Dark Pixel Test Pattern Full White Pattern Please check and ensure that the pixel number should be less than 6 pixels Suggested If not please return the u...

Page 41: ...ve to erase all saved change again and restore the factory defaults Please enter the OSDmode to do the Reset then choose YES and press enter to see if it works This action will allow you to erase all end user s settings and restore the original setting ...

Page 42: ...tware DLP Composer Lite Firmware S8 T8 T9 img file Note The FW upgrade procedure for T9 T8 S8 is the same Here we take S8 as an example Hardware Connection Connect the serial port of your PC on laptop with the Control port of S8 by the 8 pin RS232 cable FW Upgrade Mode Press and hold INPUT and MENU buttons of S8 and plug in the power cord to S8 Release INPUT and MENU buttons after TEMP POWER LAMP ...

Page 43: ...edure Photo 1 DLP Composer Lite Installation file Choose DLP Composer Lite v4 1 Setup program 2 Next Click Next button 3 Next 1 Reading the License Agreement rules 2 Choose I accept and agree to be bound by all the terms and conditions of this License Agreement icon 3 Click Next button 4 Next Click Next button 1 2 3 ...

Page 44: ...S8 T8 T9 5 3 No Step Procedure Photo 5 Next 1 Click Next button 6 Next Click Next button 7 Finish Press Finish button 8 Reboot Click Yes button to reboot ...

Page 45: ...ute the DLP ComposerTM file 2 Click Edit and Preferences 3 1 Select Edit Preferences Communications and choose Serial Port 2 Click the serial port connected Here we select COM1 3 Press Configure 4 1 Make sure the setting is same as the left picture shows 2 Press OK 1 2 1 2 3 ...

Page 46: ...e Flash Loader 2 Click Browse to search the S8 Firmware img file 3 Select the item Skip Boot Loader Area load all but the first 16KB 6 1 If the firmware is ready click Start Download to process the firmware upgrade 2 Click Yes to continue 2 1 3 2 1 ...

Page 47: ...ll see Download Complete message and only the Power LED is lit Standby Mode The FW upgrade will take about 6 minutes Unplug and re plug the power cord of the projector 8 Checking Firmware Version Power on the projector and press MENU button to launch OSD menu Select Status display to check the firmware version 1 2 ...

Page 48: ...ntroduced are reserved for engineering use How to enter Factory Mode 1 Must be with signal input 2 Hot key press ON STANDBY VOL VOL MENU sequentially to enter Factory Mode See the below pic Burn In Mode Select Burn In Mode and then press Enter key to enter Burn In Mode Chapter 6 Firmware Upgrade Procedure ...

Page 49: ...e Color Wheel Index and then the color wheel index can be adjusted by Left and Right keys PC Calibration Select PC Calibration and then press Enter to execute PC Calibration Video Calibration Select Video Calibration and then press Enter to execute Video Calibration Failure Log Select Failure Log and then press Enter key to enter Failure Log Menu Use Left and Right keys to choose the failure log c...

Page 50: ...AL USA EUR T8 V 19 Y005 23587894 USER S MANUAL JAPANESE T8 V 20 Y006 23587895 USER S MANUAL CHINA T8 V 21 Y007 23587896 CD ROM USER S CD GUIDE MULTILINGUAL T9 V 22 Y008 23587897 CD ROM USER S CD GUIDE MULTILINGUAL T8 V 23 Y009 23587898 CD ROM USER S CD GUIDE MULTILINGUAL S8 V 24 Y010 23587899 USER S MANUAL USA EUR S8 V 25 Y011 23587900 USER S MANUAL JAPANESE S8 V 26 Y012 23587901 USER S MANUAL CHI...

Page 51: ...FRONT PC TDP T9 V V V 60 A024 23587929 FOCUS RING PC ABS CA08 TDP T9 V V V 61 A025 23587930 PAD ENTER KEY PC ABS CA08 TDP T9 V V V 62 A026 23587274 SPRING ENTER KEY PE FORM 2 0t TDP T90 V V V 63 B002 23587276 SPACER ADJUST FOOT 3 0t RUBBER TDP T90 V V V 64 Y021 23587931 SOFT CASE CARRYING BAG TDP T9 V V V 65 A027 23587932 CARTON B 14 396 330 190mm TDP T9 V V V 66 A028 23587933 PAPER CUSHION B 14 3...

Page 52: ...T CHERRY DB3C A1LB 5A V V V 89 P003 23587955 WIRE HARNESS LAMP DRIVER TO LAMP HD72 V V V 90 U002 23587956 PC BOARD ASSY DMD EP719 V V V 91 U003 23587957 PC BOARD ASSY PHOTO SENSOR EP719 V V V 92 U004 23587958 PC BOARD ASSY THERMAL SENSOR PD120 V V V 93 U005 23587959 PC BOARD ASSY MAIN T9 XGA V 94 U006 23587960 PC BOARD ASSY MAIN TDP T8 XGA V 95 U007 23587961 PC BOARD ASSY IR SENSOR TDP T9 V V V 96...

Page 53: ...T O S H I B A C O R P O R A T I O N 1 1 SHIBAURA 1 CHOME MINATO KU TOKYO 105 8001 JAPAN ...

Reviews: