background image

41

Operations

40

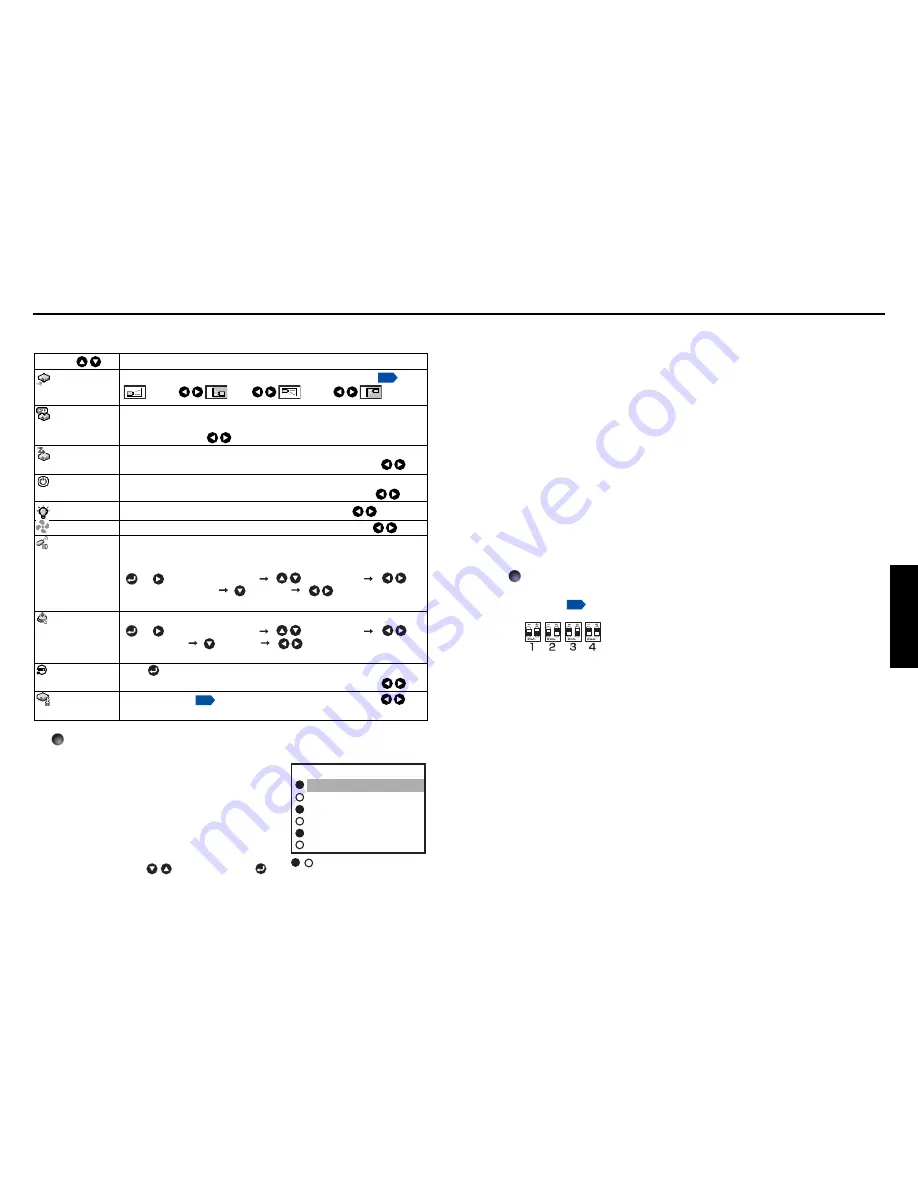
The default setting menu

This menu shows placement status and other settings.

Sets projection mode in accordance with Placement Style.  

Set the time to wait for the power to be turned off after the last 
operation is made with no input signal.

Off

 (not turned off)            

30 min.

Set whether the input with signals is only selected or not.

Sets whether to turn on the power when the 

ON/STANDBY

 button is pressed 

(Manual), or when the power cord is plugged in (Auto).            

Manual             Auto

Sets the lamp power.                                   

Sets the cooling fan speed.

When two or more projectors are used and controlled by the remote 
control respectively, this menu sets the code for the projector and the 
remote control.
[      or      : Enter setting mode]      [           : Select item]      [           : 
Select from 

1

2

3

4

]      [     :Confirm]      [           :Select 

OK 

to end]  

Press [

Cancel

] to return.

Lock the control panel buttons.
[      or      : Enter setting mode]      [           : Select item]      [           : 
Select 

On/Off

]      [     :Confirm]      [           :Select 

OK 

to end]  

Press [

Cancel

] to return.

Press       . (The password and user logo are not reset.)
Resets all adjustments and settings to their factory settings.

Password function
When [

Password

] is [

On

], the Password Setting screen is displayed.

Description

Item

Projection
mode

No signal 
power off

Auto input 
search

Power on

Lamp power

Fan mode

Remote control 

Key lock

Reset all

Password

(Rear ceiling)

(Standard)

(Rear)

(Ceiling)

On            Off

Standard           High

Yes           No

 Off           On


Low           Standard

p.21

p.32

Detailed description

[

Auto input search

]

[

On

]: Automatically searches the signals that

can be projected, and switches input
from the connected device that outputs
the video signals each time the 

INPUT

button is pressed. The input from the
connected device that outputs no video
signals is skipped.

[

Off

]: Displays the 

Input select 

menu.

Toggle with 


 buttons and press 

button. (The input without signals can be
selected.)

[

Power on

]

Note that if [

Power on

] is set to [

Auto

], then if the power is supplied when restored

after a power outage, the projector will come on.

[

Lamp power

]

When [

Lamp power

] is set to [

Low

], the screen becomes a little darker, but the

cooling fan noise gets quieter.

[

Fan mode

]

Setting [

Fan mode

] to [

High

] increases the cooling fan speed. (The cooling fan

noise gets louder.) Set this option to use the projector, for example, at high altitude
(over 1,500 meters above sea level).
• Do not set Fan mode to [

High

] when using the projector at a lower altitude.

[

Remote control

]

Sets a remote control code from 4 types. You can set each code respectively for up
to 4 projectors. The factory setting is [

1

].

To switch codes, set the same code for the projector and the remote control.
A remote control code is applied after the setting is done.
• You cannot operate the remote control if the codes of the projector and the

remote control do not match.

Remote control code setting for remote control

Remove the battery cover and set the same 

remote control code switch 

as the

projector. 

p.16

 (Use a screwdriver with thin tip to set.)

[

Key lock

]

Protect from operating errors by locking on the control panel buttons of the
projector. (The remote control operations are available.)
Control panel operations are locked after the setting is done, and accordingly
operation with the control panel buttons is disabled.
• To release the key lock, set the [

Key Lock

] to [

Off

] using remote control. Pressing

the [

RETURN

] button on the projector for 10 seconds also sets the [

Key Lock

] to

[

Off

]. (In the latter case, the LAMP, TEMP, and FAN indicators light in orange for 3

seconds.)

Computer 1
Y/P

B

/P

1

Computer 2
Y/P

B

/P

2

Video
S-video

Input select


/


shows whether signal is 

 input or not.

Input select menu

Using the menus (Continued)

Summary of Contents for TDP-T99

Page 1: ...Others Maintenance Operations Preparations Before Using OWNER S MANUAL DATA PROJECTOR TDP T99 ...

Page 2: ...e received including interference that may cause undesired operation This equipment has been tested and found to comply with the limits for a Class B digital device pursuant to part 15 of the FCC Rules These limits are designed to provide reasonable protection against harmful interference in a residential installation This equipment generates uses and can radiate radio frequency energy and if not ...

Page 3: ...RVE ALL WARNINGS AND INSTRUCTIONS GIVEN IN THIS OWNER S MANUAL AND THOSE MARKED ON THE UNIT RETAIN THIS BOOKLET FOR FUTURE REFERENCE This unit is fully transistorized and does not contain any parts that can be repaired by the user DO NOT REMOVE THE CABINET COVER OR YOU MAY BE EXPOSED TO DANGEROUS VOLTAGE REFER SERVICING TO QUALIFIED SERVICE PERSONNEL ONLY 1 Read Owner s Manual After unpacking this...

Page 4: ...uld break please handle with care to avoid injury and contact your dealer for repair service The broken pieces of glass may cause to injury In the unlikely event of the lamp rupturing thoroughly clean the area around the projector and discard any edible items placed in that area 18 Servicing Do not attempt to service this product yourself as opening or removing covers may expose you to dangerous v...

Page 5: ... TV or radio may cause interference to the images or audio sound If this happens move it away from the TV or radio Moving the projector from a low temperature room to a high temperature room may cause condensation on the lens or internal parts in the instrument If you continue to use it in that situation the malfunction may result Ensure to wait until the condensation naturally disappears In a hig...

Page 6: ...old waste By ensuring this product is disposed of correctly you will help prevent potential negative consequences for the environment and human health which could otherwise be caused by inappropriate waste handling of this product For more detailed information about recycling of this product please contact your local city office your household waste disposal service or the shop where you purchased...

Page 7: ...uto setting Only for input from computer 28 Correcting the keystone distortion 28 Resizing image 29 Cutting off the picture and sound temporarily Mute 30 Changing picture mode 30 Changing screen size 31 Freezing the image Freeze 31 Password function 32 Using the menus 34 How to use the menus 34 The image adjustment menu 35 The display setting menu 37 The default setting menu 40 Displaying Informat...

Page 8: ...box along with the main unit If any item is missing please contact the store immediately where you purchased the product 1 5 8 2 6 3 7 4 Checking the package contents Preparations Note The shape and number of supplied power cords vary depending on the product destination 6 Power cord See note 7 Carrying bag 8 Mouse remote control receiver Names of each part on the main unit Back Front 10 9 12 12 8...

Page 9: ...el CAUTION Do not look into the laser light source of the remote control or direct the laser pointer toward a person or a mirror Handling and adjusting other than described here may lead to dangerous exposure to laser Name Main Function 13 AUTO SET button Sets up analog input from computer p 28 14 Laser indicator Lights when laser is on 15 Mouse control button Controls a mouse pointer p 20 16 PAGE...

Page 10: ...nditions could impede the operation of the remote control If this happens point the remote control at the main unit again and repeat the operation Preparing and using the remote control Names of the terminals on the rear panel 4 6 3 2 5 7 9 10 1 8 Name Main Function 1 CONTROL terminal When operating the projector via a computer connect this to the controlling computer s RS 232C port p 52 2 MONITOR...

Page 11: ...uters 1 Connecting a computer Connect the mouse remote control receiver supplied to a computer Mouse remote control receiver To USB port 2 Operating a computer Operate remote control s buttons towards the mouse remote control receiver Moving the mouse pointer Press the mouse control button in the direction you wish the mouse pointer to move then press To left click Press the L CLICK button To righ...

Page 12: ...ER 2 IN terminal or outputs Y PB PR as selected with the INPUT button If no input is selected the MONITOR OUT terminal outputs the input signals last selected for each input terminal Signals are output from MONITOR OUT terminal even in standby mode However from AUDIO OUT terminal no audio signal is output A computer monitor cannot accept Y PB PR signals correctly The AUDIO IN terminal doubles for ...

Page 13: ...ile in order to expel excess internal heat C In standby mode Note The projector consumes about 9W of power in standby We recommend that you unplug the power cord if you will not be using the projector for an extended period PRECAUTION If the power cord is unplugged before cooling is complete give the lamp time about 5 minutes to cool before plugging it back in If the lamp overheats it may fail to ...

Page 14: ...he No signal will appear If a signal not supported by the projector is input the Unsupport signal will appear If an unavailable operation button is pressed the icon will appear 1 2 1 2 3 3 1 Turn on the power Turn on the power by following the instructions in Turning the power on p 24 2 Select the language and the lamp power When using the first time When the projector is used for the first time a...

Page 15: ...reset to the original size Using auto setting Only for input from computer This function sets up the projector to the optimum state such as sampling phase frequency screen position and clamp for each type of the input signal by using simple operations Press the remote control s AUTO SET button For computer input the icon will appear during processing You can set as well by selecting Auto setting i...

Page 16: ...nd listening it may infringe the copyright protected by the copyright laws Remote Control Remote Control Remote Control Notes The icon appears while resizing Operating a function other than Mute will release resizing As zooming is processed digitally the image quality is degraded in larger zoom ratio During resizing or moving the zooming area the image may be distorted Cutting off the picture and ...

Page 17: ...leted It is also added to the Default setting menu How to set password from Off to On 1 Select Password in the Default setting menu and press the or button The password setting confirmation screen is displayed OK or Cancel 2 Select On and press the button The password entry screen is displayed 3 Enter a four digit number for the password using numeric keys of the remote control The input number ap...

Page 18: ...any fine vertical lines appear on the screen H position Yes No No No Adjust the horizontal position of the image You can call up on screen menus and conduct a number of adjustments and settings using the operation buttons p 16 on the control panel main unit side and remote control How to use the menus The menu shown below is for operation instructions purposes and might differ from the actual disp...

Page 19: ...nal or Enter setting mode Selection Logo registration Press to display the registration menu Display style Background Black Blue White Logo confirmation Press Reset logo Yes No Description Item Screen size Language Background Icon Blackboard mode Start up screen User logo Detailed description Screen size If Thru is selected for Screen size portions exceeding the native resolution 1024 768 pixels w...

Page 20: ...adcast or cable broadcasting programs to display images with the varying aspect ratio except for the purpose of your private viewing and listening it may infringe the copyright protected by the copyright laws Blackboard mode Projects the image in colors more like projecting on a screen Precaution The projected image may differ depending on the type color and material of the blackboard and wall eve...

Page 21: ...nput select menu Toggle with buttons and press button The input without signals can be selected Power on Note that if Power on is set to Auto then if the power is supplied when restored after a power outage the projector will come on Lamp power When Lamp power is set to Low the screen becomes a little darker but the cooling fan noise gets quieter Fan mode Setting Fan mode to High increases the coo...

Page 22: ...room Then thoroughly clean the area around the projector and discard any edible items placed in that area When the lamp bursts consult a doctor if glass dust or mercury gas gets into your eyes or you breathe it About lamp Maintenance Using the menus Continued Displaying Information Status display This displays information about the input signal lamp use time etc Yes displayed No not displayed Item...

Page 23: ...is not loose If it is not attached correctly the projector may fail to be powered on or the lamp may fail to come on Always replace the lamp with a new one The lamp is made out of glass Do not touch the glass surface with your bare hands bang it or scratch it Dirt jolts scratches and the like could break the lamp Used Lamps This projector s lamps contain trace amounts of environmentally harmful in...

Page 24: ...ch the lamp cover p 44 After approx one minute of abnormal display the projector returns to the standby state waiting for internal cool down Power went out during use Problem inside the projector Unplug the power cord and wait for a short while then turn the power back on If the above action will not clear the problem unplug the power cord and contact your dealer The icon will appear before the po...

Page 25: ...lors too light Bad shading Control panel key doesn t work Remote control doesn t work Before calling service personnel Is the power cord plugged in Is it connected to the projector Is the outer lamp cover attached properly p 44 Is the ambient temperature high p 47 Is the air intake or air exhaust blocked p 47 Is the projector turned on When Auto input search is Off p 40 Is the mute function on p 3...

Page 26: ...of supported signals RGB signals This projector supports the following RGB signals Note however that depending on the computer model the screen may show flicker or streaking Please adjust the projector if this happens Resolution 720 x 400 640 x 480 800 x 600 832 x 624 1024 x 768 1152 x 864 1280 x 960 1280 x 1024 1400 x 1050 1600 x 1200 Mode 720x400_85 VGA_60 VGA_72 VGA_75 VGA_85 SVGA_56 SVGA_60 SV...

Page 27: ...ormat STX 02h Command 3Byte ETX 03h Only 1 command valid per communication 3 Data format For input commands only ASCII compliant all uppercase alphanumeric characters supported 4 Replies Acknowledge ACK 06h CR 0Dh Data Normally ended ACK 06h ESC 1Bh Aborted No acknowledge NAK 15h If commands are to be sent consecutively wait for the response from the projector before sending the next command Main ...

Page 28: ......

Reviews: