background image

27

Operations

26

Using auto setting

This function sets up the projector to the optimum state for
each type of the input signal by using simple operations.

1

Press the SET UP button.

The Set up menu appears.

2

Press the SET UP button again.

The menu item is automatically adjusted/set.
For computer input, the 

 icon will appear during

processing.
For manual adjustment and setting, see the following table 

p.28

.

Notes

• The image may not be projected or auto adjustment/setting may not be performed

correctly for input signals other than those supported by the projector 

p.41

p.42

.

• Keystone adjustment cannot be corrected automatically.

Correcting the keystone distortion

When the foot adjuster 

p.26

 is used to change the projector placement angle while

projecting the image, the picture will undergo keystone (trapezoidal) distortion.
This projector is capable of correcting this keystone distortion.

Manual adjustment

Press the SET UP button to display the Set up menu and select [Keystone]. Use

the 


 buttons for keystone adjustment. When the adjustment is finished, press

the RETURN button. The menu disappears.

Notes

• Depending on the amount of keystone adjustment and the content of images, some

information may be lost, or the picture quality may suffer.

• Keystone adjustment is available for the keystone distortion in a slant angle of 

±

15

degrees.

• Keystone adjustment will not change the shape of the menus, the start-up screen,

and the background (with no signal input).

Using handy features

Control panel

Remote

Control

Before correction After correction

5

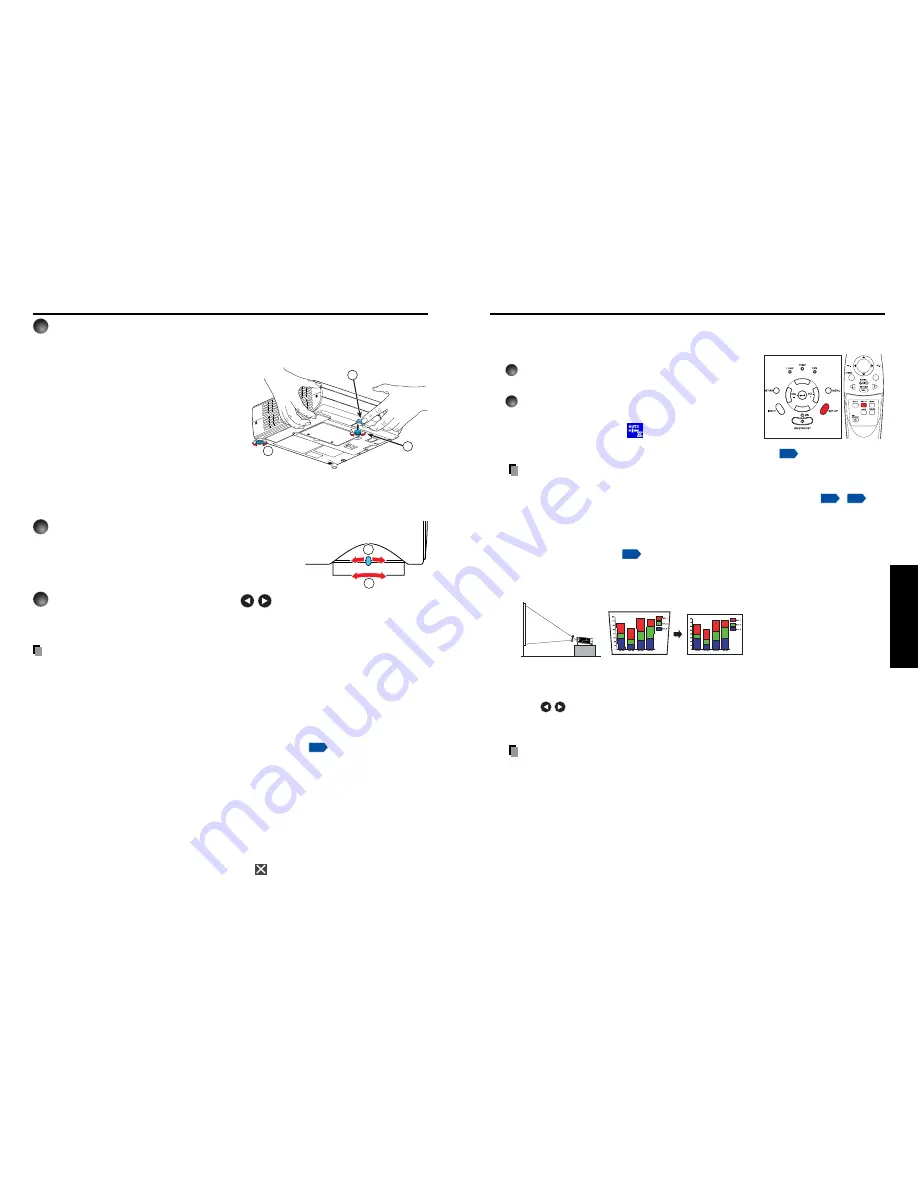
Projector placement angle adjustments

The placement angle and the height of the projected image can be adjusted by the foot
adjuster.

q

Lift up the front of the projector to
the desired angle, then press the
foot adjuster release button.

The foot adjuster extends. Release the
button to lock the position.

w

Turn the foot adjuster to fine-tune
the angle.

e

To adjust the horizontal angle, use
the tilt adjuster.

To stow the foot adjuster, hold up the projector while pressing the foot adjuster
release button, then slowly lower the projector.

6

Adjusting the screen size and focus

q

Use the zooming lever to adjust the screen
size.

w

Use the focusing lever to adjust the focus.

7

Adjusting the volume with the 


 buttons

The speaker volume can be adjusted when an audio signal is being input.

Notes

• Note that a lamp characteristics may rarely cause the brightness to fluctuate slightly.
• A lamp is consumable item. If used for extended periods, images will appear dark, and

the lamp could burn out.  This is characteristic of a lamp, and is not malfunction. (The
lifetime of the lamp depends on conditions of use.)

• The DMD

TM

 is made using extremely advanced technology, but there may be black spots

(pixels that do not light) or bright spots (pixels that are constantly lit) on the panel.  Please
note that these are not malfunctions.

• Although this projector supports a wide range of RGB signals 

p.41

, any resolutions not

supported by this projector (XGA) will be expanded or shrunk, which will affect image
quality slightly. To view high-quality images, it is recommended that the computer’s
external output should be set to XGA (1024 

×

 768) resolution.

• With some models of computer having LCD displays or the like, displaying images

simultaneously on the projector and the monitor’s display may prevent the images from
displaying properly. If this happens, turn off the computer’s LCD display. For information
on how to turn off the LCD display, see the owner’s manual of your computer.

• If a signal not supported by the projector is input, the “Unsupported signal” will appear.
• If no signal is being input from the connected device, the “No signal” will appear.
• If an unavailable operation button is pressed, the 

 icon will appear.

1

2

3

1

2

Basic operations (Continued)

Summary of Contents for TDP-T40

Page 1: ...Others Maintenance Operations Preparations Before Using OWNER S MANUAL DATA PROJECTOR TDP T40 XGA ...

Page 2: ...ause undesired operation This equipment has been tested and found to comply with the limits for a Class B digital device pursuant to part 15 of the FCC Rules These limits are designed to provide reasonable protection against harmful interference in a residential installation This equipment generates uses and can radiate radio frequency energy and if not installed and used in accordance with the in...

Page 3: ...afeguards incorporated in this unit will protect you if you observe the following procedures for installation use and servicing This unit is fully transistorized and does not contain any parts that can be repaired by the user DO NOT REMOVE THE CABINET COVER OR YOU MAY BE EXPOSED TO DANGEROUS VOLTAGE REFER SERVICING TO QUALIFIED SERVICE PERSONNEL ONLY 1 Read Owner s Manual After unpacking this prod...

Page 4: ...to avoid injury and contact your dealer for repair service The broken pieces of glass may cause to injury In the unlikely event of the lamp rupturing thoroughly clean the area around the projector and discard any edible items placed in that area 18 Servicing Do not attempt to service this product yourself as opening or removing covers may expose you to dangerous voltage or other hazards Refer all ...

Page 5: ... it away from the TV or radio Moving the projector from a low temperature room to a high temperature room may cause condensation on the lens or internal parts in the instrument If you continue to use it in that situation the malfunction may result Ensure to wait until the condensation naturally disappears In a high altitude location where air is thin cooling efficiency is reduced so use the projec...

Page 6: ...XGA are trademarks or registered trademarks of International Business Machines Corporation Digital Light Processing Digital Micromirror Device and DMD are trademakes of Texas Instruments Macintosh is a registered trademark of Apple Computer Inc Windows is a registered trademark of Microsoft Corporation in the U S and other countries Adobe is a registered trademark and Acrobat Reader is a trademark...

Page 7: ...r on and off 23 Basic operations 25 Using handy features 27 Using auto setting 27 Cutting off the picture and sound temporarily Mute 29 Freezing the image Freeze 29 Using the menus 30 How to use the menus 30 The image adjustment menu 31 The display setting menu 32 The default setting menu 33 Displaying Information Status display 34 Maintenance About lamp 35 Lamp replacement 35 Lens and main unit c...

Page 8: ... folder and run ar500enu exe Follow the on screen instructions Macintosh Run the CD ROM select the Reader English folder and run Reader Installer Follow the on screen instructions to install the software Viewing the manual Run the CD ROM and double click on Start pdf Acrobat Reader launches and the menu screen of the Owner s manual appears Click on your language The Owner s Manual cover and list o...

Page 9: ...al output terminal 15 COMPUTER 2 terminal Input RGB signal from a computer or other source or a component video signal Y PB PR from video equipment Parts on the rear panel Names of each part on the control panel and remote control Control panel Remote Control 1 2 3 4 5 6 7 8 9 10 11 FAN LAMP TEMP Name Main Function 1 ENTER button Accepts the selected mode 2 MENU button Displays menus p 30 3 SET UP...

Page 10: ...could impede the operation of the remote control If this happens point the remote control at the main unit again and repeat the operation Preparing and using the remote control Switching operation modes Operation modes should be switched between projector operation and computer operation Switching the remote control operation mode Pressing this button toggles the mode When this button is lit the r...

Page 11: ...d using the projector s remote control This function is available on any computer with the Windows 98 98SE Windows Me Windows 2000 or Windows XP OS that is equipped with a USB port supporting the USB 1 1 The mouse remote control is supported on OS 9 or OS X for the Macintosh The operation cannot be guaranteed for all the environments of computers 1 Connecting a computer Connect the supplied Mouse ...

Page 12: ... Audio amplifier etc To audio output White L Red R DVD video recorder etc Computer Computer Audio cable not supplied RGB cable supplied To RGB output Audio cable not supplied To audio input White L Red R AV cable not supplied To audio output To video output Connecting the power cord 1 Insert the power cord connector into the AC IN socket of the projector 2 Insert the power cord plug into a wall or...

Page 13: ...h the DVD software for computers may appear unnatural if it is projected with this projector but it is not a malfunction English French German Italian Spanish Portuguese Russian Swedish Turkish Japanese Chinese simplified Chinese traditional Korean Notes The start up screen will disappear after a moment You can dismiss the start up screen before this by performing any operation You can also config...

Page 14: ... foot adjuster extends Release the button to lock the position w Turn the foot adjuster to fine tune the angle e To adjust the horizontal angle use the tilt adjuster To stow the foot adjuster hold up the projector while pressing the foot adjuster release button then slowly lower the projector 6 Adjusting the screen size and focus q Use the zooming lever to adjust the screen size w Use the focusing...

Page 15: ...broadcast or broadcast on cable except for the purpose of your private viewing and listening it may infringe the copyright protected by the copyright laws Remote Control Remote Control Manual adjustments and settings The menu items of the Set up menu vary depending on the input type as shown in the table below Use the buttons to adjust the items in the table below then press the RETURN button when...

Page 16: ...to US for other languages You can call up on screen menus and conduct a number of adjustments and settings using the operation buttons p 16 on the control panel main unit side and remote control How to use the menus The menu shown below is for operation instructions purposes and might differ from the actual display Using the menus Note Menu adjustments and settings are saved when the power is turn...

Page 17: ...mple at high altitude over 1 500 meters above sea level Notes Note that in the event of a power outage but the power is restored afterwards the projector power will come on if Power on is set to Auto When you turn off the projector even if Power on is set to Auto you must press the ON STANDBY button to turn the power off The display setting menu Use this menu to set screen display related items Fu...

Page 18: ... expiration of its life How long it takes before the lamp bursts or the life expires may vary greatly by lamp Some may burst shortly after first use Burst is likely to happen if the lamp is used after the replacement period has elapsed When the lamp bursts the broken pieces of glass may get inside the product or be released outside from the openings for ventilation When the lamp bursts a slight am...

Page 19: ...rection of the arrow with your fingers as shown to remove the lamp cover Use care to avoid any damage to nails and or tip of your finger s If you have any difficulty in removal you can use a screwdriver or any other smaller tool for your convenience 4 Pull out the lamp Loosen the 2 screws holding the lamp in place and pull up the handle to remove the lamp 5 Mount the new lamp Align the orientation...

Page 20: ...tor lights inform you of internal abnormalities No power Problem with projector Unplug the power cord and contact your dealer Lamp went out during use or won t come on Lamp temperature is high so that it is difficult to turn on the lifetime of the lamp has ended or the projector is malfunctioning Unplug the power cord and wait for a short while then turn the power back on If a lamp burns out repla...

Page 21: ...500 189 000 202 500 Note Signals which resolution exceeds the native resolution 1024 768 pixels will be compressed For this reason some information may be lost or image quality may be affected Specifications List of general specifications Item Specification Consumption Power 250 W Weight 3 0 kg External Dimensions 285 98 254 mm W H D including protruding parts Cabinet material PC ABS resin and ABS...

Page 22: ...e and other commands Separately Sold Product Replacement Lamp Model TLPLV5 List of supported signals Y PB PR signals Signal format fh kHz fv Hz 480i 525i 60Hz 15 73 59 94 480p 525p 60Hz 31 47 59 94 576i 625i 50Hz 15 63 50 00 576p 625p 50Hz 31 25 50 00 720p 750p 60Hz 45 00 60 00 720p 750p 50Hz 37 50 50 00 1080i 1125i 60Hz 33 75 60 00 1080i 1125i 50Hz 28 13 50 00 1035i 1125i 60Hz 33 75 60 00 1152i 1...

Page 23: ......

Reviews: