background image

29

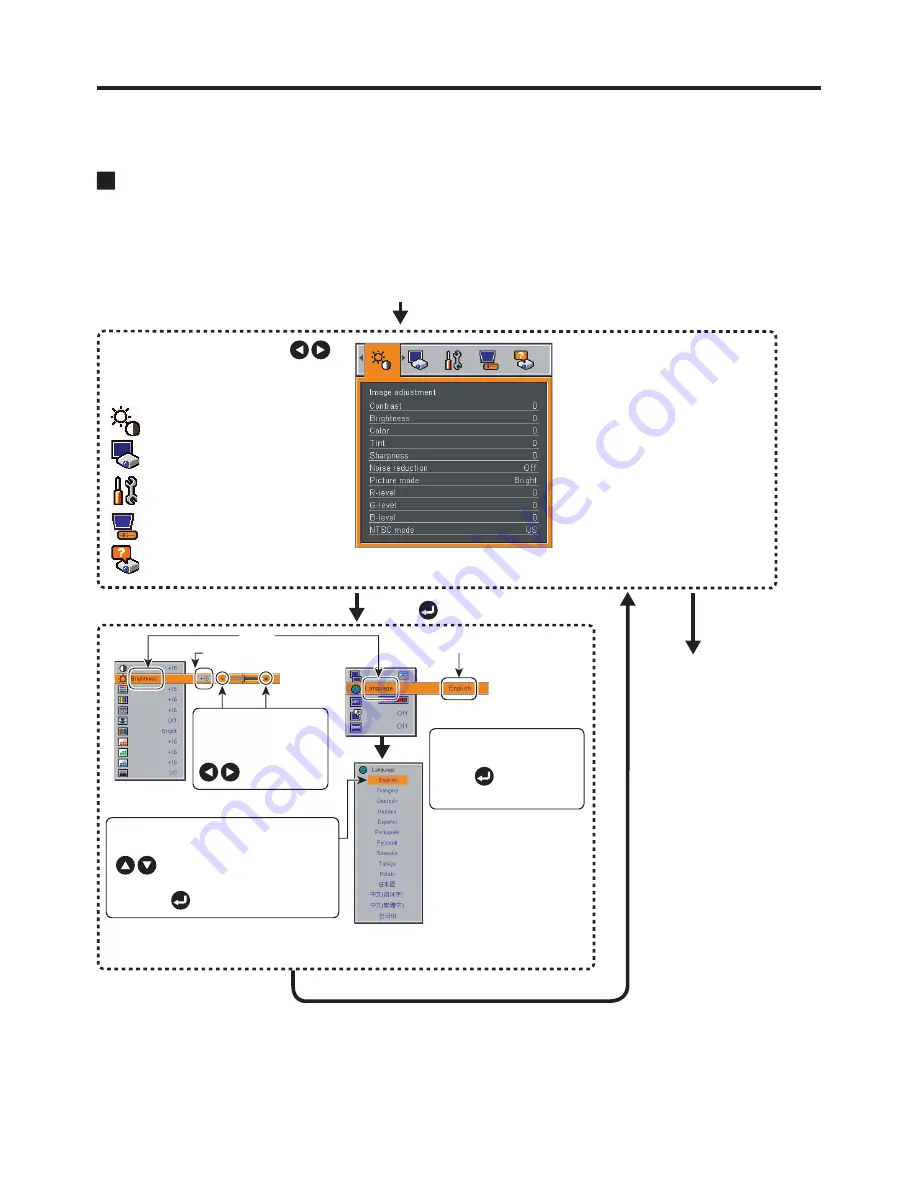
Using the menus

Display the 

Setting display

 menu.

1. Press the MENU button

2. Select a Category

3. Adjustments & Settings

Select a category by using           .
There are following five 

categories:

Displays the current 

adjustments and settings of 

selected category.

Item shown with gray cannot 

be adjusted with the current 

input source.

Image adjustment

 menu

Display setting

 menu

Default setting

 menu

Set up

 menu

The figure shows displays given for operation instructions purposes.  As the display may 

differ depending on the item, use the following pages as a reference.

Item

Adjustment/Setting Value

These marks signify 

the items can be 

adjusted/set by using

            .

These marks signify the items can 

be selected from the list by using�

            .

After an item is selected, apply it by 

pressing       .

Press       to open the menu.

Status display 

menu

These marks signify that 

there are options. 

Press         to display a 

list of options.

5. End

Press the MENU 

button

The menu disappears.

4. Back

MENU button

You can call up on-screen menus, and conduct a number of adjustments and settings 

using the operation buttons on the control panel (main unit side) and remote control.

How to use the menus

The menu shown below is for operation instructions purposes and might differ from the 

actual display.

Summary of Contents for TDP-P8

Page 1: ...ng information please contact your local authorities or the Electronic Industries Alliance www eiae org MODEL NAME TDP P8 USA only TRADE NAME DATA PROJECTOR MODEL NAME TDP P8 Tested To Comply With FCC Standards FOR HOME OR OFFICE USE FCC NOTICE This device complies with part 15 of the FCC Rules Operation is subject to the following two conditions 1 This device may not cause harmful interference an...

Page 2: ...lp RESPONSIBLE PARTY TOSHIBA AMERICA INFORMATION SYSTEMS INC 9740 Irvine Blvd Irvine CA 92618 1697 U S A Phone 949 583 3000 WARNING Changes or modifications made to this equipment not expressly approved by Toshiba or parties authorized by Toshiba could void the user s authority to operate the equipment WARNING This Class B digital apparatus complies with Canadian ICES 003 Cet appareil numérique de ...

Page 3: ...operating and other instructions 3 Source of Light Do not look into the lens while the lamp is on The strong light from the lamp may cause damage to your eyes or sight 2 Power Sources This product should be operated only from the type of power source indicated on the marking label If you are not sure of the type of power supply to your home consult your product dealer or local power company For pr...

Page 4: ...nplug this product from the wall outlet before cleaning Do not use liquid cleaners or aerosol cleaners Use a soft cloth for cleaning 8 Power Cord Protection Power supply cords should be routed so that they are not likely to be walked on or pinched by items placed upon or against them paying particular attention to cords at plugs convenience receptacles and the point where they exit from the produc...

Page 5: ...jects of any kind into this product through openings as they may touch dangerous voltage points or short out parts that could result in a fire or electric shock Never spill liquid of any kind on the product 12 Do not place the product vertically Do not use the product in the upright position to project the pictures at the ceiling or any other vertical positions It may fall down and dangerous 13 Sta...

Page 6: ... by the operating instructions as an improper adjustment of other controls may result in damage and will often require extensive work by a qualified technician to restore the product to its normal operation e If the product has been dropped or damaged in any way f When the product exhibits a distinct change in performance this indicates a need for service 17 If glass components including lens and l...

Page 7: ...m safety checks to determine that the product is in proper operating condition 21 Do not leave thermalpaper documents or easily deformed items on top of the unit or near the air exhaust for long periods of time The heat from the unit could erase the information on the thermal paper or cause deformation or warping 22 Do not use the product in a closed installation state Do not place the product in ...

Page 8: ...t from possible damage do not use the unit for at least 2 hours when there is an extreme or sudden change in temperature Place and Manner of Installation Do not place in hot locations such as near heating equipment Doing so could cause malfunction and shorten the life of the projector Avoid locations with oil or cigarette smoke Doing so will dirty the optical parts shortening their lives and darke...

Page 9: ...s no liability whatsoever for any damages arising from malfunctions arising from combination with equipment or software that is not related to Toshiba Corporation Avoid Volatile Liquid Do not use volatile liquids such as an insect spray near the unit Do not leave rubber or plastic products touching the unit for a long time They will leave marks on the finish If cleaning with a chemically saturated ...

Page 10: ...se be caused by inappropriate waste handling of this product For more detailed information about recycling of this product please contact your local city office your household waste disposal service or the shop where you purchased the product This product contains substances which are harmful to humans and the environment The lamp contains inorganic mercury Please dispose of this product or used la...

Page 11: ...mes reduced replace both batteries with new ones If the batteries are dead or if you will not be using the remote control for a long time remove the batteries to prevent battery acid from leaking into the battery compartment Using the batteries improperly may cause them to explode or leak and lead to burn or injury If battery leaking fluid contacts skin wash the fluid off immediately with clean wate...

Page 12: ...ower off 25 Adjusting the Projested Image 26 Adjusting the Projector Image Height 26 Adjusting the Projector Zoom Focus 27 Adjusting Projection Image Size 27 Adjusting the screen size and focus 28 Using the menus 29 How to use the menus 29 The image adjustment menu 30 The display setting menu 31 The default setting menu 32 Manual adjustments and settings 33 Displaying Information Status display 34...

Page 13: ...ted Owner s manual Getting started and Acrobat The supplied CD ROM contains an owner s manual including information not available for The supplied CD ROM contains an owner s manual including information not available for Reader to view the manual Reader to view the manual Installing Acrobat Reader Reader Windows Run the CD ROM select the Reader English folder and run ar500enu exe Follow the on scr...

Page 14: ...etailed information 2 Zoom Lever 3 Focus Ring 4 Projection lens 5 Lens Cap 6 Foot adjuster 7 Front foot adjuster release button 8 Infrared remote sensor 9 Rear panel Connection external devices 10 AC IN socket Main Unit Product Overview 8 2 4 3 6 7 1 9 5 1 8 10 ...

Page 15: ...ates the status of the lamp has developed a problem 4 ON STANBY button Refer to page 24 for more information Turns the projector on or off 5 MENU button Open saves and exits the on screen menu 6 button The directional buttons are used to select the desired menu items and to make adjustments when the onscreen menu is activated Refer to page 18 for more information 7 ENTER button Accepts the selecte...

Page 16: ...R IN terminal RGB Input analog RGB signal from a computer or other source or a component video signal Y PB PR from video equipment 4 Video IN terminal 5 S Video IN terminal 6 USB terminal for remote mouse control 7 Antitheft lock hole Attach a safety cable or any other antitheft device 7 6 5 4 3 2 1 The projector is a moveable equipment ...

Page 17: ...nu Press Menu to launch the on screen display OSD menu To exit OSD press Menu again Keystone Adjusts image distortion caused by tilting the projector 15 de grees Enter Confirm your selection of items Auto Set Automatically synchronizes the projector to the input source Remote Control Control Panel Control Panel Remote Control There are two ways for you to control the functions Re mote Control and C...

Page 18: ...J MODE button Switches remote control mode 13 FREEZE button Pauses image 14 MUTE button Cuts off the picture 15 L CLICK button Left button click of remote control mouse CAUTION Do not look into the laser light source of the remote control or direct the laser pointer toward a person or a mirror Handing and adjusting other than described here may lead to dangerous exposure to laser 8 9 10 1 3 2 13 1...

Page 19: ...tteries from remote control when not using for extended periods If the remote control stops working or if its range decreases replace all the batteries with new ones The remote control The remote control may fail to operate if the infrared remote sensor is exposed to bright sunlight or fluorescent lighting Do not drop or bang Do not leave in hot or humid locations Do not get wet or place on top of ...

Page 20: ...e projector that might obstruct the infrared beam PJ Mode Functions as a select button If no menu is displayed operate INPUT KEYSTONE AUTO SET button PC Mode Functions as a mouse pointer control Pressing displays a laser pointer regardless of the mode PC Mode Functions as a down button Used to go forward on Microsoft PowerPoint PowerPoint slides etc slides etc PC Mode Functions as an up button Use...

Page 21: ...ion is available when the remote control is set to PC Mode See Switching operation modes Point the Mouse remote control at the mouse remote control receiver and operate the remote controlfs buttons Moving the mouse pointer Move the pointer control button in the direction that you wish the mouse pointer to move then press To left click Press the L CLICK button To right click Press the R CLICK butto...

Page 22: ...re the timing of the dis play mode is compatible with the projector Refer to the Com patibility Modes section on page 40 Due to the differ ence in applications for each country some regions may have different ac cessories S Video Output Video Output DVD Player Settop Box HDTV receiver 1 Power Cord 2 VGA Cable 3 Video Cable not supplied 4 D sub15p to YPbPr cable not supplied 5 S VIDEO cable not sup...

Page 23: ...air intake or exhaust Doing so could cause a fire due to internal overheating Do not place your hands face or other objects near the air exhaust Doing so could cause burns deform break the object Notes The start up screen will disappear after a moment You can dismiss the start up screen before this by performing any operation You can also configure the start up screen not to appear via the Display s...

Page 24: ... standby mode A B When cooling lamp After cooling complete A During cooling the POWER indicator flashes In this state the power cannot be turned back on If you are in a hurry there is no problem with unplugging the power cord or turning off the power consunption in this state In standby mode Note The projector consumes about 3 4W of power in standby We recommend that you unplug the power cord or tu...

Page 25: ... image 1 Press the foot adjuster button 2 Raise the image to the desired height angle then re lease the button to lock the foot adjuster into position 3 Use to fine tune the display angle To lower the image 1 Press the foot adjuster button 2 Lower the image then release the button to lock the foot adjuster into position 3 Use to fine tune the display angle 1 Tilt Adjusting Wheel Installation Continu...

Page 26: ... x 103 35 350 0 x 262 5cm 196 85 x 147 64 500 0 x 375 0cm 240 16 x 180 12 610 0 x 457 5cm Min WxH 25 68 x 19 26 65 2 x 48 9cm 51 35 x 38 51 130 4 x 97 8cm 85 59 x 64 19 217 4 x 163 0cm 119 82 x 89 87 304 3 x 228 3cm 171 17 x 128 38 434 8 x 326 1cm 208 83 x 156 62 530 4 x 397 8cm 4 99 1 5m 9 84 3 0m 16 40 5 0m 22 97 7 0m 32 81 10 0m 40 03 12 2m Screen Diagonal Screen Size Distance Focus Ring Zoom L...

Page 27: ... projector supports a wide range of RGB signals any resolutions not supported by this projector XGA will be expanded or shrunk which will affect image quality slightly To view high quality images it is recommended that the computer s external output should be set to XGA resolution With some models of computer having LCD displays or the like displaying images simultaneously on the projector and the...

Page 28: ...e the following pages as a reference Item Adjustment Setting Value These marks signify the items can be adjusted set by using These marks signify the items can be selected from the list by using After an item is selected apply it by pressing Press to open the menu Status display menu These marks signify that there are options Press to display a list of options 5 End Press the MENU button The menu ...

Page 29: ...brightness of the image Darker Brighter Yes Yes Yes Color Adjust the color of the image Lighter Deeper No Yes Yes Tint 1 Adjust the tint of the image color Reddish Greenish No No Yes Sharpness Adjust the sharpness of the image Softer Sharper No Yes Yes Noise reduction Set the function to reduce screen noise On Enable Off Disable No Yes Yes Picture mode Press Toggle the picture mode with Bright Tru...

Page 30: ...isplay icons as function guides On Off Start up screen Display start up screen when power is turned on On Off Note If Thru is selected for screen size portions exceeding the native resolution 1024 768 pixels will not appear on the screen Note that for RGB signals with clock frequency 140MHz or lower all input pixel signals are sampled However if the clock speed is higher than this the RGB pixel si...

Page 31: ...tch with and Off not turned off 1 min 5 min 10 min 30 min 60 min Auto input search Set whether the input with signals is only selected or not On Off Lamp power Note 1 Sets the lamp power Low Standard Fan mode Note 2 Sets the cooling fan speed Standard High Reset all Press Resets all adjustments and settings to their factory settings Yes No Notes 1 When Lamp power is set to Low the screen becomes a...

Page 32: ...ne Correct the keystone trapezoid distortion of the screen Screen shrinking Screen shrinking downward upward Yes Yes Yes Auto setting Automatically adjusts items such as the samplingphase depending on the type of input signal Press the MENU button Yes No No Phase Adjust with to eliminate flicker Yes No No Frequency Adjust with to eliminate periodic patterns and flickering when many vertical lines ap...

Page 33: ... Yes Yes Lamp reset count The count for lamp replacement Yes Yes Yes Total time The total time that this projector is used Yes Yes Yes Version Firmware version Note 5 Yes Yes Yes Notes 1 The mode of supported RGB signals p 39 is shown 2 Same as the refresh rate of the computer signal 3 Sync signal polarity shown as P positive or N negative for H V 4 Displays Lamp time as a measure of when the lamp...

Page 34: ...If you are using a PC For Windows 3 x 1 In the Windows Program Manager double click the Windows Setup icon in the Main group 2 Verify that your display resolution setting is less than or equal to 1280 x 1024 For Windows 95 98 2000 XP 1 From the My Computer icon open the Control Panel folder and double click the Display icon 2 Select the Settings tab 3 Click on the Advanced Properties button If the...

Page 35: ...Book com puter is not displaying a presentation If you are using a Notebook PC Some Notebook PCs may deactivate their own screens when a second display device is in use Each has a different way to be reactivated Refer to your computer s documentation for detailed information Problem Image is unstable or flickering Use Phase to correct it Refer to page 33 Change the monitor color setting from your c...

Page 36: ...an t select 4 3 aspect ratio type on your DVD player please select 4 3 aspect ratio in the on screen menu Problem Image is reversed Select Default setting from the OSD and adjust the projection direction See page 32 Problem Lamp burns out or makes a popping sound When the lamp reaches its end of life it will burn out and may make a loud popping sound If this happens the projector will not turn on ...

Page 37: ...ause injury if it is dropped 1 3 4 2 Appendices Continued Used Lamps This projector s lamps contain trace amounts of environmentally harmful inorganic mercury Be careful not to break used lamps and dispose of them in accordance with local regulations Lamp Replacing Procedure 1 Switch off the power to the projector by pressing the Power button twice 2 Allow the projector to cool down at least 1 hou...

Page 38: ...time every 100 hours This display disappears when you press button Attach the outer lamp cover correctly so that it is not loose If it is not attached correctly the projector may fail to be powered on or the lamp may fail to come on Always replace the lamp with a new one The lamp is made out of glass Do not touch the glass surface with your bare hands bang it or scratch it Dirt jolts scratches and...

Page 39: ...08 37 86 35 640x400 640x400_85 85 08 37 86 35 640x480 VGA_60 59 94 31 46 25 17 VGA_72 72 8 37 86 31 5 VGA_75 75 37 5 31 5 VGA_85 85 43 26 36 720x400 720x400_70 70 31 5 32 720x400_85 85 03 37 92 35 5 800x600 SVGA_56 56 25 35 15 36 SVGA_60 60 3 37 87 40 SVGA_72 72 18 48 07 50 SVGA_75 75 46 87 49 5 SVGA_85 85 06 53 67 56 25 1024x768 XGA_60 60 48 36 65 XGA_70 70 06 56 47 75 XGA_75 75 02 60 02 78 75 XG...

Page 40: ...1 0Kg 200 x 75 3 x 154 2 mm WxHxD AL MG alloy PC ABS resin Temp 5 o C to 35 o C Relative humidity 30 to 70 1 Chip DMD 786 432 pix els 1024H x 768V Zoom lens F 2 7 2 88 f 28 43 32 73 mm High pressure mercury lamp 31 7 300 inches 1 5m 12 2m Mini D sub 15 pin RGB Y PB PR Dual use RCA Pin Jack Mini DIN 4 pin For mouse remote control Notes This model complies with the above specification Designs and spe...

Page 41: ... of mercury gas enclosed in the lamp along with glass dust may be released from the openings for ventilation Immediately replace the lamp when a sign ap pears on the screen When the replacement time approaches a message will appear on the screen The risk of burst will increase if the lamp is continuously used with out being replaced Frequently check the used hours and prepare spares when the repla...

Page 42: ...le with care to avoid injury due to broken pieces and contact your dealer for repair service Lens cleaning Clean the lens with a commercially available blower and or lens cleaner The lens is easily scratched so do not rub it with hard objects or strike it Main unit cleaning Clean the main unit after unplugging the power cord Wipe dirt off the main unit gently with a soft cloth Do not wipe the main...

Reviews: