background image

Operation

31

English

Using the menus

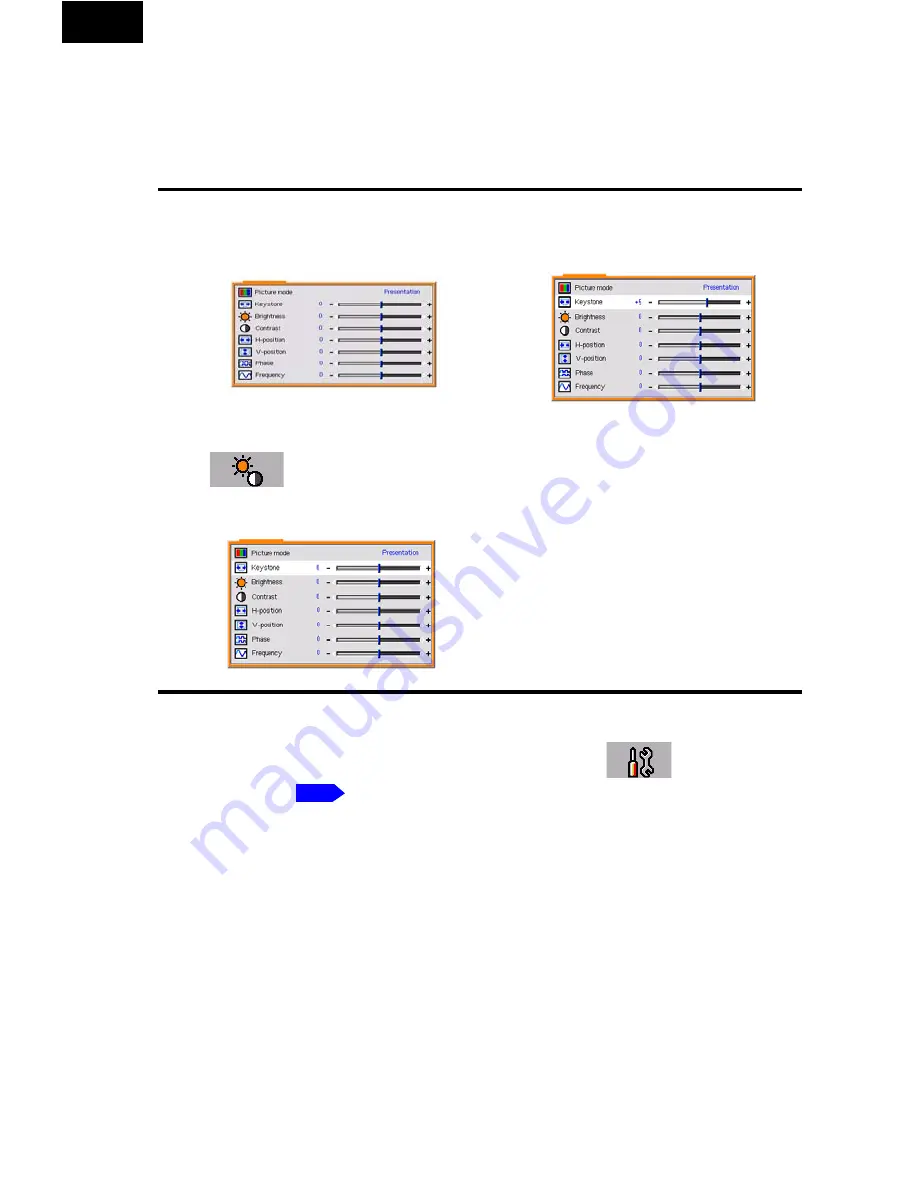
The projector is equipped with on-screen display (OSD) menus for making 
various adjustments and settings.
The following example describes the adjustment of the keystone.  

There are 10 different menu languages. Before making adjustments, you may 

choose a suitable OSD language in the 

Default setting


Language


menu. 

(Refer to 

 for more details.)

1.

Press the 

MENU

 button on the 

projector or remote control to turn 
the on-screen menu on.

2.

Use 

3

 /

4

 button on the projector or 

on the remote control to select 


Image adjustment

 and 

press 

5

 or 

6

 button to select 

Keystone

.

3.

Adjust keystone values by 
pressing 

3

/

4

 on the 

projector or remote control.    

4.

Press the 

MENU

 button to 

leave and save the settings.

p.34

Summary of Contents for TDP-P75

Page 1: ...English Owner s Manual DATA Projector TDP P75 ...

Page 2: ...s For disposal or recycling information please contact your local authorities or the Electronic Industries Alliance www eiae org MODEL NAME TDP P75 FCC NOTICE This device complies with part 15 of the FCC Rules Operation is subject to the following two conditions 1 This device may not cause harmful interference and 2 this device must accept any interference received including interference that may ...

Page 3: ...nician for help RESPONSIBLE PARTY TOSHIBA AMERICA INFORMATION SYSTEMS INC 9470 Irvine Blvd Irvine CA 92618 1697 U S A Phone 949 583 3000 WARNING Changes or modifications made to this equipment not expressly approved by Toshiba or parties authorized by Toshiba could void the user s authority to operate the equipment Notice This Class B digital apparatus complies with Canadian ICES 003 Cet appareil ...

Page 4: ...POSED TO DANGEROUS VOLTAGE REFER SERVICING TO QUALIFIED SERVICE PERSONNEL ONLY 1 Read owner s manual After unpacking this product read the owner s manual carefully and follow all the operating and other instructions 2 Power sources This product should be operated only from the type of power source indicated on the marking label If you are not sure of the type of power supply to your home consult y...

Page 5: ...basement or near a swimming pool 7 Cleaning Unplug this product from the wall outlet before cleaning Do not use liquid cleaners or aerosol cleaners Use a soft cloth for cleaning 8 Power cord protection Power supply cords should be routed so that they are not likely to be walked on or pinched by items placed upon or against them paying particular attention to cords at plugs convenience receptacles ...

Page 6: ...res at the ceiling or any other vertical positions The product may fall over causing personal injury or product damage 13 Attachments Do not use attachments not recommended by the product manufacturer as they may cause hazards 14 Do not stack components Do not stack other equipment on this product or stack this product on other equipment The top and bottom surfaces of this product develop heat and...

Page 7: ...aler for repair service This product incorporates glass components including the lens and lamp If such parts should break please handle with care to avoid injury Contact your dealer for repair service The broken pieces of glass may cause injury In the unlikely event of the lamp rupturing thoroughly clean the area around the projector and discard any edible items placed in that area 18 Servicing Do...

Page 8: ...mal paper or cause deformation or warping 22 Do not use the product in a closed installation state Do not place the product in a box or in any other closed installation state Otherwise it may overheat This could result in a risk of fire Plug configuration Plug type Line voltage Plug configuration Plug type Line voltage EURO 220 240V Australian 240V 10A 200 240V UK 220 240V Switzerland 240V 6A 200 ...

Page 9: ... the projector Avoid locations with oil or cigarette smoke which can affect the quality and useful life of the product s optical parts and darken the screen Do not use the product vertically in any upright position or slantwise at an angle of 20 degrees or more Using this product near a TV or radio may cause interference in the image or sound If this happens move it away from the TV or radio In a ...

Page 10: ...roblems Toshiba Corporation bears no responsibility for incidental damages lost profit work interruption corruption or loss of the memory contents etc arising from the use of or the inability to use this unit Toshiba Corporation accepts no liability whatsoever for any damages arising from not having followed the descriptions in this Instruction Manual Toshiba Corporation accepts no liability whats...

Page 11: ...accordance with local regulations WEEE Directive Following information is only for EU member states The use of the symbol indicates that this product may not be treated as household waste By ensuring this product is disposed of correctly you will help prevent potential negative consequences for the environment and human health which could otherwise be caused by inappropriate waste handling of this...

Page 12: ...different battery types or combine used batteries with new ones If the remote control does not operate correctly or if the operating range becomes reduced replace both batteries with new ones If the batteries are dead or if you will not be using the remote control for a long time remove the batteries to prevent battery acid from leaking into the battery compartment Using the batteries improperly m...

Page 13: ...ctions 17 Remote control 18 Preparing and using the remote control 19 Operating a computer using the remote control 21 Positioning your projector 22 Choosing a location 22 Projection distance and size 23 Connection 23 Connecting to a computer 24 Connecting to a Component Video device 24 Connecting Video and S Video devices 25 Operation 26 Start up 26 Adjusting the image 27 Adjusting the height 27 ...

Page 14: ...ion menu 35 Additional Information 36 Care of the projector 36 Cleaning the lens 36 Cleaning the projector case 36 Storing the projector 37 Transporting the projector 37 About the lamp 37 Lamp warning message 38 Replacing the lamp 38 Indicator lights 40 Troubleshooting 41 Specifications 42 Projector specifications 42 Dimensions 43 Signal timing 43 Regulation statements 45 FCC statement 45 EEC stat...

Page 15: ...al Run the CD ROM and double click on Start pdf Acrobat ReaderTM launches and the menu screen of the Owner s manual appears Click on your language The Owner s Manual cover and list of bookmarks appear Click on a bookmark title to view that section of the manual Click on to view a reference page with related information See the Help menu for more information about Acrobat ReaderTM Projector Soft ca...

Page 16: ... Projection lens Focus ring and zoom ring AC IN socket Antitheft lock hole Lens cap Air exhaust S Video terminal Rear IR remote sensor Audio in terminal RGB signal input PC YPBPR YCBCR terminal USB terminal For service purpose only Video terminal Monitor out terminal Audio out terminal Lamp cover Tilt adjuster Front adjuster foot Tilt adjuster Tilt adjuster Speaker ...

Page 17: ...reen menu is not activated the 3 and 4 buttons function as VOLUME decrease and VOLUME increase hot keys 5 INPUT button Sequentially selects the input signal RGB YPBPR Video or S Video 6 LAMP indicator Indicates the status of the lamp Lights up or flashes when the lamp has developed a problem 7 TEMP indicator Flashes red if the projector s temperature becomes too high 8 ON indicator Lights up or fl...

Page 18: ...tton 11 button This control functions as a computer s button 12 PJ MODE button Switches remote control mode 13 FREEZE button Pauses image 14 MUTE button Cuts off the picture and sound temporarily 15 L CLICK button Left button click of remote control mouse 4 7 6 1 8 10 3 2 13 14 11 12 5 15 R CLICK ESC AUTO MENU INPUT 9 EN TE R IN P U T PLA Y Mouse remote control receiver Remote Control Remote contr...

Page 19: ...wet objects Do not take apart In rare cases ambient conditions could impede the operation of the remote control If this happens point the remote control at the main unit again and repeat the operation Q Loading dry cell batteries into the remote control 1 Remove the battery cover 2 Insert the dry cell batteries Be sure to align the plus and minus ends of the batteries properly 3 Replace the batter...

Page 20: ...de If no operations are made for 30 seconds this light goes out and the remote switches back to PC Mode Computer operation mode PJ Mode Functions as a select button If no menu is displayed adjusts volume PC Mode Functions as a mouse pointer control Pressing displays a laser pointer regardless of the mode PC Mode Functions as a down button Used to go forward on Microsoft PowerPoint slides etc PC Mo...

Page 21: ... is available when the remote control is set to PC Mode See Switching operation modes Point the Mouse remote control at the mouse remote control receiver and operate the remote controlfs buttons Moving the mouse pointer Move the pointer control button in the direction that you wish the mouse pointer to move then press To left click Press the L CLICK button To right click Press the R CLICK button T...

Page 22: ...jury If you wish to mount the projector on the ceiling be sure to ask your dealer to do so Mounting the projector on a ceiling requires special ceiling brackets sold separately and specialized knowledge Improper mounting could cause the projector to fall resulting in an accident I Floor front Select this location with the projector placed near the floor in front of the screen This is the most comm...

Page 23: ...sure that the cables are firmly inserted In the connections shown below cables are not included with the projector see Cables are commercially available from electronics stores a is the distance m between the lens and the screen and corresponds to a range of 1 15 m to 10 00 m H is the height from the image bottom to the center of the lens a min length a max length projection size inches projection...

Page 24: ...FN and the labeled function key simultaneously Refer to your laptop s documentation to learn your laptop s key combination Audio out terminal accepts a stereo connector but signal is monaural The output volume from the Audio out terminal can be adjusted by the volume buttons Connecting to a Component Video device The projector is capable of accepting a Component Video signal Use a Component Video ...

Page 25: ... not displayed after the projector is turned on and the correct video source has been selected check that the video source is turned on and operating correctly Also check that the signal cables have been connected correctly S Video or Video devices S Video cable Audio cable Video cable or ...

Page 26: ...start to search for input signals The projector screen displays the current input source being scanned at the upper left corner of the screen If no input source signal is detected the search will continue until an input source signal is detected 7 You can also press the INPUT button on the projector or remote control to select an input signal to display For more information refer to If the frequen...

Page 27: ...screen and the projector are not perpendicular to each other the projected image becomes vertically trapezoidal To correct this situation adjust the value of Keystone in the Picture menu on the projector control panel or on the remote control Auto adjusting the image In some cases you may need to optimize the picture quality To do this press the AUTO button on the control panel of the projector or...

Page 28: ...button on the projector or the remote control Go to the Image adjustment Keystone menu and adjust the values by pressing 3 4 button on the projector or remote control For example Switching input signals The projector can be connected to multiple devices at the same time To sequentially select input sources press the INPUT button on the projector control panel or the remote control The selected inp...

Page 29: ...r dark and the lamp could burn out This is characteristic of a lamp and is not malfunction The lifetime of the lamp depends on conditions of use The DMDTM is made using extremely advanced technology but there may be black spots pixels that do not light or bright spots pixels that are constantly lit on the panel Please note that these are not malfunctions CAUTION Do not block the projection lens fr...

Page 30: ...mode Keystone Brightness Contrast H position V position Phase Frequency Picture mode Keystone Brightness Contrast Color Tint Sharpness Display setting menu Volume OSD time Reset all Screen size Aspect ratio Volume OSD time Reset all Screen size Aspect ratio Default setting menu Projection mode Auto input search Language Start up screen Fan mode Power on Information menu Input Resolution Picture mo...

Page 31: ...tments you may choose a suitable OSD language in the Default setting Language menu Refer to for more details 1 Press the MENU button on the projector or remote control to turn the on screen menu on 2 Use 3 4 button on the projector or on the remote control to select Image adjustment and press 5 or 6 button to select Keystone 3 Adjust keystone values by pressing 3 4 on the projector or remote contr...

Page 32: ...eo Signal Input 1 Standard It is suitable for enjoying TV movies 2 Cinema With a lower color temperature it is suitable for enjoying cinematic movies 3 Economic Use this mode to reduce system noise and reduce power consumption by 20 The lamp life is also extended with lower light output Economic mode is effective from the next power on after turn off standby the projector Keystone Corrects any key...

Page 33: ...e to reduce image distortion Frequency Adjusts the horizontal width of the image Color Increases or decreases the color intensity of the image Tint Adjusts the color tones of the image Sharpness Adjusts the image to make it look sharper or softer 30 30 30 30 FUNCTION DESCRIPTION Volume Adjusts the volume level OSD Time Sets the length of time the OSD will remain active after your last button press...

Page 34: ... screen Enables the user to select which logo screen will appear during projector start up Three modes are available Default Toshiba logo black screen or blue screen Fan mode A mode used for extreme environments like high altitude We recommend you set High when your environment is higher than 3000 feet above sea level Press 3 or 4button on the projector or remote control to select Operation under ...

Page 35: ...UNCTION DESCRIPTION Input Shows the current signal source Resolution Shows the native resolution of the input signal Picture mode Shows the selected mode in the Image adjustment menu Lamp time Displays the number of hours the lamp has been used Video mode Shows the Video input system format NTSC SECAM or PAL ...

Page 36: ... touch the lens with your bare hands or rub the lens with abrasive materials products such as paper towels can damage the lens coating ALWAYS use a photographic lens brush or lens cleaning cloth and solution NEVER attempt to clean the lens while the projector is on or while it is still hot from previous use Cleaning the projector case CAUTION HOT SURFACE Before cleaning the lens turn the projector...

Page 37: ...eatly by lamp Some may burst shortly after first use Burst is likely to happen if the lamp is used after the replacement period has elapsed When the lamp bursts the broken pieces of glass may get inside the product or be released outside from the openings for ventilation When the lamp bursts a slight amount of mercury gas enclosed in the lamp along with glass dust may be released from the openings...

Page 38: ...r extended periods images will appear dark and the lamp could burn out This is characteristic of a lamp and is not malfunction The lifetime of the lamp depends on condition of use If this happens replace it with a new one Message Status The lamp has been in operation for 2000 hours Install a new lamp for optimal performance WARNING If the projector is mounted on the ceiling ask your Toshiba dealer...

Page 39: ...ll the lamp out of the projector Pulling it too quickly may cause the lamp to break and scatter broken glass in the projector Do not place the lamp in locations where water might splash on it children can reach it or near flammable materials Do not insert your hands into the projector after the lamp is removed If you touch the optical components inside it could cause color unevenness and distortio...

Page 40: ...conds after the power is turned off Cannot turn on the projector POWER TEMP LAMP State Remark Off Off Red The lamp has exceeded its usage life Solution Install a new lamp Red Red Off The internal temperature is too high The intake ventilation or the exhaust ventilation is blocked The projector may be in a poorly ventilated location The ambient temperature may be too high The fans are not working S...

Page 41: ... not been correctly selected Select the correct input signal with the INPUT buttons on the remote control or INPUT on the projector Image is unstable The connection cables are not securely connected to the projector or the signal source Correctly connect the cables to the appropriate terminals Picture is blurred The projection lens is not correctly focused Adjust the focus of the lens using the fo...

Page 42: ...sions 238 mm W x 86 8 mm H x 180 mm D Weight 4 2 lbs 1 9 Kg Input terminal RGB YPBPR input Mini D sub 15 pin female S VIDEO Mini DIN 4 pin port x 1 VIDEO RCA x 1 Audio in Mini stereo USB Mini type B Service purpose only Output terminal Monitor out Mini D sub 15 pin female Audio out Mini stereo variable Output Speaker 1 watt x 1 Environmental requirements Operating altitude and temperature 0 35 C f...

Page 43: ...VGA_72 37 500 75 000 31 500 VGA_75 43 269 85 008 36 000 VGA_85 800 x 600 37 879 60 317 40 000 SVGA_60 48 077 72 188 50 000 SVGA_72 46 875 75 000 49 500 SVGA_75 53 674 85 061 56 250 SVGA_85 1024 x 768 native 48 363 60 004 65 000 XGA_60 56 476 70 069 75 000 XGA_70 60 023 75 029 78 750 XGA_75 68 667 84 997 94 500 XGA_85 1280 x 1024 63 981 60 020 108 000 SXGA3_60 Signal Format Horizontal Frequency kHz...

Page 44: ...nd S Video inputs Video mode Horizontal Frequency kHz Vertical Frequency Hz Color sub carrier Frequency MHz NTSC 15 73 60 3 58 PAL 15 63 50 4 43 SECAM 15 63 50 4 25 or 4 41 PAL M 15 73 60 3 58 PAL N 15 63 50 3 58 PAL 60 15 73 60 4 43 NTSC4 43 15 73 60 4 43 ...

Page 45: ...o try to correct the interference by one or more of the following measures Reorient or relocate the receiving antenna Increase the distance between the equipment and receiver Connect the equipment into an outlet on a circuit different from that to which the receiver is connected Consult the dealer or an experienced radio TV technician for help EEC statement This machine was tested against the 89 3...

Reviews: