background image

TD-X552M/TD-X552X

17

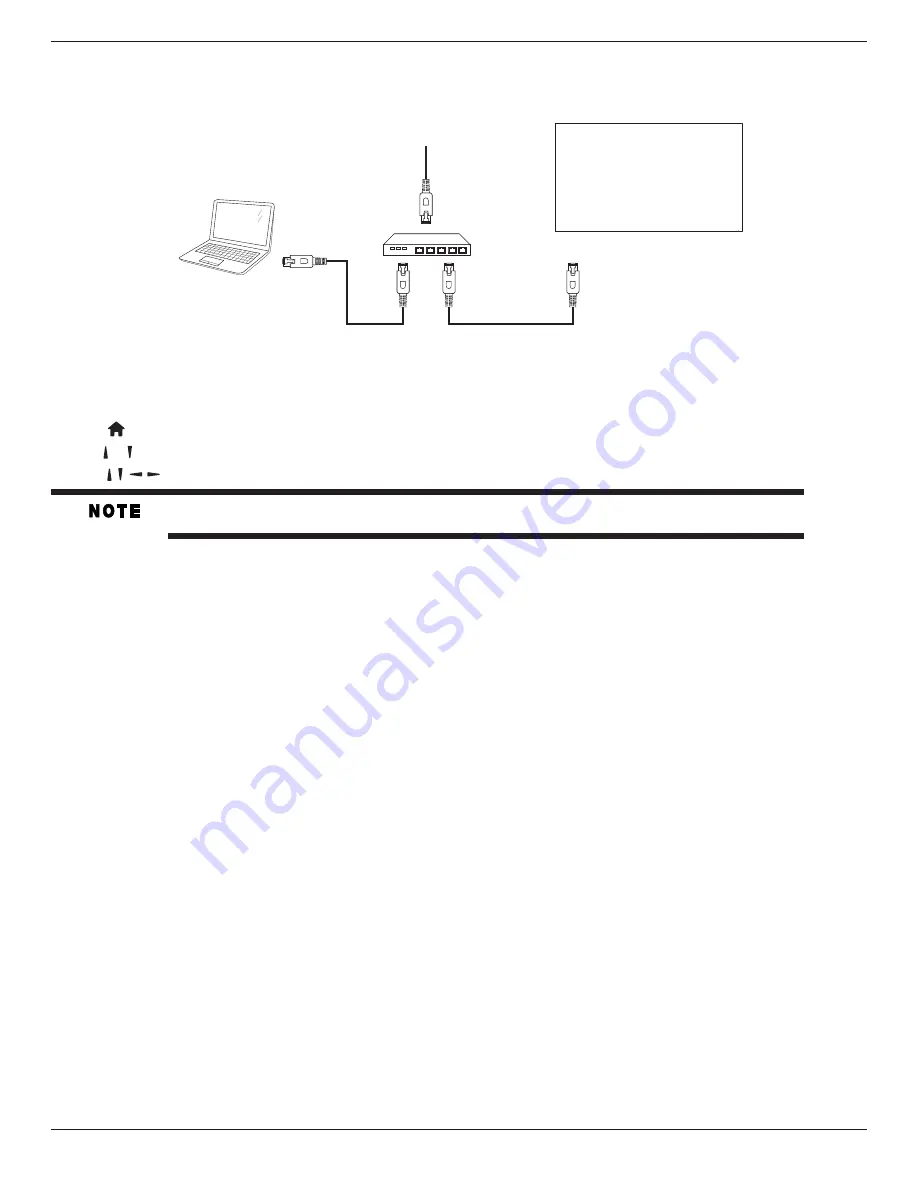
3.7.  Wire-connecting to Network

If you connect this display to existing network, you can play photos, music and videos from your computer. See 

Play multimedia files via Local Area Network 

(Page 18) for more details.

PC

[RJ-45]

[RJ-45]

ROUTER

INTERNET

To setup the network:

1.  Switch on the router and switch on its DHCP setting.
2.  Connect the router to this display with an Ethernet cable.
3.  Press 

[ ] HOME


button to display the OSD menu

.

4.  Press   or


 button to select the menu item {

Network setting

}

Press 

OK

 button to enter its submenu

.

5.  Press   ,


,


,   

or number button to adjust its value. Press 

OK

 button to confirm.

Connecting with a shielded CAT-5 Ethernet cable to comply with the EMC directive.

Summary of Contents for TD-X552M

Page 1: ...LCDDisplayMonitor User sGuide TD X552M TD X552X 04 15 ...

Page 2: ...oint where they exit from the apparatus Grounding prong 11 Only use attachments accessories specified by the manufacturer 12 Refer all servicing to qualified service personnel Servicing is required when the apparatus has been damaged in any way such as power supply cord or plug is damaged liquid has been spilled or objects have fallen into the apparatus the apparatus has been exposed to rain or mo...

Page 3: ...ots or openings in the monitor cabinet back bottom and sides Never place the monitor on a bed sofa rug or similar surface too close to drapes curtains or walls or in a confined space such as a bookcase built in cabinet or any other place with poor ventilation 32 Always leave a space of at least 10cm 4 four inches around the monitor The slots and openings are provided to protect the monitor from ov...

Page 4: ...nce to radio communications However there is no guarantee that interference will not occur in a particular installation If this equipment does cause harmful interference to radio or television reception which can be determined by turning the equipment off and on the user is encouraged to try to correct the interference by one or more of the following measures Reorient or relocate the receiving ant...

Page 5: ...ulting from these symptoms 1 An afterimage ghost may appear on the screen if a fixed non moving image appears for a long period of time The afterimage is not permanent and will disappear in a short period of time 2 The LCD panel contained in this monitor is manufactured using an extremely high level of precision technology however there may be an occasional pixel dot of light that does not operate...

Page 6: ...external speakers 13 3 3 2 Connecting an external audio device 14 3 4 Connecting Multiple Displays in a Daisy chain Configuration 14 3 4 1 Display control connection 14 3 4 2 Digital video connection 14 3 4 3 Analog video connection 15 3 5 IR connection 16 3 6 IR Pass through Connection 16 3 7 Wire connecting to Network 17 4 Operation 18 4 1 Display the ConnectedVideo Source 18 4 2 Change Picture ...

Page 7: ...s an imminently hazardous situation which if not avoided will result in death or serious injury Indicates a potentially hazardous situation which if not avoided could result in death or serious injury Indicates a potentially hazardous situation which if not avoided may result in minor or moderate injury Indicates a potentially hazardous situation which if not avoided may result in property damage ...

Page 8: ...e of the power socket and has been approved by and complies with the safety regulations of the particular country You might like to save the package box and packing material for shipping the display 1 3 Installation Notes Due to the high power consumption always use the plug exclusively designed for this product If an extended line is required please consult your service agent The product should b...

Page 9: ...d place the display face down on the protective sheet 4 After inserting the stand in the guide block tighten the screws on both sides of the display The longer side of the stand should face the front of the display Carrying handle Thumbscrews Longer portions face the front Table stand Guide block To remove table stands 1 Power off the display 2 Spread a protective sheet on a flat surface 3 Grab th...

Page 10: ...For the wall mounting kit use M6 mounting screws having a length 10 mm longer than the thickness of the mounting bracket and tighten them securely 5 Unit without base weight 29 2 kg The equipment and its associated mounting means still remain secure during the test For use only with UL Listed Wall Mount Bracket with minimum weight load 87 6 kg 1 5 1 VESA Grid TD X552M TD X552X 400 H x 400 V mm To ...

Page 11: ...socket near the display 1 8 Avoiding Image Retention Do not display static non moving content on the display for long periods of time This may cause image burn in or image retention which is not covered under warranty Avoid Static Content Display dynamic moving images whenever possible Turn off the display when not in use or use the scheduling feature refer to General Setting on page 23 to automat...

Page 12: ...vel while OSD menu is off 6 button Move the highlight bar up to adjust the selected item while OSD menu is on 7 button Move the highlight bar down to adjust the selected item while OSD menu is on 8 MENU button Return to previous menu while OSD menu is on or to activate the OSD menu when OSD menu is off 9 Remote control sensor and power status indicator Receives command signals from the remote cont...

Page 13: ...r the use of remote control signal from control center 8 HDMI1 IN 9 HDMI2 IN HDMI video audio input 10 DVI IN DVI D video input 11 DVI OUT VGA OUT DVI orVGA video output 12 DisplayPort IN 13 DisplayPort OUT DisplayPort video input output 14 VGA IN D Sub VGA video input 15 COMPONENT IN BNC ComponentYPbPr video source input 16 CompositeY CVBS Video source input 17 PC LINE IN Audio input forVGA sourc...

Page 14: ... Navigate through menus and choose items 7 button Confirm an entry or selection 8 ADJUST button Access currently available options picture and sound menus 9 MUTE button Press to turn the mute function on off 10 COLOR buttons Choose tasks or options 11 Number ID SET ENTER button Enter text for network setting Press to set the display ID Refer to 2 3 2 ID Remote Control for more detail 12 FORMAT but...

Page 15: ... display you want to contro For example press 0 and 1 for display No 1 press 1 and 1 for display No 11 The numbers available are from 01 255 2 Not pressing any button within 10 seconds will exit the ID Mode 3 If you mistakaly press a button wait 1 second after the red LED lights off and then lights up again then press the correct digits again 4 Press ENTER button to confirm The red LED blinks twic...

Page 16: ...sed battery acid as it can damage your skin If you do not intend to use the remote control for a long period remove the batteries 2 3 4 Handling the remote control Do not subject to strong shock Do not allow water or other liquid to splash the remote control If the remote control gets wet wipe it dry immediately Avoid exposure to heat and steam Other than to install the batteries do not open the r...

Page 17: ...al Equipment 3 1 Connecting External Equipment DVD VCR VCD 3 1 1 Using COMPONENT video input DVD VCR VCD AUDIO IN COMPONENT IN YPbPr COMPONENT Out YPbPr Audio Out R L 3 1 2 UsingVideo Source input DVD VCR VCD AUDIO IN Y CVBS IN Y CVBS Out R L ...

Page 18: ... 12 3 1 3 Using HDMI video input DVD VCR VCD HDMI Out HDMI IN 3 2 Connecting a PC 3 2 1 UsingVGA input PC VGA IN VGA AUDIO IN VGA Out D Sub 15 pin Audio Out 3 2 2 Using DVI input PC VGA AUDIO IN DVI Out Audio Out DVI IN ...

Page 19: ...52M TD X552X 13 3 2 3 Using HDMI input PC HDMI Out HDMI IN 3 2 4 Using DisplayPort input PC DisplayPort Out DisplayPort IN 3 3 Connecting Audio Equipment 3 3 1 Connecting external speakers External speakers ...

Page 20: ...ll size using a single analog source andVGA pass through connectors 2 x 2 Maximum video wall size using multiple source signals from an external splitter or distribution amplifier 10 x 10 For DP1 2 multi stream maximum video wall size is 2 x 2 3 4 1 Display control connection Connect the RS232C OUT connector of DISPLAY 1 to the RS232C IN connector of DISPLAY 2 DISPLAY 1 PC DISPLAY 2 RS 232C IN RS ...

Page 21: ...firmed types of PC and graphics card PC DP IN DP DP OUT DP IN DISPLAY 1 DISPLAY 2 Connect the DVI OUT connector of DISPLAY 1 to the DVI IN connector of DISPLAY 2 DISPLAY 1 DISPLAY 2 DVI IN HDMI DVI OUT DVI IN DVD VCR VCD 3 4 3 Analog video connection Connect the DVI OUT VGA OUT connector of DISPLAY 1 to the VGA IN connector of DISPLAY 2 PC DISPLAY 1 DISPLAY 2 VGA IN VGA DVI VGA OUT VGA IN ...

Page 22: ...52X 16 3 5 IR connection IR IN External IR Receiver This display s remote control sensor will stop working if the IR IN is connected 3 6 IR Pass through Connection DVD VCR VCD DVD VCR VCD Remote Control IR OUT IR IN ...

Page 23: ...5 ROUTER INTERNET To setup the network 1 Switch on the router and switch on its DHCP setting 2 Connect the router to this display with an Ethernet cable 3 Press HOME button to display the OSD menu 4 Press or button to select the menu item Network setting Press OK button to enter its submenu 5 Press or number button to adjust its value Press OK button to confirm Connecting with a shielded CAT 5 Eth...

Page 24: ...the most energy 4 4 Choose your Preferred Sound Settings 1 While this display is playing video source press ADJUST button 2 Press or button to choose Sound style then press button 3 Press or button to choose an option then press button Personal Apply your personalized sound settings Original Settings that suit most environments and types of audio Movie Ideal settings for movies Music Ideal setting...

Page 25: ...3 Press and to choose the directory and files to play 4 You can connect up to 4 displays to the same PC and play same media stream We suggest to use DLNA DMP function via wired network for the benefit of higher security and sufficient network bandwidth 4 7 3 How to use DLNA DMR from PC 1 Press HOME button Choose Network Settings and press View network settings Network configuration Static IP confi...

Page 26: ...ose one music track and press button To play all the tracks in a folder choose one music file Then press to Play All To skip to the next or previous track press or button To pause the track press button Press button again to resume playback To skip backward or forward 10 seconds press or button To search backward or forward press G or J button press repeatedly to toggle between different speeds To...

Page 27: ... the USB device and display on the screen choose folder from Music Movie Picture and press OK button The display start playing the file When play all the file for each format in the folder select one of the file and press Red button Then start the play all the selected format file Operation for each folder Music Movie Picture please refer to for each folder part Daisychaining is not supported on m...

Page 28: ...the non linear setting for picture luminance and contrast Tint Change the color balance Custom tint Customise color balance setting Only available if Tint Custom is chosen Video contrast Adjust video contrast Brightness Adjust screen brightness Hue Adjust screen hue Game or computer When viewing content from a connected game console choose Game to apply game settings When a computer is connected t...

Page 29: ...image to compensate for the width of the display bezels in order to accurately display the image 5 1 4 General settings Menu language Monitor ID Auto search Clock Scheduling Sleep timer Link Local KB lock RC lock Pixel shift Picture Sound Tiling General settings Network settings Menu language Choose language used for OSD menus Monitor ID Adjust the ID number for controlling the display via the RS2...

Page 30: ... 4 Schedule 5 Schedule 6 Schedule 7 USB HDMI 1 HDMI 2 DisplayPort Card OPS DVI D YPbPr AV VGA 3 Set On time Status Source On time Off time Repeat modes Playlist setting Schedule 1 Schedule 2 Schedule 3 Schedule 4 Schedule 5 Schedule 6 Schedule 7 On time Cancel Done 00 00 4 Set Off time Status Source On time Off time Repeat modes Playlist setting Schedule 1 Schedule 2 Schedule 3 Schedule 4 Schedule...

Page 31: ...l the keyboard function except the and buttons Lock but power Disable all the keyboard function except the POWER buttons Lock all expect volume and power Disable all the keyboard function except the and POWER buttons To disable the lock function from Local KB lock or RC lock item press buttons and 1 9 9 8 on the remote contro Pixel shift For video input sources you may choose On to move the screen...

Page 32: ...play Factory settings Reset all your customized settings to the factory defaults 5 2 Network Settings 1 Press HOME button choose Network Settings and press button View network settings Network configuration Static IP configuration Digital Media Render Network name Picture Sound Tiling General settings Network settings View network settings View connected network status Network Configuration Networ...

Page 33: ...3 AC3 LPCM ADPCM WMA MPEG4 SP ASP 1920x1080 6 30 8 Motion JPEG 1920x1080 6 30 8 Window Media Video v9 1920x1080 6 30 25 H 264 BP MP HP 1920x1080 6 30 25 wmv ASF MPEG4 SP ASP 1920x1080 6 30 8 WMA mp4 MP4 XVID 1920x1080 6 30 8 MP3 ADPCM AAC H 264 BP MP HP 1920x1080 6 30 25 HEMPEG4 SP ASP 1920x1080 6 30 8 3gp 3GPP MPEG1 352x288 24 25 30 30 ADPCM AAC HE AAC MPEG2 1920x1080 24 25 30 30 vro VROVOB MPEG1...

Page 34: ...8 LPCM aif Mac aiff Mac LPCM 192 768 LPCM aac mp4 m4a AAC 48 1024 AAC HE AAC v1 v2 pls m3u Playlists m4a M4A 48 1024 AAC HE AAC v1 v2 USB Photo file format type JPEG BMP PNG GIF Sound or video may not work if the contents have a standard bit rate frame rate above the compatible Frame sec listed in the table above Video content with a Bit rate or Frame rate larger than the rate specified in the tab...

Page 35: ...Hz 4 3 Modified PAL Standard 576p 50 Hz 27 MHz HDTV Resolution Standard Resolution Active Resolution Refresh Rate Pixel Rate Aspect Ratio Stand for Mode H Pixels V Lines 720p 1280 720 50 Hz 74 25 MHz 16 9 Normally DVB Mode 60 Hz 1080i 1920 1080 50 Hz 74 25 MHz 16 9 Normally ATSC Mode 60 Hz 1080p 1920 1080 50 Hz 148 5 MHz 16 9 Normally ATSC Mode 60 Hz The PC text quality is optimum in HD 1080 mode ...

Page 36: ...t lint free cloth If the surface becomes dirty soak a soft lint free cloth in a mild detergent solution Wring the cloth to remove excess liquid Wipe the surface of the display to remove dirt Then use a dry cloth of the same type to dry Do not scratch or hit the surface of the panel with fingers or hard objects of any kind Do not use volatile substances such as insect sprays solvents and thinners C...

Page 37: ...e exceeds the screen size Scan Mode may need to be set to Underscan Use the Zoom mode or Custom zoom function in the Screen menu to fine tune display geometry and time frequency parameter Can hear sound but no picture Improperly connected source signal cable Make sure that both video inputs and sound inputs are correctly connected Can see picture but no sound is heard 1 Improperly connected source...

Page 38: ... out RJ 45 RJ 45 Jack x 1 8 pin 10 100 LAN Port HDMI Input HDMI Jack x 2 Type A 18 pin Digital RGB TMDS Video Audio MAX Video 720p 1080p 1920 x 1080 60 Hz WUXGA Audio 48 KHz 2 Channel L R Supports LPCM only DVI D Input DVI D jack Digital RGB TMDS Video VGA Input D Sub Jack x 1 15 pin Analog RGB 0 7V p p 75Ω H CS V TTL 2 2kΩ SOG 1V p p 75Ω MAX 720p 1080p 1920 x 1080 60 Hz WUXGA DVI I DVI D VGA Outp...

Page 39: ...ndle 47 8 x 26 9 x 3 7 Net Weight 29 2 Kg 64 4 lbs Gross Weight 43 5 Kg 95 9 lbs Environmental Condition Item Specifications Temperature Operational Landscape mode 0 40 C Portrait mode 0 35 C Storage 20 60 C 4 140 F Humidity Operational 20 80 RH No condensation Storage 5 95 RH No condensation Altitude Operational 0 3 000 m 0 9842 5 ft Storage Shipment 0 9 000 m 0 29527 6 ft Internal Speaker Item S...

Page 40: ... 2015 Toshiba Lifestyle Products Services Corporation All rights reserved Specifications are subject to change without prior notice ...

Reviews: