background image

35

P

repar

ations

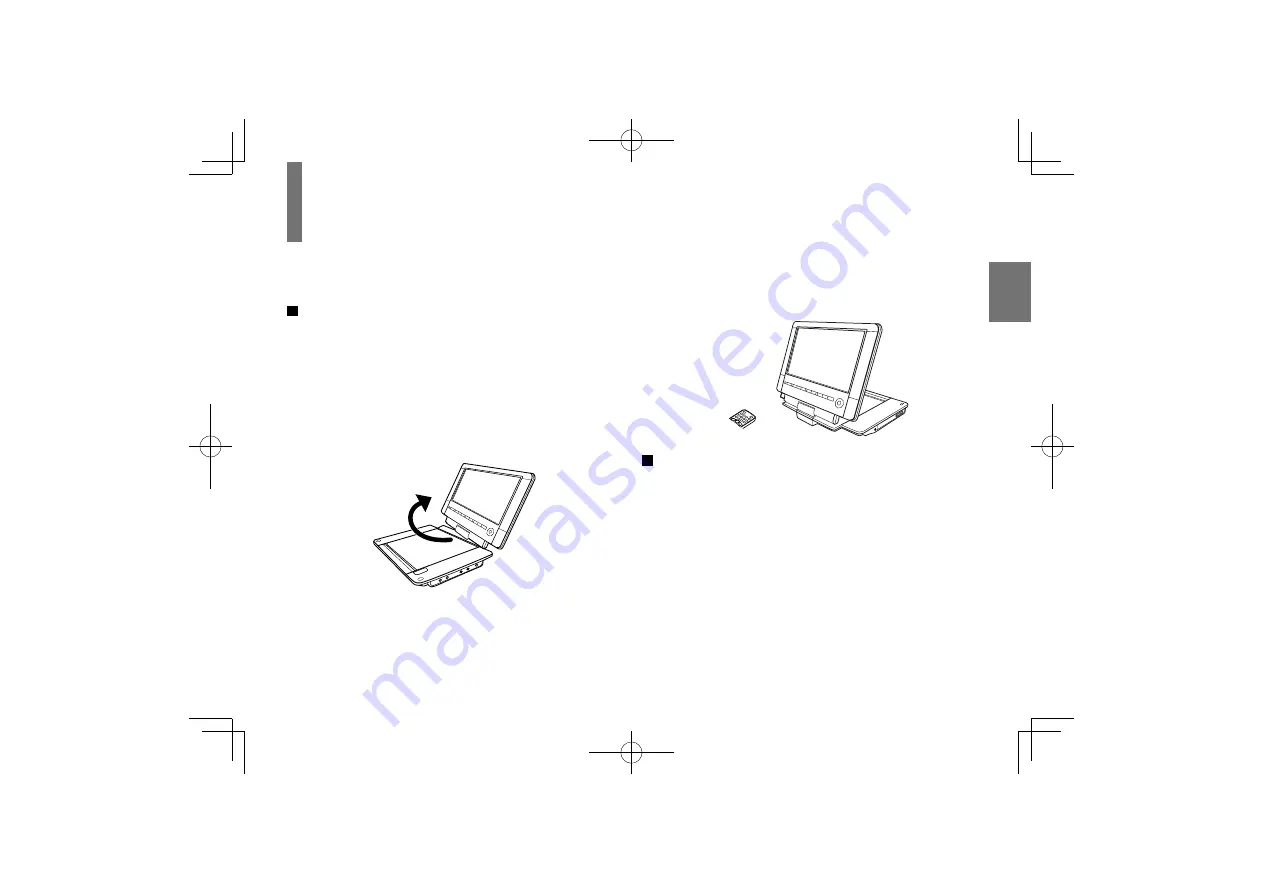
To turn the LCD monitor

You can turn the LCD monitor 180 degrees.

  To turn the LCD monitor

1

Put the player on a level place.

2

Open up the LCD monitor vertically.

3

While holding the lower side of the player, turn 
the LCD monitor slowly 180 degrees to the 
direction of “TURN” until it clicks.

4

Adjust the angle of the LCD monitor.

The LCD monitor can be laid flat.

  To put back the LCD monitor

1

Open up the LCD monitor vertically.

2

While holding the lower side of the player, turn 
the LCD monitor slowly 180 degrees to the 
direction of “REVERSE” until it clicks.

Notes


The LCD monitor does not turn over 180 degrees or to the 
opposite direction. Do not force the LCD monitor to turn over 
180 degrees or to the opposite direction. It may damage the 
LCD monitor.


Do not store the player or attach/detach the battery pack with 
the screen side up. Otherwise, the LCD monitor will get dust 
on the screen or be damaged by an unexpected shock.

SDP94DTWE̲E̲01-56.indd   35

SDP94DTWE̲E̲01-56.indd   35

2010/06/03   9:10:09

2010/06/03   9:10:09

Summary of Contents for SDP94DTWE

Page 1: ...WE PORTABLE DVD PLAYER OWNER S MANUAL PX1D00006800 T Introduction Preparations TV viewing Playback Function Settings Connections Other SDP94DTWE E 01 56 indd 1 SDP94DTWE E 01 56 indd 1 2010 06 03 9 10 03 2010 06 03 9 10 03 ...

Page 2: ...ure reference Should the unit require maintenance contact an authorised service location see service procedure Use of controls or adjustments or performance of procedures other than those specified herein may result in hazardous radiation exposure To prevent direct exposure to laser beam do not try to open the enclosure Visible and invisible laser radiation when open and interlocks defeated DO NOT...

Page 3: ...nformity Statement This product is marked with CE and complies therefore with the applicable harmonized European standards listed under the Low Voltage Directive 2006 95 EC and the EMC Directive 2004 108 EC ErP Directive 2009 125 EC Responsible for CE marking is TOSHIBA INFORMATION SYSTEMS U K LTD Toshiba Court Weybridge Business Park Addlestone Road Weybridge Surrey KT15 2UL United Kingdom Manufa...

Page 4: ...valid for EU member States EU The crossed out wheeled dust bin symbol indicates that batteries and or accumulators must be collected and disposed of separately from household waste If the battery or accumulator contains more than the specified values of lead Pb mercury Hg and or cadmium Cd defined in the Battery Directive 2006 66 EC then the chemical symbols for lead Pb mercury Hg and or cadmium C...

Page 5: ...sc holder or the memory card slot Heat build up or fire may result 9 Protect the power cord from being walked on or pinched particularly at plugs convenience receptacles and the point where they exit from the apparatus 10 Only use attachments accessories specified by the manufacturer 11 Unplug this apparatus during lightning storms or when unused for long periods of time However while it is thunde...

Page 6: ...pparatus malfunction 19 Do not touch a spinning disc When you open the disc holder the disc may have not stopped spinning Touching a spinning disc may cause personal injury or damage to the product 20 Do not rest the product on your lap or other parts of body The product may become warm during use Even low temperatures may cause personal injury when exposed to your skin for prolonged periods 21 Us...

Page 7: ...reach of children Injury to the child or malfunction may result 28 Should you ever notice a strange odor smoke or excessive heat coming from the player remove the battery pack and AC adapter Continued use in this state might cause fire electric shock or burns Take care not to burn yourself if the battery gets hot For details on repair consult Toshiba Customer Service 29 Battery Pack Lithium ion ba...

Page 8: ...caution is not heeded k Never immerse the battery pack in any liquid l Never expose the battery pack to direct sunlight Never store or use the battery pack in a locked and unventilated vehicle where excessive internal temperatures may be encountered m Always keep the battery pack out of reach of infants or small children n Never shock the battery pack by dropping or throwing it o If the liquid con...

Page 9: ... SHOCK DO NOT OPEN 34 Vehicle adapter and operation in a car a NEVER operate the apparatus or view a DVD Video while operating an automobile or other vehicle Note doing so is illegal in many jurisdictions NEVER place an apparatus within the eyesight of a driver while he she is driving an automobile vehicle Note an apparatus located in the front seating section of a vehicle is illegal in many juris...

Page 10: ...o not charge the battery pack which is attached to the apparatus by the adapter Doing so may cause smoke fire or electrical shock to human body Whenever you use the adapter be sure to remove the battery pack from the apparatus to prevent it from being charged by the adapter k Some cars may not have a compatible socket NEVER modify this adapter to fit an incompatible cigarette lighter socket and or...

Page 11: ... AC adapter is used as the disconnect device Therefore use the AC adapter near the wall outlet so that the mains plug can be access easily at all times SDP94DTWE E 01 56 indd 11 SDP94DTWE E 01 56 indd 11 2010 06 03 9 10 04 2010 06 03 9 10 04 ...

Page 12: ... If you do not use the player for a long period the unit may not function properly in the future Turn on and use the player occasionally Notes on use in a vehicle Do not use this product while driving Neglecting this may cause a traffic accident Never operate the player in a moving vehicle Vibration may prevent proper playback of the player or cause damage to the disc Do not leave the player in a ...

Page 13: ...nd humid place just after you move the unit from an air conditioned room When you use the player in a humid place Do not use the player when moisture condensation may occur If you use the player in such a situation it may damage discs and internal parts Remove the disc connect the AC adapter turn on the player and leave it for two or three hours After two or three hours the player will have warmed...

Page 14: ...phical playback area are printed on your DVD video disc If you do not find 2 or ALL disc playback will not be allowed by the player In this case the player will display a message on screen MPEG Layer 3 audio coding technology licensed from Fraunhofer IIS and Thomson Manufactured under license from Dolby Laboratories Dolby and the double D symbol are trademarks of Dolby Laboratories Confidential Un...

Page 15: ...nging modes 37 Adjusting the volume of the speakers or the connected headphones 38 Connecting to headphones 38 General adjustments 39 Adjusting the picture 39 Using QUICK MENU 40 TV viewing Antenna connection 42 Initial settings 43 Operation 44 Selecting channels 44 Zooming a picture 45 Viewing information 45 Using teletext 46 Selecting subtitle 46 Selecting audio language 46 To operate EPG Electr...

Page 16: ...ks 63 Locating by entering numbers 63 Bookmark function 64 Playing in random order 65 Playing repeatedly 65 Repeating a specific segment 65 Repeating a title chapter or track 66 Playing in a favorite order 67 Zooming a picture 68 Changing the camera angle 69 Selecting subtitles 69 Selecting audio formats 70 Selecting enhancement modes 71 On screen display mode 71 Playing audio video picture files ...

Page 17: ...ected video equipment 87 Connecting to an audio system equipped with analog audio inputs 88 Using the automobile vehicle adapter or power port 89 Other Before calling service 94 Specifications 97 SDP94DTWE E 01 56 indd 17 SDP94DTWE E 01 56 indd 17 2010 06 03 9 10 05 2010 06 03 9 10 05 ...

Page 18: ...d 37 40 30 59 59 60 62 36 Vol Volume buttons To adjust the volume ENTER button To enter a selected content 38 40 60 60 40 SKIP buttons To locate a title chapter or track 63 buttons To change TV channels 44 19 Right side OPEN button To open the disc cover Disc cover Speakers LCD monitor Most instructions are based on remote control operation unless otherwise noted You can use the buttons on the rem...

Page 19: ...n of the power on off charge 73 Card slot To insert a memory card to play 42 ANT IN jack To connect an aerial 87 AV IN jack Connect to AV output terminal of your video equipment Important Magnets are incorporated inside the player to lock the LCD when closed To avoid trouble keep magnetized objects e g watches magnetic cards away from the player SDP94DTWE E 01 56 indd 19 SDP94DTWE E 01 56 indd 19 ...

Page 20: ...on MENU button TOP MENU button SUBTITLE button AUDIO button STOP button PAUSE STEP button MEMORY button CLEAR button Green button Red button A B REPEAT button QUICK button TV RADIO button 10 button FWD button SLOW button SET UP button SHIFT button E A M button PICTURE button ANGLE button ZOOM button PLAY button RETURN button REPEAT button RANDOM button Blue button Yellow button T button Volume but...

Page 21: ...rite order CLEAR To clear entered information Green Red Function A B REPEAT Repeat play of a specific segment QUICK To display QUICK MENU TV RADIO To switch TV channels and radio channels 10 button To enter numbers for ten places Volume To adjust the volume FWD Fast forward playback SLOW Slow motion playback ENTER To enter a selected content SET UP To display the setup menu SHIFT To change functio...

Page 22: ...an AC adapter a battery pack and a vehicle adapter other than one specified Also do not use these supplied accessories with any device other than this player Owner s manual Battery pack SD PBP94E Outdoor aerial RF adapter x1 Headphones Carrying case Use this for carrying etc of the player SDP94DTWE E 01 56 indd 22 SDP94DTWE E 01 56 indd 22 2010 06 03 9 10 06 2010 06 03 9 10 06 ...

Page 23: ...N DN DN DN TJOHMF DN DN DN DN DVD Video disc DVD RW r 7JEFP VEJP 7 73 GPSNBU DPNQBUJCMF XJUI 13 7 WJEFP GPSNBU JOBMJ FE EJTDT POMZ r VEJP 1 GJMFT r PWJF JW9 r 1IPUPHSBQI 1 GJMFT r 7JEFP NPWJOH QJDUVSFT VEJP r VEJP DVD R CD R RW VIDEO CDs Audio CDs CD ROM 3 38 EJTDT PG 7 0 GPSNBU DBO BMTP CF QMBZFE 4PNF PG UIFTF EJTDT NBZ CF JODPNQBUJCMF DIGITAL VIDEO Disc Disc Mark Disc Size Contents R e W r i t a...

Page 24: ...lly play every disc bearing the DVD and CD logos If you happen to experience any difficulty playing a DVD and or CD disc on this player please contact Toshiba Customer Service On VIDEO CDs This player supports VIDEO CDs equipped with the PBC Version 2 0 function PBC is an abbreviation for Playback Control You can enjoy two playback variations depending on types of discs VIDEO CD not equipped with ...

Page 25: ... by Rovi Corporation and is intended for home and other limited viewing uses only unless otherwise authorized by Rovi Corporation Reverse engineering or disassembly is prohibited Playback side On handling discs Do not touch the playback side of the disc Do not attach paper or tape to discs On cleaning discs Fingerprints and dust on the disc may cause picture and sound deterioration Wipe the disc f...

Page 26: ...f the player and or card Saving data It is recommended that you back up your memory card data Toshiba is not liable for any damage caused by the use of any memory card with this player Toshiba will not compensate for any lost data or recording s caused by the use of such cards For instructions on using your memory card refer to the owner s manual for your memory card Failure to take proper care of...

Page 27: ...ot to touch with your fingers nor allow foreign objects to come in contact with nor dirt to accumulate on the metal area gold coloured area of the memory card Wipe off any dirt with a soft dry cloth When carrying or storing the memory card always place it inside of its antistatic case to avoid any effects from static electricity When ejecting the memory card after extended use it may feel warm to ...

Page 28: ...SDP94DTWE E 01 56 indd 28 SDP94DTWE E 01 56 indd 28 2010 06 03 9 10 08 2010 06 03 9 10 08 ...

Page 29: ...ol Power connection Using the battery pack To turn the LCD monitor Powering on off Changing modes Adjusting the volume of the speakers or the connected headphones General adjustments SDP94DTWE E 01 56 indd 29 SDP94DTWE E 01 56 indd 29 2010 06 03 9 10 08 2010 06 03 9 10 08 ...

Page 30: ...sensor and press the buttons Distance About 3 m 9 9 feet from the front of the remote sensor Angle About 30 in each direction of the front of the remote sensor Do not expose the remote sensor of the player to a strong light source such as direct sunlight or other illumination If you do so you may not be able to operate the player via the remote control Do not drop or give the remote control a shoc...

Page 31: ...an AC adapter other than one specified as it can cause a fire or damage to the player When the AC adapter is in use its temperature may increase This is normal Make sure that the AC adapter is disconnected and the temperature decreases before carrying it Note Do not use the supplied AC adapter with any device other than this player To the DC IN 12V jack Follow steps 1 to 2 to connect When disconne...

Page 32: ...is attached firmly to the player when using it Otherwise the battery pack may become detached and cause personal injury Attaching the battery pack 1 Turn the player off 2 Disconnect all cables and cords from the player 3 Turn the player upside down 4 Remove the connector cover on the bottom of the player 5 Turn the battery pack over and insert four catches into the player s corresponding holes 1 T...

Page 33: ... not start and the POWER indicator does not illuminate when the battery is near full charge Notes Charge the battery pack with a surrounding temperature of 10 C to 30 C 50 F to 86 F While the charge is in progress do not disconnect the AC adapter until the POWER indicator turns off The attached battery pack may get warm when you are charging it or operating the player This is not a defect Charging...

Page 34: ...ry pack while the POWER indicator illuminates in green or orange About battery pack life Battery pack has a limited service life The length of service life varies depending on product use and user settings If you use the battery pack beyond its service life you may notice that playback time becomes remarkably shorter even if the battery pack is fully charged If you notice that playback time has be...

Page 35: ...the LCD monitor vertically 2 While holding the lower side of the player turn the LCD monitor slowly 180 degrees to the direction of REVERSE until it clicks Notes The LCD monitor does not turn over 180 degrees or to the opposite direction Do not force the LCD monitor to turn over 180 degrees or to the opposite direction It may damage the LCD monitor Do not store the player or attach detach the batt...

Page 36: ...main unit and remove the protective sheet POWER indicator The indicator illuminates when the power is on POWER button Press POWER The POWER button and the POWER indicator illuminate To turn off the power press POWER again POWER indicator Condition Green On Off Off Orange Charging SDP94DTWE E 01 56 indd 36 SDP94DTWE E 01 56 indd 36 2010 06 03 9 10 09 2010 06 03 9 10 09 ...

Page 37: ...sc on the LCD monitor of this player SDCARD Select when you want to play a memory card AV IN Select when you want to view the picture played using a VTR or other external equipment on the LCD monitor of this player 3 Press ENTER The player enters the selected mode Notes Make sure that DVD CD is selected when you play a disc Cannot be played any discs other than DVD CD mode This operation is not av...

Page 38: ... shakes produced by plug connecting disconnecting may cause damage to the disc You can connect up to 2 headphones Connecting to the headphone jack disables output from the speakers CAUTION Connect your headphones ONLY to headphones jack of the player Neglecting this may cause hearing damage When you use headphones keep the volume at a moderate level If you use the headphones continuously with high...

Page 39: ...r Contrast 0 16 Lower Highter Color 0 16 Paler Deeper Tint 0 16 Reddish Greenish Sharpness 0 16 Softer Sharper Backlight LOW MIDDLE HIGH Picture size AUTO Displays its originally formatted proportion 4 3 Displays in 4 3 picture size 4 3 pictures keep their proportion with black bars at the left and right 16 9 pictures keep their proportion with black bars at the top and bottom 16 9 Displays in ful...

Page 40: ...re available in the current mode It can be operated in the same manner in any mode 1 Press QUICK QUICK MENU appears The contents may vary depending on the mode e g MENU QUICK MENU P I CTURE 2 Press to select an item then press ENTER 3 Set the details SDP94DTWE E 01 56 indd 40 SDP94DTWE E 01 56 indd 40 2010 06 03 9 10 11 2010 06 03 9 10 11 ...

Page 41: ...TV viewing You can view TV programmes on this player Antenna connection Initial settings Operation SDP94DTWE E 01 56 indd 41 SDP94DTWE E 01 56 indd 41 2010 06 03 9 10 11 2010 06 03 9 10 11 ...

Page 42: ...se or audio noise may occur Also depending on your location the broadcast reception signal may fail Antenna connection Note Before you use the player outdoors attach the battery pack supplied with the player and sufficiently charge the battery Aerial cable not supplied Outdoors aerial supplied The tip of the outdoor aerial is sharp and can inflict injury such as puncture wounds Be careful when hand...

Page 43: ... 1 Press and to select a language for on screen displays then press ENTER 2 Press 3 Press and to select your country area then press ENTER 4 Press ENTER A confirming message appears 5 Press to select Yes then press ENTER Channel search starts To cancel the process press RETURN When complete a current TV programme appears Go to Selecting channels 44 SDP94DTWE E 01 56 indd 43 SDP94DTWE E 01 56 indd ...

Page 44: ...ELECT ITV2 S No 0007 0006 0010 0028 0009 0014 Channel Name None ITV1 ITV3 ITV4 MDR FERNSEHEN More 4 0014 More 4 e g Select the group by and a station by then press ENTER To turn off the QUICK SELECT menu press MENU or RETURN Press FAVOURITE while pressing SHIFT Favourite LIST appears Set your favourite channel beforehand See page 47 Press FAV while pressing SHIFT to select a channel Note If you pr...

Page 45: ...screen displays may not permit this operation Zooming a picture 1 Press ZOOM 2 Select the zoom point and magnification level Magnification level Press or repeatedly Zoom point Press repeatedly 3 To cancel press ZOOM or RETURN Viewing information 1 Press DISPLAY repeatedly Information changes in the following order Channel name and programme name Disappears in the specific seconds 52 More detailed ...

Page 46: ...operate EPG Electronic Programme Guide 1 Press EPG while pressing SHIFT Daily Mode Extended 25 04 2010 Sunday 25 4 2010 10 47 56 Date Time 003 ITV1 006 010 028 009 014 ITV2 ITV3 ITV4 MDR FER More 4 10 00 11 00 Young plum garden Cat news premium El mundo the worl 11 00 11 55 11 55 13 00 Smily Kowkey 13 00 14 05 Mr Howe s sweet lif 14 05 15 00 The Champions 15 00 16 00 Minder 16 00 17 05 10 00 11 00...

Page 47: ...49 49 Channel Organizer menu Channel Organizer ITV2 S No 0007 0006 0010 0028 0009 England London 490000KHz 8M 0014 Channel name Fav Mov Lock Del ITV1 ITV3 ITV4 MDR FERNSEHEN More 4 e g Del Move Lock Fav When complete your setting press MENU repeatedly until the menus disappear Making a favourite list 1 On Channel Organizer menu press to select a channel 2 Press the red button A mark appears The ch...

Page 48: ...he channel is deleted Sorting channels 1 On Channel Manager menu select Channel Sorting then press ENTER 2 Press and to select the area then press ENTER 3 Press 4 Set Second Option and Third Option in the same manner as steps 2 and 3 5 Press ENTER A confirming message appears 6 Select Yes by then press ENTER Grouping channels 1 On Channel Manager menu select Channel Grouping then press ENTER 2 Sel...

Page 49: ...etter RETURN To discard input Audio PID Video PID PCR PID Press the number buttons 5 Press ENTER Editing a channel 1 On Channel Manager menu select Edit Channels then press ENTER 2 Select a channel by 3 Press the yellow button 4 Change the details See Saving a channel as a new one step 4 Area Name and Carrier cannot be changed 5 Press ENTER Deleting channels 1 On Channel Manager menu select Delete...

Page 50: ...equency of a channel you need you can save the searching time by specifying the frequency 1 Perform steps 1 to 2 2 Press to select Manual Search or Auto Search then press ENTER Manual Search To specify the frequency Auto Search To specify the frequency range 3 Set the channel data Auto Search Start Freq KHz 7M BandWidth 474000 End Freq KHz 474000 Manual Search Freq KHz 7M BandWidth 474000 e g 4 Pr...

Page 51: ...tallation Configuration Factory Default Version OSD TV System Setup Time Parental Lock Configuration 47 50 On screen display details and sound preference Picture adjustment in TV SD V mode Sound effects area selection and parental control level Password setting Clock setting Setting in TV SD V mode are all reset Enter your 4 digit password Select Yes then press ENTER FW version will be displayed P...

Page 52: ...D Trans Transparency of on screen displays 0 10 20 30 40 50 60 Press OSD Language Language for on screen displays English French German Italian Spanish Swedish Dutch Turkish Greek 1 Press and 2 Press ENTER Audio Language Language for TV sounds English French German Italian Spanish Swedish Dutch Turkish Greek 1 Press and 2 Press ENTER Operation continued SDP94DTWE E 01 56 indd 52 SDP94DTWE E 01 56 ...

Page 53: ... 80 90 100 1 Press and 2 Press ENTER Contrast Contrast of pictures in TV SD V mode 0 10 20 30 40 50 60 70 80 90 100 1 Press and 2 Press ENTER HUE Hue of pictures in TV SD V mode 6 5 4 3 2 1 0 1 2 3 4 5 6 1 Press and 2 Press ENTER Saturation Saturation of pictures in TV SD V mode 0 1 2 3 4 5 6 7 8 9 10 11 12 1 Press and 2 Press ENTER SDP94DTWE E 01 56 indd 53 SDP94DTWE E 01 56 indd 53 2010 06 08 19...

Page 54: ...y LCN data OFF ON Press Area Country area where this player receives TV broadcast Germany England Italy France Spain Netherlands Norway Sweden Finland Greece Austria Ireland Denmark Portugal Turkey Poland 1 Press and 2 Press ENTER Parental Rating Parental control level of TV channels OFF 4 18 Parental control level 1 Press the number buttons to enter your password 0000 for the first time 2 Press a...

Page 55: ...me If Timer Mode is set to Manual Press the number buttons to set a time GMT Offset If Timer Mode is set to Auto 12 00 12 00 Auto 1 Press and 2 Press ENTER Summer Time If GMT Offset is not set to Auto OFF No clock adjustment for summer time ON One hour advances in summer months Press SDP94DTWE E 01 56 indd 55 SDP94DTWE E 01 56 indd 55 2010 06 03 9 10 13 2010 06 03 9 10 13 ...

Page 56: ... Old Password Enter New Password Confim New Password 1 Press the number buttons to enter your old password 0000 for the first time 2 Press the number buttons to enter your new 4 digit password 3 Press the number buttons to enter the same digits again Operation continued SDP94DTWE E 01 56 indd 56 SDP94DTWE E 01 56 indd 56 2010 06 03 9 10 13 2010 06 03 9 10 13 ...

Page 57: ...random order Playing repeatedly Playing in a favorite order Zooming a picture Changing the camera angle Selecting subtitles Selecting audio formats Selecting enhancement modes On screen display mode Playing audio video picture files SDP94DTWE E 57 100 indd 57 SDP94DTWE E 57 100 indd 57 2010 06 03 9 11 38 2010 06 03 9 11 38 ...

Page 58: ...LOSE To remove the disc Press OPEN on the main unit to open the disc cover and remove the disc from under the rim while gently pressing down on its centre CAUTION Keep your fingers clear of the disc as it is spinning Be careful not to catch your fingers in the disc holder Do not use a cracked deformed or repaired disc Do not tilt shake or move the main unit while playing It may damage the disc Do ...

Page 59: ...on where playback resumes depending on the disc The following icons are used in this manual to indicate features and or functions that are applicable to each disc DVD V DVD Video disc VCD VIDEO CD CD Audio CD Preparations Turn on the power of the player Place a disc to the player 1 Follow the steps on page 37 to select DVD CD mode 2 Press PLAY Playback starts If you select a DVD video disc that co...

Page 60: ...completed Using the top menu DVD V VCD CD 1 Press TOP MENU The top menu appears 2 Press to select the title you want If the titles in the top menu are assigned a number you can select the title by pressing the number buttons 3 Press ENTER Playback starts from chapter 1 of the selected title Notes This method of locating a title is available only on a disc that contains a top menu Instruction notes...

Page 61: ...LCD The LCD panel contained in this product is manufactured using an extremely high level of precision technology however there may be an occasional pixel dot of light that does not operate properly does not light remains constantly lit etc This is a structural property of LCD technology is not a sign of malfunction and is not covered under your warranty Such pixels are not visible when the pictur...

Page 62: ...ard rewind may not function properly depending how the disc was created the status of titles on the disc or the condition of the disc itself Playing frame by frame DVD V VCD CD Press PAUSE STEP repeatedly during playback The sound is muted during frame by frame playback Press PLAY to resume normal playback Playing in slow motion DVD V VCD CD Press SLOW while pressing SHIFT during playback If you p...

Page 63: ...me this button is pressed 2 Press to select the category you want to search Category To search by specifying Title Title number Chapter Chapter number Track Track number Time Elapsed time of the current track Disc Time Elapsed time in the entire disc Not available in CD playback 3 Press the number buttons to enter a number e g To enter 25 2 5 e g To enter the time 1 hour 25 minutes 30 seconds 1 2 ...

Page 64: ...s PAUSE STEP to pause 2 Press T repeatedly to display Bookmark 3 Press to select a bookmark 1 2 3 to register then press ENTER To cancel the procedure press T to turn the display off 4 If you select a bookmark already registered press CLEAR to erase the digits 5 Press ENTER The scene is registered to the bookmark Notes Bookmarks may not be able to be registered for some discs or scenes A registere...

Page 65: ...1 Press A B REPEAT at the beginning of the segment point A you want to play repeatedly Rep A appears 2 Press A B REPEAT again at the end of the segment point B The player automatically returns to point A and starts playback of the selected segment A B To resume normal playback Press A B REPEAT repeatedly until RepAB Off appears Notes If you press STOP twice the A B repeat function ends and playbac...

Page 66: ...Notes Some discs may not permit repeat playback The repeat mode will be cancelled when you turn off the power open the disc cover If you press STOP twice the repeat mode ends and playback stops Disc Mode Repeating range Repeat Chapter Current chapter Repeat Title Current title Repeat single Current track Repeat all Whole disc Repeat off Returns to normal playback DVD V DVD V VCD VCD DVD V VCD CD C...

Page 67: ...steps 1 and 2 to program an order you want Playing in a favorite order 3 Press to select Play then press ENTER The player starts memory playback To cancel the programmed selections Select a number to cancel then press CLEAR Select Clear program on the screen and press ENTER All of the programmed selections are cleared To stop memory playback Press STOP twice The programmed selection is cleared Not...

Page 68: ...ce the size X3 Three times the size X4 Four times the size Off Normal size Zoom point Press repeatedly To resume normal playback Press ZOOM repeatedly until Off appears Notes Some discs may not respond to zoom feature Depending on scenes the buttons may not work as described Zooming does not work on characters selected on menus Zoom playback will be cancelled when you turn off the power open the d...

Page 69: ...hem off even if you set the subtitle function to off Some discs will allow you to make subtitle selections and turn subtitles on or off only via the disc menu DVD V VCD CD DVD V VCD CD 1 Press ANGLE while playing a scene recorded with multiple camera angles The angle icon appears on the screen This display does not appear if the disc includes no scenes recorded with multiple angles If you press AN...

Page 70: ...electing sound channels of VIDEO CDs During playback press AUDIO repeatedly to select the sound channel Notes Some discs allow you to change audio selections only via the disc menu In such a case press MENU and choose the appropriate language from the selections on the disc menu If you select a sound track which is not included on the disc the player plays a prior sound track programmed on the dis...

Page 71: ...back The current instructional information appears e g DVD video disc DVD Video Time Title Chapter 00 22 59 01 56 59 1 13 6 51 Current title number Current chapter or track number Elapsed time of the current title Remained time of the current title 2 Press DISPLAY again Contents of the information change Audio Subtitle Angle Bitrate 1 4 Eng 2 2 2 3 D 3 2 1Ch Eng 3 920Mbps Current language Current ...

Page 72: ...ess or equal JPEG compatibility Playable media CD ROM CD R CD RW DVD R DVD RW SD Memory Card SDHC Memory Card File system ISO9660 UDF without interleave File name File names are limited to eight characters or less and must incorporate JPG extension e g jpg File names cannot contain special characters such as etc Total number of files Less than 650 File size Unrestricted File format BASELINE PROGRE...

Page 73: ...ed Photo Video e g Select MP3 file Select JPEG file Select DivX file Audio 2 Select the category using then press ENTER to add remove the check mark 3 When complete press to return to the previous screen The setting will be saved Note When using a commercially available audio CD this function cannot be used How to use a memory card 1 Insert a memory card into the slot 2 Follow the steps on page 37...

Page 74: ...andom order Plays only music intro in order Effective only in playback of audio CDs and MP3 files Normal Shuffle On Music Intro Resumes to normal playback Notes Some media may not permit repeat or random playback Some functions such as REPEAT RANDOM and SKIP can be operated from the remote control directly Rotating a picture JPEG files Press while a picture is played The picture will be rotated to...

Page 75: ...TER Programmed selections appear 6 Press PLAY Playback starts in the order you programmed To display recorded track file Select Browser view on the screen then press ENTER The track file list of the media appears To cancel the programmed selections 1 While Edit mode is selected press STOP twice to stop playback 2 Position the cursor using to the screen displayed track file 3 Select track file you ...

Page 76: ...SDP94DTWE E 57 100 indd 76 SDP94DTWE E 57 100 indd 76 2010 06 03 9 11 42 2010 06 03 9 11 42 ...

Page 77: ...ction Settings You can change the default settings to customize to your preferences Customizing function settings SDP94DTWE E 57 100 indd 77 SDP94DTWE E 57 100 indd 77 2010 06 03 9 11 42 2010 06 03 9 11 42 ...

Page 78: ...ettings press then repeat steps 2 to 4 5 Press SET UP The setting menu disappears and the procedure finishes Icon Setting Disc Details Language OSD Menu DVD V VCD CD To select a preferred language for on screen displays Subtitle DVD V VCD CD To select a preferred language for subtitles Audio DVD V VCD CD To select a preferred language for the sound track DVD menu DVD V VCD CD To select a preferred...

Page 79: ...urn on or off a function that makes faint sounds easier to hear even if you lower the volume during late hours playback D R C Dynamic Range Control Rating Parental control DVD V VCD CD To set the level of the parental lock PBC DVD V VCD CD To use the menu screen when playing a PBC controllable VIDEO CD Screen saver DVD V VCD CD To turn the screen saver on or off Default Default To restore all sett...

Page 80: ...ected A prior subtitle language may be programmed on the disc Some DVD video discs allow you to change subtitle selections only via the disc menu If this is the case press the MENU button and choose the appropriate subtitle language from the selection on the disc menu Audio DVD V VCD CD Preferred language for the sound track English French Spanish Note Some DVD video discs may be played in a diffe...

Page 81: ... DVD video discs may not conform to the picture size you select When you play DVD video discs recorded in the 4 3 picture size only the playback picture always appears in the 4 3 picture size regardless of the TV shape setting If you select 16 9 and you own a 4 3 TV set the DVD playback picture will be horizontally distorted during playback Images will appear to be horizontally compressed Always b...

Page 82: ...l and the way a DVD video disc can be controlled may vary from disc to disc For example if the disc allowed you could edit out violent scenes unsuitable for children and replace them with more suitable scenes or lock out playback of the disc altogether Some DVD video discs may or may not respond to the parental lock settings This is not a defect in the player Make sure this function works with you...

Page 83: ... enter the 5 digit security code you have set then press ENTER Now the parental lock level can be changed 3 Press ENTER while selecting Parental control 4 Press to select the parental level to set and then press ENTER 8 Adult 7 NC 17 6 R 5 PG R 4 PG 13 3 PG 2 G 1 Kid Safe To change the parental lock level Follow the step To set the parental level to change the parental level PBC DVD V VCD CD On To...

Page 84: ...s Yes To restore the function settings to their default settings DivX Registration The DivX information appears Return to Default if you press ENTER while it is displayed Customizing function settings continued SDP94DTWE E 57 100 indd 84 SDP94DTWE E 57 100 indd 84 2010 06 03 9 11 43 2010 06 03 9 11 43 ...

Page 85: ...on a connected TV Viewing pictures from connected video equipment Connecting to an audio system equipped with analog audio inputs Using the automobile vehicle adapter or power port SDP94DTWE E 57 100 indd 85 SDP94DTWE E 57 100 indd 85 2010 06 03 9 11 43 2010 06 03 9 11 43 ...

Page 86: ... jack disables the LCD of the player Notes Refer to the owner s manual of the connected TV as well When you connect the player to your TV be sure to turn off the power and unplug both units from the wall outlet before making any connections Connect the player directly to your TV If you connect the player to a VTR TV VTR combination or video selector the playback picture may be distorted as DVD vid...

Page 87: ...f this player When supplying non standard signals such as playback images from a video deck or images from a game player some images may be displayed incorrectly For example shooting games which shoots at a target on the screen with a light gun may not work because of the LCD Colour monitor properties In the external AV input mode AV IN appears on the screen screen saver function auto power OFF fu...

Page 88: ...wall outlet before making any connections Turn off the amplifier before you connect or disconnect the player s AC adapter If you leave the amplifier power on the speakers may be damaged The output sound of the player has a wide dynamic range Be sure to adjust the receiver s volume to a moderate listening level Otherwise the speakers may be damaged by a sudden high volume sound Notes Refer to the o...

Page 89: ...o power an apparatus other than this player Neglecting these may cause smoke fire or electrical shock to human body This adapter is intended for exclusive use in automobiles vehicles with a DC 12V negative ground electrical system NEVER use this adapter with a DC 24V configured or a DC 12V positive ground electrical system automobile vehicle Consult your vehicle owner s manual before using this ad...

Page 90: ...ug from the DVD player Do not force the adapter into an incompatible lighter socket or power port 1 Be sure to turn off the DVD player then remove the battery pack from the player Note Charging the battery pack with the vehicle adapter may cause smoke fire or electrical shock to human body ALWAYS remove the battery pack before using the vehicle adapter 2 Turn on the vehicle engine so that the ciga...

Page 91: ... this adapter may not be applied In some vehicles the cigarette lighter socket is powered even when the vehicle s engine is not running Using the cigarette lighter socket for power when the engine is not running will drain the car s battery Never add any devices to the cigarette lighter socket or power port to apply the adapter These may damage the DVD player or themselves or may cause fire If noi...

Page 92: ...SDP94DTWE E 57 100 indd 92 SDP94DTWE E 57 100 indd 92 2010 06 03 9 11 44 2010 06 03 9 11 44 ...

Page 93: ...Other Useful information Before calling service Specifications SDP94DTWE E 57 100 indd 93 SDP94DTWE E 57 100 indd 93 2010 06 03 9 11 44 2010 06 03 9 11 44 ...

Page 94: ...ove the aerial away from the cause of the interference No picture on the LCD monitor The AV OUT jack is connected When you use the LCD of the player unplug the AV OUT jack No picture Other than built in LCD monitor The connected TV is not set to receive DVD signal output Select the appropriate video input mode on the TV so the picture from the player appears on the TV screen No picture or Sound Wh...

Page 95: ...ure may be distorted as DVD video discs are copy protected Connect the player directly to the TV Avoid connecting the player to a VTR or TV VTR combination The player does not start playback No disc is inserted Insert a disc An unplayable disc is inserted Insert a playable disc Check the disc type colour system and region number The disc is inserted upside down Insert the disc with the playback si...

Page 96: ...ensor of the player Point the remote control at the remote sensor of the player The remote control is too far from the player Operate the remote control within about 3 m 9 9 feet The batteries in the remote control are exhausted Replace the batteries with new ones The player s remote sensor is exposed to a strong light source such as direct sunlight or other illumination Avoid the player from bein...

Page 97: ...velength 650 nm 795 nm Operating conditions Temperature 5 C to 35 C 41 F to 95 F Operation status Horizontal Connectors AV output AV OUT ø3 5mm mini jack 1 Video 1 0 V p p 75Ω negative sync Audio 2 0 V rms 100Ω AV input AV IN ø3 5mm mini jack 1 Video 1 0 V p p 75Ω negative sync Audio 2 0 V rms 10kΩ Headphone terminal ø3 5mm stereo mini jack 2 Antenna input 75Ω IEC connector Card drive Card slot 1 ...

Page 98: ...ons are subject to change without notice This model may not be compatible with features and or specifications that may be added in the future Supplied accessories Audio video cable 1 Remote control SE R0353 1 Coin shaped battery CR2025 1 AC adapter EADP 18SB C 1 Battery pack SD PBP94E 1 Vehicle adapter MEDC01AX 1 Headphones 1 Outdoors aerial RF adapter x1 1 Carrying case 1 Owner s manual 1 Specifi...

Page 99: ...SDP94DTWE E 57 100 indd 99 SDP94DTWE E 57 100 indd 99 2010 06 03 9 11 45 2010 06 03 9 11 45 ...

Page 100: ...Printed in China 2010 Toshiba Corporation SDP94DTWE E 57 100 indd 100 SDP94DTWE E 57 100 indd 100 2010 06 03 9 11 45 2010 06 03 9 11 45 ...

Reviews: