background image

Programmed Playback with MP3 Disc

Programmed Playback with MP3 Disc

Program allows you to store your favorite tracks for a
particular disc in the player memory.

Program can contain 60 tracks.

11

Insert the disc and close the tray.

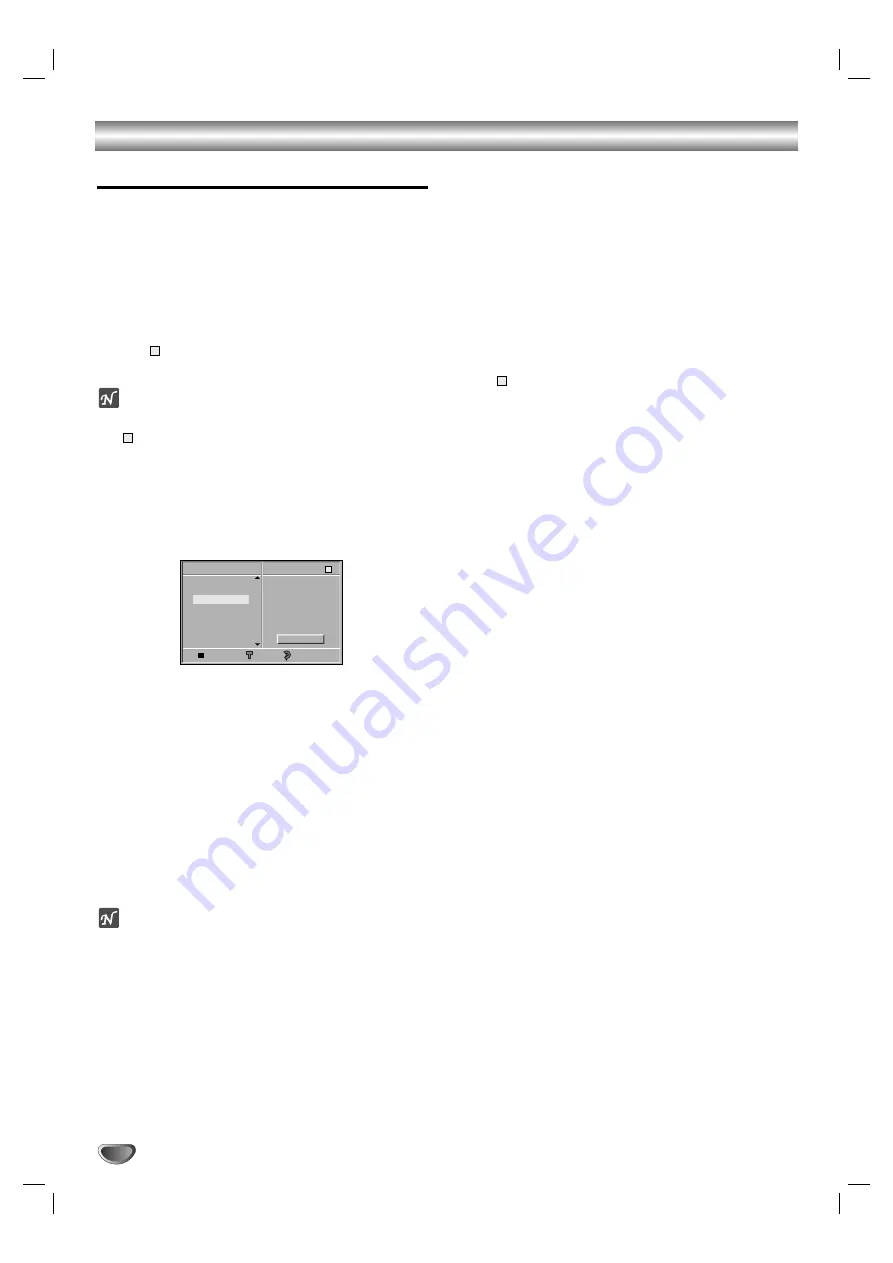
The menu is displayed on the TV screen.

2

2

Press PROGRAM during playback or in the stop
mode to enter the Program Edit mode.

The 

mark will appear to the right of the word Program

on the right side of the menu screen.

Note

Press PROGRAM to exit the Program Edit mode; 

the 

mark will disappear.

3

3

Press 

3

3

/

4

4

to select a track then press ENTER to

place the selected track on the Program list.

4

4

Repeat step 3 to place additional tracks on the
Program list.

MP3 menu

5

5

Press 

2

.

The programmed track you selected last is highlighted on
the program list.

6

6

Press 

3

3

/

4

4

to select the track you want to start

playing.

Press TOP MENU to move to the next page.
Press MENU to move to the previous page.

77

Press PLAY to start.

Playback begins in the order in which you programmed the
tracks and “PROGRAM” appears in the display window.
Playback stops after all of the tracks on the Program list have
played once.

Note

The programmed tracks are cleared when the power is
turned off or the disc is removed.

Repeat Programmed Tracks/All 

To repeat the track currently playing, press REPEAT.

The Repeat Track icon appears on the menu screen.

To repeat all tracks on the program list, press
REPEAT a second time.

The Repeat All icon appears on the menu screen.

To cancel Repeat mode, press REPEAT a third time.

The Repeat Off icon appears on the menu screen.

Erasing a Track from Program List

1

Press PROGRAM during playback or in the stop
mode to enter the Program Edit mode.

The 

mark will appear.

2

Press 

2

to move to the Program list.

3

Use 

3

3

/

4

4

to select the track that you wish to erase

from the Program list.

4

Press CLEAR.

The track will be erased from the Program list.

Erasing the Complete Program List

1

Follow steps 1-2 of “Erasing a Track from Program
List” as above.

2

Use 

3

3

/

4

4

to select “Clear All”, then press ENTER.

The complete Program for the disc will be erased.
The programs are also cleared when the disc is removed.

To resume normal playback from programmed
playback

Press and hold PROGRAM for 3 seconds until “PROG.”
indicator disappears in the display window.

E

E

E

22

Program

MP3

Clear All

TRACK 1.MP3

TRACK 2.MP3

TRACK 3.MP3

TRACK 4.MP3

TRACK 8.MP3

TRACK 2.MP3

TRACK 4.MP3

TRACK 3.MP3

TRACK 5.MP3

TRACK 6.MP3

TRACK 7.MP3

TRACK 8.MP3

56:35

1

OFF

E

Summary of Contents for SD-K615

Page 1: ...DVD PLAYER OWNER S MANUAL MODEL SD K615 Before connecting operating or adjusting this product please read this instruction booklet carefully and completely Surround Sound 3D ...

Page 2: ...nce to radio communications However there is no guarantee that interference will not occur in a particular installation If this product does cause harmful interference to radio or television reception which can be determined by turning the product off and on the user is encouraged to try to correct the interference by one or more of the following measures Reorient or relocate the receiving antenna...

Page 3: ... this can result in a risk of fire or electric shock 13 Lightning Unplug this apparatus apparatus during lightning storms or when unused for long periods of time This will prevent damage to the product due to lightning and power line surges 14 Object and Liquid Entry Never push objects of any kind into this product through openings as they may touch dangerous voltage points or short out parts that...

Page 4: ...ncement 18 Zoom 18 Marker Search 19 Special DVD Features 19 Title Menu 19 Disc Menu 19 Camera Angle 19 Changing the Audio Language 19 Changing the Audio Channel 19 Subtitles 19 Programmed Playback with Video CD and Audio CD 20 Programmed Playback with Video CD and Audio CD 20 Repeat Programmed Tracks All 20 Erasing a Track from Program List 20 Erasing the Complete Program List 20 Operation with MP...

Page 5: ...d by area limits Note on DTS encoded CDs To avoid possible damage to the audio system turn down the volume before playing back such discs Adjust the volume gradually to personal preference To enjoy DTS Digital SurroundTM playback an external 5 1 chan nel DTS Digital SurroundTM decoder system must be connected to the digital output of the player Disc related terms Title DVD only The main film conte...

Page 6: ...poor Regular inspection and maintenance are recommended after every 1 000 hours of use This depends on the operating environment For details please contact your nearest dealer Notes on Discs Handling discs Do not touch the playback side of the disc Hold the disc by the edges so that fingerprints will not get on the surface Do not stick paper or tape on the disc Storing discs After playing store th...

Page 7: ...e playing during playback E A M Select sound mode during disc playback Reverse Skip S S Returns to beginning of current chapter track or to PREVIOUS chapter track Press and hold for two seconds for fast reverse search STOP 9 9 Stops playback PAUSE Pauses playback temporarily press repeatedly for frame by frame playback PLAY 2 2 Starts playback OPEN CLOSE Opens or closes the disc tray ON STANDBY in...

Page 8: ... for frame by frame playback STOP 9 9 Stops playback Forward SKIP T T Advances to next chapter or track Reverse SKIP S S Returns to beginning of current chapter or track or go to previous chapter or track ANGLE Selects a DVD camera angle if available SUBTITLE Selects a subtitle language AUDIO Selects an audio language DVD or an audio channel CD FL DIM Controls the Display Window s light POWER Swit...

Page 9: ...ap when not using the connector to protect against dust intrusion Dust protection cap COAXIAL Digital audio out jack Connect to digital coaxial audio equipment VIDEO OUTPUT Switch Select either S VIDEO or COMPONENT depending on how you connect DVD Player to the TV OPTICAL Digital audio out jack Connect to digital optical audio equipment COMPONENT VIDEO OUT Y PB PR Connect to a TV with Y PB PR inpu...

Page 10: ...en using the S VIDEO OUT jack set the VIDEO OUTPUT switch to S VIDEO Video connection Good 1 1 Connect the VIDEO OUT jack on the DVD Player to the video in jack on the TV using the video cable supplied V 2 2 Connect the Left and Right AUDIO OUT jacks of the DVD Player to the audio left right in jacks on the TV A using the supplied audio cables S Video connection Better 1 1 Connect the S VIDEO OUT ...

Page 11: ...ound quality For this you need a multi channel Audio Video receiver that supports one or more of the audio formats supported by your DVD Player MPEG 2 Dolby Digital and DTS Check the receiver manual and the logos on the front of the receiver Notes If the audio format of the digital output does not match the capabilities of your receiver the receiver will produce a strong distorted sound or no soun...

Page 12: ... Time search Audio language and Digital Audio Output mode Subtitle language Angle Sound Function Press 3 3 4 4 to select desired item Displays the current title number and total number of available titles and skips to a desired title number Displays the current chapter number and total number of available chapters and skips to a desired chapter number Displays the elapsed playing time and searches...

Page 13: ...icture TV Aspect 4 3 Letterbox Select when a standard 4 3 TV is con nected Displays theatrical images with masking bars above and below the picture 4 3 Panscan Select when a standard 4 3 TV is con nected Displays pictures cropped to fill your TV screen Both side of the original picture may be cut off 16 9 Wide Select when a 16 9 wide TV is connected DVD DVD Disc Subtitle Disc Menu Rating Area Code...

Page 14: ...nd the quietest ones Then you may listen to a movie at a lower volume without losing clarity of sound Set DRC to On for this effect Vocal Set Vocal to On only when a multi channel karaoke DVD is playing The karaoke channels on the disc will mix into normal stereo sound PBC Set Playback Control PBC to On or Off On Video CDs with PBC are played according to the PBC Off Video CDs with PBC are played ...

Page 15: ...back will stop You must enter your 4 digit password or change the rating level in order to play the disc 5 5 Press ENTER to confirm your rating selection then press SETUP to exit the menu Area Code Enter the code of a country area whose standards were used to rate the DVD video disc referring to the list See Area Code List page 26 1 1 Select Area Code using the 3 3 4 4 buttons on the setup menu 2 ...

Page 16: ...so may set PBC to Off under setup See page 14 Notes If Parental Control is set and the disc is not within the Rating settings not authorized the 4 digit code must be entered and or the disc must be authorized see Parental Control on page 15 DVDs may have a region code Your player will not play discs that have a region code different from your player The region code for this player is 1 one Exchang...

Page 17: ...STEP again Slow Motion 1 Press SLOW t or T during playback The player will enter SLOW mode 2 Use the SLOW t or T to select the required speed t 1 16 t 1 8 t 1 4 or t 1 2 reverse or T 1 16 T 1 8 T 1 4 or T 1 2 forward 3 To exit slow motion mode press PLAY Note Slow motion playback in reverse is not available from a Video CD Search 1 Press REV m or FWD M during playback The player will now go into S...

Page 18: ...the Time Search icon in the on screen display The appears in the Time Search box 3 Within 10 seconds use the number buttons to enter the required start time Enter hours minutes and sec onds from left to right in the box If you enter the wrong numbers press CLEAR to remove the numbers you entered Then enter the correct numbers 4 Within 10 seconds press ENTER to confirm the start time Playback start...

Page 19: ... may contain menus that allow you to access spe cial features To access the disc menu press MENU Then press the appropriate number button to select an option Or use the 1 2 3 4 buttons to highlight your selection then press ENTER Title Menu 1 Press TOP MENU If the current title has a menu that menu will appear on the screen Otherwise the disc menu may appear 2 The menu can list camera angles spoke...

Page 20: ...ck of all programmed tracks is completed playback is stopped Repeat Programmed Tracks All To repeat the track currently playing press REPEAT The Repeat Track icon appears on the menu screen To repeat all tracks on the program list press REPEAT a second time The Repeat All icon appears on the menu screen To cancel Repeat mode press REPEAT a third time The Repeat Off icon appears on the menu screen ...

Page 21: ...ension mp3 MP3 Disc compatibility with this player is limit ed as follows 1 Sampling Frequency only at 44 1kHz 2 Bit rate within 32 320kbps 3 CD R physical format should be ISO 9660 4 If you record MP3 files using the software which cannot create a FILE SYSTEM for example Direct CD etc it is impossible to playback MP3 files We recommend that you use Easy CD Creator which creates an ISO9660 file sy...

Page 22: ...Note The programmed tracks are cleared when the power is turned off or the disc is removed Repeat Programmed Tracks All To repeat the track currently playing press REPEAT The Repeat Track icon appears on the menu screen To repeat all tracks on the program list press REPEAT a second time The Repeat All icon appears on the menu screen To cancel Repeat mode press REPEAT a third time The Repeat Off ic...

Page 23: ...mode press and hold GUI DISPLAY about 3 seconds during disc playback The new video mode number selected is displayed on the TV screen Check whether the video quality has improved If not repeat the above procedure until pic ture quality is improved Video mode sequence Video1 Video2 Film Adapt Auto If you turn off the power the video mode will return to initial default state Auto Detailed Descriptio...

Page 24: ...s an obstacle in the path of the remote control and the DVD player The batteries in the remote control are exhausted Correction Plug the power cord into the wall outlet securely Insert a disc Check that the DVD or audio CD indicator in the display window is lit Select the appropriate video input mode on the TV so the picture from the DVD player appears on the TV screen Connect the video cable into...

Page 25: ...ada 7579 Korean 7583 Kashmiri 7585 Kurdish 7589 Kirghiz 7665 Latin Code Language 7678 Lingala 7679 Laothian 7684 Lithuanian 7686 Latvian Lettish 7771 Malagasy 7773 Maori 7775 Macedonian 7776 Malayalam 7778 Mongolian 7779 Moldavian 7782 Marathi 7783 Malay 7784 Maltese 7789 Burmese 7865 Nauru 7869 Nepali 7876 Dutch 7879 Norwegian 7982 Oriya 8065 Panjabi 8076 Polish 8083 Pashto Pushto 8084 Portuguese...

Page 26: ...slands KZ Kazakhstan LA Laos LB Lebanon Code Area LC Saint Lucia LI Liechtenstein LK Sri Lanka LR Liberia LS Lesotho LT Lithuania LU Luxembourg LV Latvia LY Libya MA Morocco MC Monaco MD Moldavia MG Madagascar MH Marshall Islands MK Macedonia ML Mali MM Myanmar MN Mongolia MO Macau MP Northern Mariana Islands MQ Martinique French MR Mauritania MS Montserrat MT Malta MU Mauritius MV Maldives MW Mal...

Page 27: ... p 75 ohms sync negative RCA jack x 1 S VIDEO OUT Y 1 0 V p p 75 Ω negative sync Mini DIN 4 pin x 1 C 0 3 V p p 75 ohms COMPONENT VIDEO OUT Y 1 0 V p p 75 Ω negative sync RCA jack x 1 PB PR 0 7 V p p 75 Ω RCA jack x 2 Audio output digital audio 0 5 V p p 75 Ω RCA jack x 1 Audio output optical audio 5 V p p 75 Ω Optical connector x 1 Audio output analog audio 2 0 Vrms 1 KHz 0 dB 330 Ω RCA jack L R ...

Page 28: ...rst rental or thirty 30 days from the date of shipment to the rental firm whichev er comes first Commercial Units Products sold and used for commercial use have a limited ninety 90 day warranty for all parts and labor Owner s Manual You should read the owner s manual thoroughly before operat ing this product You should complete and mail the enclosed Demographic card within ten 10 days after you or...

Page 29: ...ler with respect to the repair or replacement of any parts In no event shall TACP THI be liable for consequential or incidental damages No person agent distributor dealer or company is authorized to change modify or extend the terms of these warranties in any manner whatsoever The time within which an action must be commenced to enforce any obligation of TACP THI arising under the warranty or unde...

Page 30: ...P NO 3834RS0033L Printed in China ...

Reviews: